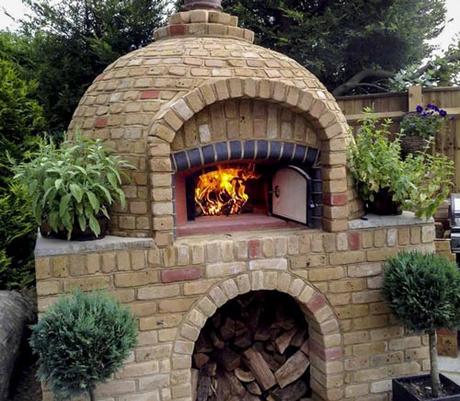
Building a Wood Fired Outdoor Pizza Oven
What You'll Need
Start by gathering your materials. You'll need the following:

Backyard Wood Fired Pizza Oven Plan
Before you start, it is important to have a plan. I recommend sketching out the oven's design on paper before beginning construction. This will ensure that you are able to build an oven with even heat distribution throughout, in addition to saving time and frustration when laying out bricks.
- A base for your oven - The base is the foundation that supports the oven and prevents it from sinking into the ground. I built mine by digging down about six inches and creating a circular brick pattern to support my dome.
- A dome for your oven - The dome is what will be cooking your pizzas, so make sure it's sturdy and even all around.
- An oven door - The oven door is what you'll be using to place your pizzas in and take them out of the oven. It shouldn't be too far above the floor or too close to it, otherwise, heat may escape or enter through it respectively.
- A chimney - Most people just build a square brick chimney that goes straight up, but I decided to use a hexagonal chimney. Either way, the idea is to have something that conducts heat up and away from your oven.
- A space for your fire - You don't want your fire near or under your oven, so having some space between them will keep it safe when in use.
Now... on with the tutorial!
*Note: If you're using new bricks, make sure to wash them before use. This will help remove any residue on the outside of the brick that might also get transferred onto your pizza.
How to Build a Wood Fired Pizza Oven Guide

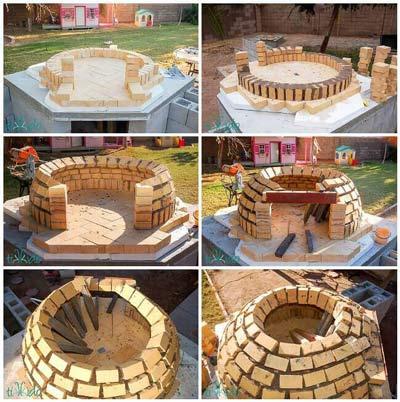
01. Begin by placing your base bricks on the ground where you'd like to build your oven.
*If you are building over an existing surface, make sure it can support 900 pounds of weight - Otherwise, dig down about 6 inches for a sturdier foundation. It is also important to remove any debris from this area that might accidentally get baked into your oven.
*Note: If you are planning on baking more than pizzas in your oven, consider making the base larger to accommodate whatever you intend to cook.
02. Make a circular pattern with your base bricks.
03. Continue building your base until it's 18 inches high - This is important because the inside of your oven should be around 18 inches high as well.
04. Once the base is complete, begin laying out bricks for the sides of your dome according to this pattern: Hexagon, Half-circle. I found it easiest to start with the hexagon because that meant there was always an even number of bricks on both sides, whereas with the half-circle, there were always odd numbers on both sides. Continue building like this until you reach your desired dome height - I made my dome 24 inches high (18 around plus 6 above). *If you're building a hexagonal chimney like me, make sure to keep it one brick width away from the edge of your circle while building the dome.
*Note: For stability, try to keep your dome as perfectly round as possible. If you don't, make sure to compensate for this while finishing it off (eg. I had to rebuild a section of my hexagon because it was slightly trapezoidal).
05 . Once the dome is complete, begin laying bricks for the oven door according to this pattern: Half-circle for the bottom, Hexagon for the top. *Make sure to leave enough space between these two patterns for your oven's chimney later on.
06 . Now build up to four bricks above each point of your hexagon to create a small shelf - This will be where you place your pizza stones. *Make sure to leave enough space for two bricks between the top hexagon point and your shelf. More on this later.
07 . Now that you've finished building up around points of your hexagon, it's time to fill in the empty space with more hexagons - Fill in every other empty spot by making a half-circle pattern with your base bricks, then continue laying your hexagon pattern. You should now have a circle of hexagons that fills up all the empty space between your dome and oven door patterns. *Repeat this process until you've used up all your base bricks!
08 . Finally, layout three half-circles using the leftover pieces of your base bricks to create a door for your oven.
09 . To finish it off, you can either leave the inside unpainted or paint it black so that heat is reflected back into the oven. I first painted my oven with an orange brick-art paint and then finished off with a high-gloss black (but it's not necessary to do both, since my oven is a small one).
*Note: I also added several coats of polyurethane every month or so to help protect the wood from moisture damage. You can achieve a similar effect by using cooking oil in your oven. Just make sure not to burn it -- And don't use any oil that might have gone rancid. :)
10 . Now you have a personal wood-fired pizza oven! You can place your pizza stone on the shelf inside the oven, light up some charcoal, and start baking.
