If you are a photographer, be it amateur or professional, you must know to watermark your images. It is essential when you upload pictures to the web. Most of the photographers would be using Lightroom or Photoshop for photo editing. So, I will show you how to add watermark in Lightroom and Photoshop. I will try to explain the whole procedure in simple steps.
Why Use Watermark on Images?
Watermark is used on photos which are uploaded to the web. It serves two purposes.
1. Credibility to the Image
Watermark adds credibility to the Image. It will show who has photographed the image. Thus, it gives a brand value to the photo.
2. Protects the Image to an Extent
Watermark helps to protect the photo from unauthorized use to an extent.
Different Types of Photo Watermarks
You can use different types of watermark on the picture. I will share the two commonly used ones to give you a better idea if you are entirely new to this.
1. Text Watermark
It is the most commonly used one. You can enter your name or brand name on the photo in plain text.
Some photographers prefer to add the © symbol in front of the name to give the copyright mark.
Mac users, press “Alt+G” to generate the copyright symbol.
For Windows users, use “Alt+0+1+6+9”.
You can make the text look stylish with beautiful fonts which are available online, both free and paid ones.
2. Graphics Watermark

Some photographers do it the professional way by adding their logo. The logo will contain either the symbol/graphics alone or with the name of the person or brand.
Logo watermarks will be usually in “PNG” file format with transparency layer. You can also create your logo using photo editing tools like Photoshop. I made the above graphic watermark in Photoshop.
How to Add Watermark in Lightroom?
Now, let us see, how to add a watermark to a photo in Lightroom.

1. Open Lightroom and import the image. You can either add a “Text” watermark or a “Graphic” one.

2. Select the “Export” option from the File menu in the top toolbar. You should be in the Develop module to select the export option.

3. A popup window will open. The second last module is the “Watermark” module. Tick the “Watermark” checkbox to enable it.
4. Select “Edit Watermarks” option from the dropdown menu. It opens the Watermark editor in Lightroom. You can add your Text/Graphic watermark using this module.

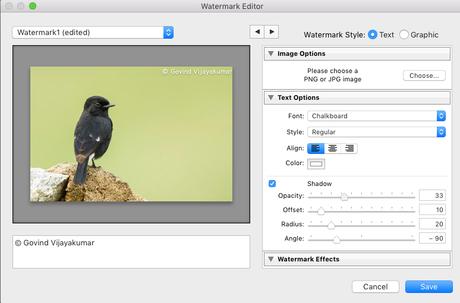
5. If you select the “Text” Watermark Style, then you can play with “Text Options” and “Watermark Effects” options.
5.1. Text Options
You can enter the desired text in the white box under the image preview. On the right side adjustment panel, you can set the Text Font, Style, Alignment, and Colour. You can also vary the Text Shadow with the help of Opacity, Offset, Radius, and Angle sliders.
5.2. Watermark effects

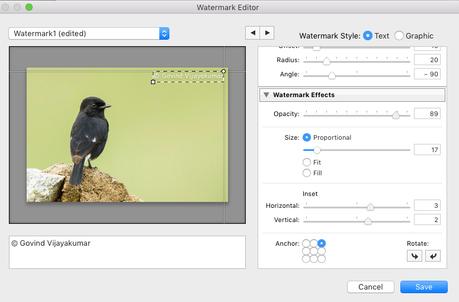
5.2.1. Watermark effects come with sliders and adjustments for positioning the watermark. You can reduce the strength of the watermark using the Opacity slider.
5.2.2. You can vary the size of the watermark using the Size options. Use Horizontal and Vertical sliders to move around the watermark so that you can place it in a position of your choice. I recommend placing the watermark on any of the four corners. Putting it on the center will make the photo look ugly.
5.2.3. A 9 point Anchor placement option is also there for quick placement. You can also rotate the watermark using the clockwise and anti-clockwise sliders.

6. After completing the placement, click the “Save” button to save the setting as a “New Preset.” Thus, you can create multiple watermarks presets and choose them accordingly in the watermark section of the export settings.
7. Make sure that you have selected the saved preset in watermarks module. Click the “Export” button to export the final image to the destination folder with the text watermark.

8. If you select “Graphic” watermark, then you can play with “Image Option” and the “Watermark Effect“.
8.1. Image Options
This option allows you to upload an image in PNG or JPG format for the watermark. I recommend using PNG format with transparency option. Click the “Choose” button and upload your image.
NOTE: I have already explained the watermark effect adjustments in section 5.2. So, refer to that section.

9. The final image after the graphic watermark is shown above.
How to Add Watermark in Photoshop?
You may be using Photoshop for editing or exporting the image from Lightroom to Photoshop for final edits. In such cases, you will be looking to add watermark in Photoshop. I will share the steps to add watermark in Lightroom (both Text and Graphics).

1.Open image in Photoshop.
2. Text Watermark:

2.1. If you want to place the Text watermark, click on the “T” symbol for adding the text. Type the words and select your font type and size. I will use my name as text, along with the copyright sign for watermarking. It will be added as a New Layer.

2.2. Once done, select the “Move” button from the control panel. Click and hold your mouse pointer on top of the watermark and move the text to place it in the appropriate position.

2.3. If you want to make some changes, select the “T” (Text) option, and click on the watermark text to make the final edits.
3. Graphics Watermark:

3.1.If your choice of the watermark is a graphics one, which you have already created. Select the “Place Embedded” option from the “File” dropdown menu in Photoshop. I will place my watermark image, which I have created in Photoshop.

3.2. Select the graphics image (PNG or JPG). Hold “Shift+ Mouse left-click” on any of the corners of the graphics box to vary its size without distorting the aspect ratio. Once you get the proper size, hit the “Enter” button.

3.3. Now, you can move around the watermark using the pointer to place it in the appropriate place. I will place it on the top left corner.
Conclusion
So, now you know how to add watermark in Lightroom and Photoshop. So, next time onwards, start using watermarks on your photos. It gives more authenticity to your image.

