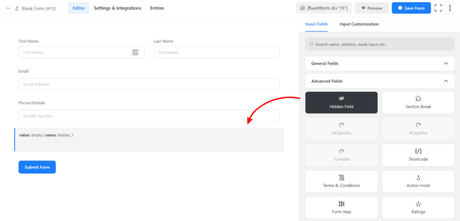
When building forms for your website, you might encounter situations where you need to store data without showing it to the user. Hidden input fields are perfect for such use cases, as they allow data to be stored and submitted with the form while being invisible on the webpage.
Fluent Forms, a popular form builder plugin for WordPress, enables you to add and manage hidden input fields in your forms easily. This blog post will guide you through the steps to add a hidden input field in Fluent Forms and provide tips for customizing it effectively.
What is a Hidden Input Field?
A hidden input field is an HTML form element that is not visible to the users of the website. It stores data that can be sent when the form is submitted. For example, you might use hidden fields to keep track of user session information, submit identifiers like user IDs that should not be altered, or carry data from one form to another. In Fluent Forms, adding these fields is straightforward and doesn’t affect the visual presentation of your form.
Step-by-Step Guide to Adding a Hidden Input Field
Step 1: Drag and Drop the Field
To begin with, you’ll need to open your Fluent Forms editor. Here, under the Advanced Input Fields section, you’ll find the Hidden Field option. Simply drag this field and drop it into your form where you need it.

Step 2: Customize the Field
Once the hidden field is in place, customization follows. You can hover over the field and click the edit icon that appears. When selecting the field, click the Input Customization tab in the right sidebar. This opens the customization settings for the hidden field.

Fluent Forms Customization Options
Admin Field Label
This option allows you to set a label for the hidden field only visible to admins when viewing form submissions. It helps identify the field in the backend. The label you choose here does not affect what’s visible on the form to users, serving purely administrative purposes.
Default Value
Here, you can assign a fixed value to the hidden field or use shortcodes to populate the value dynamically. Fluent Forms supports various shortcodes that can pull data from the user session, post data, or other sources, making your forms more interactive and personalized.
Name Attribute
The name attribute for an input field is crucial as it determines the variable’s name that stores the data from this field when the form is submitted. Typically, you do not need to change this unless you are handling form data with custom scripts.
Saving Your Form
After customizing the hidden field to your liking, don’t forget to save the form. This ensures all your settings are stored and the form functions as expected when published on your website.
Conclusion
Adding a hidden input field in Fluent Forms is an effective way to manage data that users don’t need to see or interact with. Whether you’re managing user sessions, passing data between forms, or storing information for backend use, hidden fields streamline the process and keep your forms clean and focused. By following the steps outlined above, you can efficiently integrate hidden fields into your Fluent Forms and enhance the functionality of your online forms.
