The problem
Ever since I can remember, I have always wanted to control the lights in my home from a central location and in an automated manner, namely from a computer. But there were just too many obstacles which have prevented me from achieving this… until now. The biggest problem was the need for pairs of wires to run from each light to the computer. That meant a lot of wires (which translates to a lot of money, but also to a big, messy block of wire endings at the computer) and it also meant digging/drilling/cutting into the walls to hide the wires from sight.

It was the only possible solution because the current had to run from each light to the device that switches them on and off, so there was no way to avoid this big mess. Also, there was another problem. You want to be able to control the lights spontaneously and quickly whenever you need to, which means that the controlling computer has to be up and running all the time, which is a waste of power (and money) and permanent noise in the room where the command center is established, which is usually a room in which you want peace and quiet or maybe even to sleep in. Finally, let’s not forget that in spite of the strong desire to automate my lights, I never wanted to spend a fortune on it. So for many years and elegant and affordable solution has eluded me… until the Christmas of 2013.
Raspberry Pi
Fortunately the technology related to home automation has progressed enormously in the last few years and new pieces of hardware have been developed which provide easy solutions to the above problems. The first important piece of the puzzle has emerged at the beginning of the year 2012, when the Raspberry Pi computer was officially released.
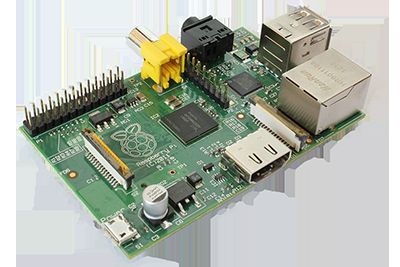
The Raspberry Pi is a small, noiseless computer, which has a very low power consumption (typically 1-2 Watts) and is very lightweight. It takes up little space in the room and most importantly it is cheap (the official price is 25$ for model A and 35$ for model B). In other words it is the perfect choice for a computer to control the lights in your home. Some may argue that it is not very easy to use because it runs Linux (not Windows), but the truth is that Linux is really easy once you get the hang of it and it is very reliable, making it a good choice for home automation projects.
Wireless bulb sockets
The other very important component of this home automation solution is the ability to control the lights in a wireless manner, preferably both from home and from far away. Wireless sockets for light bulbs have appeared on the international market not so long ago. These are bulb sockets (E27, E26, E14, B22, etc.) which you screw into the existing socket and then you install your light bulb into these sockets. They contain radio receivers and you can use a remote to switch the socket on and off, putting your light bulb in an on or off state.
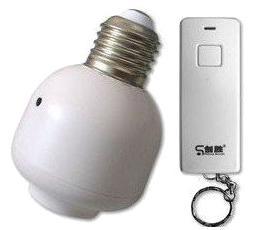
The good thing about these sockets is that you can keep your existing light bulbs. The not so good thing is that they will be a bit bulky and ugly unless you have a large lamp to conceal them. Also, I’ve never seen wireless bulb sockets so far which can be controlled with anything but simple radio signal transmitters, meaning that you can only send commands to them from your home. If you want to turn them on and off from far away, you need to reverse engineer their protocol and use a radio transmitter on your Raspberry Pi to send them the same signals that their remote is sending. Time consuming and cumbersome. Unless, of course, there are wireless bulb sockets out there which have an open specification which lets you know what signals to send, but I’ve never seen one until now. Finally, all that these wireless sockets can do is to turn the lights on and off, which is great in itself, but if you have higher aspirations, like dimming the lights or changing their color, then the sockets are not a good enough solution.
Wireless LED bulbs
Luckily there’s another technological development that has progressed rapidly in the last few years: wireless LED bulbs. These are light bulbs which can be controlled through radio signals directly (no special socket required). Most of them support dimming and changing the light color, which is a beautiful thing to do.
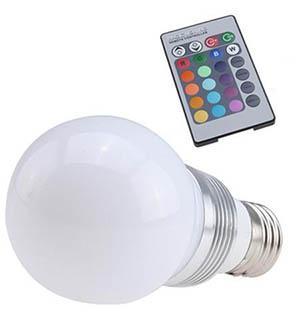
The ones that we’ve seen until now were quite similar to the wireless sockets in the sense that the way you could control them was through a wireless remote. Unfortunately this meant that if you wanted to control them from a central computer (which also gives you the ability to control them from outside your home), you also had no choice but to reverse engineer their protocol and send the appropriate signals from a radio transmitter attached to the computer, which is hard to do. The fact that these bulbs produce light using LEDs is a good thing because they are very energy efficient and last for many years, but until recently it was also their major drawback because they just weren’t bright enough and could be used only for ambient lighting.
Smart Wi-Fi LED bulbs
Three brands of wireless LED bulbs stand out today from the rest: Philips HUE, LifX and MiLight / LimitlessLED / EasyBulb. There are two main characteristics that separate these three from the usual wireless LED bulbs: they are bright enough for comfortable everyday use and they can be controlled over Wi-Fi (not just with a remote that sends radio signals).
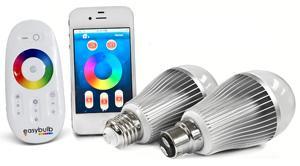
Unfortunately none of them is perfect, each of them has smaller or bigger weaknesses, but they are good enough to be used in home automation projects. Philips HUE was the first to show itself to the public. Unfortunately, because it was the only such product on the market for some time, it’s price is ridiculously high, so high that I would not buy it unless I had money to trow away. But it is also the one that has the most versatile smart phone app. LifX was the second to emerge. It is bright (over 1000 Lumens) and promises a very versatile and comfortable smart phone app (for Android and iPhone). It’s price is much less compared to HUE, but it’s still high (89$ for a bulb). The biggest problem of LifX, however, is that you have to order it well in advance and wait months until you get your bulb.
MiLight/LimitlessLED/EasyBulb
And so we arrive to the wireless LED bulb which I prefer use in my home automation projects. In different parts of the world it has different names: MiLight, LimitlessLED and EasyBulb. Unlike HUE or LifX, this bulb has quite a fair price (somewhere around 25-40$ for a bulb depending on where and when you buy it) and it is available today, not months from now, something that the manufacturers take pride in. It has been developed over the last couple of years and it is still being improved. MiLight is a bit less luminous compared to HUE and LifX, with the most recent RGBW bulb producing 800-850 Lumens at full brightness, but I’ve tested it myself and it is surprisingly bright (in spite of the specs), fit for everyday lighting. Its colors are very nice, saturated and vivid and the brightness can be set in fine steps.
Here is the presentation video for MiLight bulbs, to give you an idea of how it looks and what can be done with it:
The way I encountered MiLight was through the kindness and benevolence of Santa. A very special person, who knows that I’m a big fan of home automation, has whispered to him that some WiFi LED bulbs would make me happy. And they did, when Santa put 3 9W RGBW Milight bulbs, a wireless remote and a V3 wireless bridge under the Christmas tree this year (2013). Actually, I’m more excited about these MiLight bulbs than Santa or myself would have ever imagined because they look so nice and they are surprisingly bright. Also, they are very easy to communicate with, which finally allowed me to turn my dream of automating the lights in my home into reality. Getting such a wonderful present for Christmas came as an overwhelming surprise. After a few days of experimenting and reading about them I realized that, when coupled with a Raspberry Pi, the MiLight system can be turned into an affordable and elegant light automation solution.
MiLight technical details
So let’s take a look at the technical details. The MiLight system consists of 3 main parts:

- The wireless LED bulb
- The wireless remote control
- The wireless bridge (controller)
The new 9W RGBW wireless LED bulb contains 15 white LED chips and 9 RGB LED chips. While the white ones give a strong and pleasant warm white light that can be used for everyday lighting, the RGB LEDs are perfect for setting the mood in the room. Inside the bulb, which is quite heavy, by the way, there is also a 2.4 GHz radio wave receiver, which is waiting for commands from the wireless remote or from the wireless bridge. Available socket types are E27, E26 (Edison screw), E14 (through adapter) and B22 (bayonet mount). The new 9W RGBW LED bulb is said to last over 50.000 hours (about 25 years of regular usage), consumes about 10W at full brightness and about 0.3W when turned off (but listening to commands), making it a good long term money saver. Of course, it can also be turned off from the regular wall switch, in which case it does not consume any power but it also won’t respond to wireless commands. It has a very pleasant warm white tone and also 255 distinct other color shades. A “party mode” is also available, in which the bulb will automatically cycle through the colors. I personally find the 9W RGBW lights to be the best, but MiLight also has simple 6W white and RGB bulbs for sale.
The wireless remote or the wireless bridge are needed to control the bulbs. One of them is sufficient, but it’s more comfortable if you have both. The wireless remote is the simpler, conventional way of sending radio signals to the bulbs, but it’s also the quickest one because you can simply pick up the remote and press it’s buttons. The Wi-Fi bridge is needed if you wish to control the bulbs from a smart phone, from a computer or from some other Wi-Fi enabled device. It also provides the ability to play with the lights from far away (from outside home). The Android and iPhone apps are available as free downloads. They aren’t extremely optimized for user comfort, but still they are relatively fun to use and cover all the basic functions (on/off, brightness, colors, disco mode, etc.). Both the wireless remote and the smart phone apps (which by the way don’t seem to be available for (some) tablets) can command a maximum of 4 bulb groups (zones). Each group can contain hundreds of bulbs and all groups can be controlled by several remotes or wireless bridges. But if you need more than 4 zones in your home, then you’ll have to get more than one remote or wireless bridge.
Why MiLight?
So why would we use exactly MiLight with the Raspberry Pi to automate the lighting in our home? Well, first there are the obvious reasons: it’s affordable, bright enough, the colors look great, lasts very long and it’s energy efficient. Also, it can be controlled over Wi-Fi from home and from far away. But there is one very important thing that makes the MiLight wireless bridge very suitable to use in more advanced home automation projects: it is very easy to communicate with and it has an open API, in the sense that the commands which it uses to control the bulbs are publicly available on the LimitlessLED website’s developer section. This is why it’s easy to send commands from a Raspberry Pi to the wireless bridge and control the bulbs through it. The Pi simply has to send the known UDP command messages to the bridge, which will translate them into radio signals understood by the bulbs. No need to guess or reverse engineer the protocol, it’s all documented. No need to transmit radio signals from the Pi directly, the wireless bridge does that for us if we send messages to it through UDP.
Components
Our lighting automation system will consist of the following components:
- Raspberry Pi (model A – 25$ or model B – 35$)
- Raspberry Pi micro-USB power cord (~10$)
- Raspberry Pi SD card (I recommend high quality 8GB, 30+ MB/s SD cards: ~25$)
- Raspberry Pi Wi-Fi USB dongle (I recommend the Edimax EW-7811UN, which is small and 100% compatible with the Pi: ~15$)
- MiLight wireless bridge V3 (~30$)
- MiLight 9W RGBW LED bulb (~27$ each)
This means that the cost of the system starts from a minimum of around 140-150$, depending on where you manage to get the components from and what you use exactly, but also on how many and what kind of LED bulbs you attach to the system.
How it works
After getting the Raspberry Pi up and running (there are many guides out there about how to do this, but it is very simple, works mostly out of the box), you can log into it either directly (if you attach a monitor and a keyboard to it) or via SSH if you use it in headless mode. The great thing about connecting to it via SSH is that you can do it locally, in your home network, but also from outside networks, through any SSH client. On Windows machines I use the putty SSH client and on Android devices I use Juice SSH, both of them being simple and working great. To communicate with the MiLight wireless bridge, we will need to run some software on the Raspberry Pi which sends UDP messages to the it. I have created such a simple command line Linux program, simply called the “MiLight RGBW V3 Command Line Utility”. The binary can be downloaded from here. The C++ source files are also available for download here, in case you wish to tweak them (yes, it’s all completely free!).
The MiLight RGBW V3 Command Line Utility
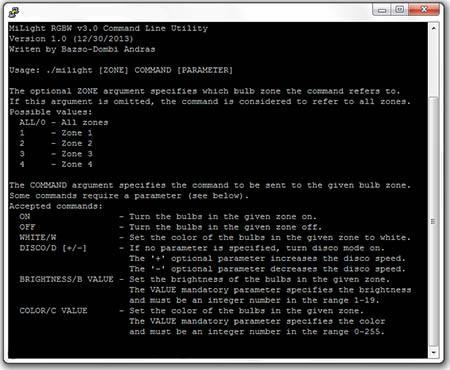
This lightweight command line Linux program can be used to send commands to the MiLight RGBW light bulbs, one at a time, through the MiLight wireless bridge V3 (not compatible with earlier versions of the bridge). The program consists of two files:
- milight – the executable
- milight.conf – the configuration file
The configuration file simply contains two lines of text. The first line is the address (IP) of your MiLight bridge in your local area network. It is assigned through DHCP by default but it can be set to a fixed local IP address. You can find and set this IP address using your router’s configuration page. By default it is assumed to be 192.168.1.2, but it is likely that your router will assign a different IP address to the MiLight bridge. The second line is the port number on which the communication occurs with the MiLight wireless bridge. By default it is 8899, but it can be changed through the MiLight bridge‘s configuration page (at http://10.10.100.254/home.html by default).
If you ever forget the arguments with which you can call the milight command line utility, just call it without any parameters and it will tell you how to use it:
milight [ZONE] COMMAND [PARAMETER]
The optional ZONE argument specifies which bulb zone the command refers to. If this argument is omitted, the command is considered to refer to all zones. Possible values:
ALL/0 – All zones
1 – Zone 1
2 – Zone 2
3 – Zone 3
4 – Zone 4
The COMMAND argument specifies the command to be sent to the given bulb zone. Some commands require a parameter (see below). Accepted commands:
ON – Turn the bulbs in the given zone on.
OFF – Turn the bulbs in the given zone off.
WHITE/W – Set the color of the bulbs in the given zone to white.
DISCO/D [+/-] – If no parameter is specified, turn disco mode on. The ‘+‘ optional parameter increases the disco speed. The ‘-‘ optional parameter decreases the disco speed.
BRIGHTNESS/B VALUE – Set the brightness of the bulbs in the given zone.
The VALUE mandatory parameter specifies the brightness and must be an integer number in the range 1-19.
COLOR/C VALUE – Set the color of the bulbs in the given zone. The VALUE mandatory parameter specifies the color and must be an integer number in the range 0-255.
For example, if you wish to turn on all lights, call:
./milight on
If you wish to turn off all the lights, call:
./milight off
If you wish to set the brightness of the lights in zone 2 to minimum, call:
./milight 2 b 1
If you wish to set the color of the lights in zone 2 to some kind of blue, call:
./milight 2 c 5
Why combine MiLight with Raspberry Pi?
You might be wondering why it is a good idea to use a Raspberry Pi to control your MiLight bulbs when it’s quite easy and fun to use them even without a Raspberry Pi, and they can be controlled in a wireless manner anyway, from home or from away, using the wireless remote or a smart phone. Well, the command line utility presented above is very basic and might not impress much at first sight, but once you get it working, it opens a world of endless possibilities. To mention just a few:
- It can be used to transmit various predefined sequences of commands to the bulbs.
- It can be called from a fancy web page which will allow you to control your lights over the web (you’ll need a web server on the Pi for this, perhaps Apache or Tomcat? See this article if you need a basic guide).
- It can be used to turn lights on or off based on a schedule (at given hours of the day).
- It can send commands to the LED bulbs in response to events triggered by sensors (such as motion, temperature, etc).
- You can call the command line utility when you receive an e-mail and blink your lights to notify you.
- You can turn the lights on automatically when somebody enters the room or when the sun goes down.
- You can attach a microphone to the Raspberry Pi and issue voice commands to control your lights in the most comfortable way ever.
The possibilities are endless. With a little bit of knowledge and imagination, you can have the most modern lighting system that exists today, with MiLight LED bulbs controlled by a Raspberry Pi. Have fun

Final word
I realize that this article sounds a bit like advertisement for the Raspberry Pi and for the MiLight LED bulbs. Even though this was not my original intention, I don’t mind that it turned out this way… they both are great devices which help us live a more interesting life. I like to believe that both were created with innovation in mind and the purpose was much more than just to sell a product. I like to believe that both were invented to help us unleash our own creativity and to create more advanced devices. Both of them have reasonable prices and appeal to the mind of the technology oriented people. So, yes, I do like them very much and I like to advertise them, even though there’s nothing in it for me, except the thought that through my article other people will get to know and enjoy these technological wonders, just like I do


