I am blessed to have some *AWESOME* readers. One of them is a fellow blogger, Candi (find her blog here). She kindly agreed to write a guest post for me about food preservation. Candi shares what’s she’s learned about food preservation in hopes of helping each of you. Thanks, Candi!

This beautiful lady has generously agreed to share her knowledge with us.
Food preservation
Most of this is regarding Long Term Storage, but some of the tips are very important for Short Term Storage and every day use.
I’m Candi Harris and I really have to thank Laurie for asking me to guest blog regarding Emergency Preparation. She does such an incredible job sharing all the information on Food Storage, canning and everyday use. It’s good information, and I learn more from her every day, I really do appreciate all she does. I’m just a novice, so please check various sites to get precise directions. Mine come from my own experiences after researching the process.
Some things I learned the hard way, I lost freeze-dried meat, TVP, some veggies, even things as simple as flour and eggs because I didn’t read the labels thoroughly. It was a very costly and sad learning experience. Read the label on your can regarding storage, not only dating and shelf life of unopened cans, but “opened cans”. Uppermost are the meats. Because they are a real beef product, when you open the can that first time, you must reseal the meat not used in another container WITHIN 24-48 hours. A sterile air-tight container, such as a canning jar, that can be sealed either using an oxygen absorber or a “dry vacuum” method. You CANNOT vacuum seal fresh meats, vegetables or any fresh produce for long term storage. IT must be either water canned or pressure canned.
There are pluses either way. The Oxygen Absorbers are handy to have on hand . The flip side of that is once you open the package of absorbers, you do need to work quickly putting them in the jar putting the lid on, add the ring and tightening securely. Then reseal your remaining Oxygen Absorbers – I use a half pint jar and pack them in as tightly as I can) Just as anything you can, wipe the edges of the jars with a clean cloth so there is no residue to interfere with the jar sealing.
Vacuum Sealing isn’t a lot different. The basics are the same, but you CAN-NOT use the vacuum sealer bags for long term storage. You follow the same process as when you use the absorbers, except you put just the lid on and use your vacuum sealer attachment, and it will remove all the air from the jar. If you are resealing any powdery substances, you’ll want to use something to keep the powder from plugging up your sealer. I use coffee filters and cut them to fit inside the jar. They’re cheap, easy to keep on hand and simple to “cut to fit” :)
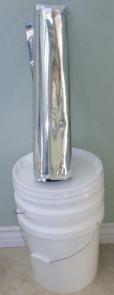
Food Grade Buckets and 5-gallon Mylar Bags.
Another method is the Mylar bags. They’re great for use in Earthquake country, but mice love them:(. So if you’re going to use them and store where there is the slightest chance of critters, be sure you put the Mylar bags in a a food safe storage bucket and put the lid on tight! Those little buggar’s have radar noses. TVP products are easier to work with in that they remain pretty good for about 6 months. So if you’re going to use it up in that period of time, it doesn’t hurt to throw in an Oxygen Absorber when you put the lid back on and put it in the cabinet. It’s just my husband and me so we don’t use it that fast. So for us I find it best just to reseal it in the jars with my vacuum sealer. I do that with most things TVP included, because I want to keep them as fresh as I can. Unless I make Meals In A Jar, I’m not sure when I’ll use that product again. Even though I try to plan our meals, we often change them:)Always remember, anytime you do this, LABEL the jars. Write Date Opened ,Expiration Date, Shelf Life of contents is quick to spot too. You want to Label what is in the jar, directions for use (rehydrate, cooking directions, etc), as well as the dos and don’ts of the product.
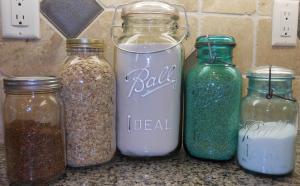
Mason Jars. Make sure to label with contents and date!
I make the Meals In A Jar so I tend to reseal everything I use:) Chef Tess Bakeresse has a recipes from her book “52 Meals In A Jar” on her site using all freeze-dried foods. She goes deeper into Vacuum Sealing than I did, as well as the Mylar Bags and Oxygen Absorbers, as Laurie does. I have her books ( and believe you me, I’ve used several of Laurie’s ideas too) and before I can a meal, we try it out. If we like it, then I make up several and put them in the cabinet. We’re trying a variety of them, from cereal to roast beef and potatoes:) There are also recipes on Meals For One. (*Meals In A Jar have a shelf life of anywhere from 3-15 yrs) A lot of these recipes are found in her books. You’ll find a lot of books on food in a jar, but not all of them give you the length of Shelf Life.The great thing about all of this is it’s such a wonderful variety. Using freeze-dried foods everyday in your cooking and baking makes things so much easier, too. There are Freeze Dried Eggs, Shortening, Sour Cream, Butter, Margarine, as well as all the fruits, vegetables and meats.As I said in the beginning, read those labels, look on the site where you bought them and read all the information so you don’t lose them or contaminate them.I hope I’m not sounding like a “worry wart” lol I am just hoping I can save someone else the aggravation I went through. I’m not a blogger on Emergency Food Preparation as Laurie is, but I have friends that blog some about it, so I’ve learned a lot. Especially from Susan, who is also LDS and has shared a lot with me as Laurie does:) Mine, Quilts n Things is more about Quilting, Recipes and my Grandchildren.Laurie thank you so much for the opportunity to share with your readers:) I think what you’re doing is just wonderful, and you’ve also helped so many people learn about Emergency Preparedness and why it’s something we should all do. None of us are alarmists or expecting the world to come crashing down around us. As Laurie has said, be ready, you don’t know when an earthquake might hit, a tornado, an unheard of snow storm in your area or Forest Fire.Just an FYI about jars and the worry about them breaking. Use an old sock, put the jar inside it, and if you have the storage put them back in the box they came in. If you don’t have old socks, go to your nearest Deseret, Cancer Society, Hospice or any thrift store and pick some up real cheap. Use bubble wrap that is in packages you receive. I use anything I think will work .lol If they’re on a shelf, use a bungee cord to put across the front row to keep them secure. Or something even stronger. We live East of San Francisco, so we get a tremor now and then. We’ve had some strong one’s too, so I’m always open to ideas on how to protect those canning jars:). Laurie, thank you again, and never stop doing what you’re doing:) God Bless you, yours and all your followers.Susan’s prep blog is. http://providentprep.blogspot.com/Cheff Tess Bakeresse (52 Jar Method) is: http://cheftessbakeresse.blogspot.com/search/label/52%20jar%20methodCandi
http://quiltsnthings.wordpress.comhttp://candiseyecandy.wordpress.com