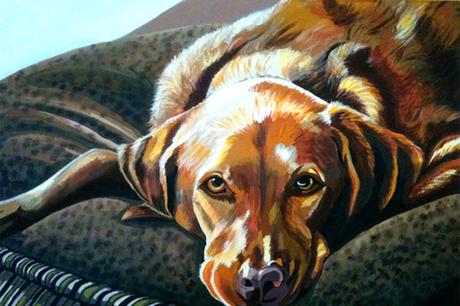
One of the most difficult part to doing an animal portrait on canvas is getting the texture of the fur right. It could be fluffy, wavy, short, straight or long and it depends entirely on you how you try to make it look realistic. In this article we share with you some tips on how to get the texture of fur right for your animal portrait. You can overlook the importance of details and layers when it comes to fur, which means for every layer that you give for fur you have to give time for the paint to dry. The points below will be really helpful for you in this context, and they are mostly in the details.
1. Get The Base Right
Begin your painting with the shadowed area first. This will be helpful to prepare a good base for the number of layers that will come on top of it. This will also help you in creating depth for the subject. Let the shadowed area be as dark as possible. Once this is done you can add as many layers as you want and reach up to the focal areas of the fur. The areas you are going to focus on can be highlighted with lighter colours than the base.
2. Now Add Layers
The strands above the base should be layered to the maximum, only then can you start highlighting the focal points and eventually lighten the colours above the layers. The rule of thumb here is to go from the darkest shade to the lightest one and it should be as smooth as possible. Don't jump from dark to lighter tone. Learn to overlap one above other and keep it gradual. Give a close look at the details you would want to create above the layers. For example, if the animal has fluffy hair then you would want to add more lighter tones for the strands to be more visible. But in all of this ensure that you don't overdo the layers or else your painting will look extremely muddy and it won't accentuate the value of the elements on the animal. Wait for the paint of one layer to dry completely, and then start with the next. More tips on Instapainting.com
3. Work In Parts
One important part of animal fur is the kind of strokes you apply. Do not haphazardly go in every direction. If it is on the right, then keep the direction entirely on the right. You could break it down to section - may be focus on the fur on the face first and then the rest of the body. Even in case of the face, focus on one feature at one time. Doing this will help you add a realistic touch to the features. Continue doing this with all the features.
4. Finer Details
In continuation to the above point, go into finer details. For example, if it the fur on the face that you are focussing on, add light touch ups here and there and highlight certain features in a subtle tone to give depth to the facial features.
Aforementioned, painting fur can be extremely challenging and there are high chances that you won't be able to get the desired results in the first few times. How you hold your brush also has its impact on the quality of your painting and it is even more impactful in case of animal fur. When you are highlighting finer details of the fur, make sure to take a smaller brush than the brush you use to create the base. You could even practise sketching it on paper several times before you begin painting on canvas to avoid big mistakes. The idea is to make the fur look as smooth as possible and there should a flow to it. The base and first few layers will require your brush to release more pressure when you use strokes as compared to the highlighted areas. All of these will come with practise. In between your painting if you feel you are slightly confused with certain areas, take a piece of paper and sketch it first before you pick up the paint brushes again. You will realise what it is that you are confused about or missing out on! We hope these tips have been handy for you to paint your animal portrait.
