Changing the Remote Control Battery: A Step-by-Step Guide
Remote controls have become an indispensable part of modern life, seamlessly connecting us to our entertainment systems, garage doors, and more. However, when the battery in your remote control runs out, it can be a minor inconvenience if you don't know how to replace it. Here's a comprehensive guide on how to change the battery in your remote control, whether it features a folding key blade or not.1. Safety First
Before you begin, it's essential to prioritize safety, both for yourself and the environment. Make sure to dispose of old batteries responsibly by seeking guidance from your local authority on recycling options. This simple step contributes to environmental sustainability and prevents hazardous waste from accumulating in landfills.Remote Control With a Folding Key Blade:
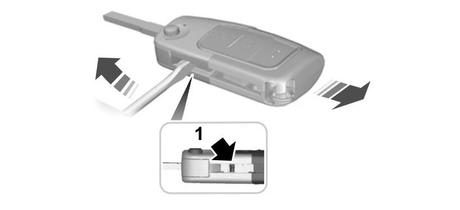
1. Detach the Key Blade: Insert a screwdriver into the slot on the side of the remote control, pushing it toward the key blade to detach it carefully.
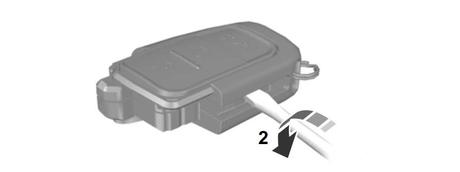
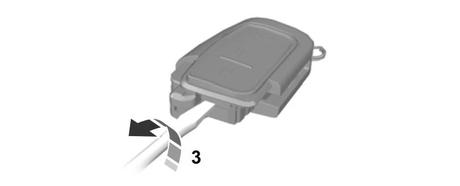
2. Separate the Halves: Using the screwdriver, twist it in the specified position to start separating the two halves of the remote control. Repeat this step until the halves come apart.

Note: Avoid Contact, exercise caution not to touch the battery contacts or the printed circuit board with the screwdriver to prevent damage.
3. Remove the Battery: Carefully extract the old battery from its compartment using the screwdriver.

4. Install the New Battery: Insert a new 3V CR 2032 battery into the compartment, ensuring the positive (+) side faces downward.
5. Reassemble the Remote: Gently join the two halves of the remote control back together.
6. Reattach the Key Blade: Place the key blade back into its slot on the remote control.
Remote Control Without a Folding Key Blade:
1. Remove the Cover: Press and hold the buttons on the edges of the remote control to release the cover. Once released, carefully remove the cover.2. Detach the Key Blade: Remove the key blade from its slot, if applicable.
3. Separate the Halves: Use a flat-bladed screwdriver to twist it in the specified position, separating the two halves of the remote control.
4. Exercise Caution: Just like with the previous method, avoid touching the battery contacts or the printed circuit board with the screwdriver.
5. Replace the Battery: Using the screwdriver, carefully remove the old battery from its compartment.
6. Insert the New Battery: Install a fresh 3V CR 2032 battery into the compartment, ensuring correct orientation (+ facing downward).
7. Reassemble the Remote: Once the new battery is in place, reassemble the two halves of the remote control securely.
8. Reattach the Key Blade: If your remote control features a key blade, slot it back into place.
By following these step-by-step instructions, you can easily replace the battery in your remote control, ensuring uninterrupted functionality and convenience. Remember to handle both old and new batteries responsibly to contribute to a cleaner, safer environment.
