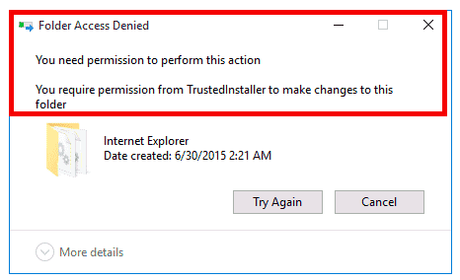
TrustedInstaller is a built-in user account in Windows 10 which can handle a variety of system files, system folder, registry keys and pretty much everything. Many times, when you want to delete or install something on the Windows 10 PC, it pops up a message "Folder Access denied." To resolve this issue, you need to have proper permission from the TrustedInstaller of your system. If you don't know how to fix this, following guidelines will help you to resolve this issue on a Windows 10 PC.
When you see this message, it means you Trustedinstaller is corrupted or outdated and you have to restore it manually. Yes, you need to restore the TrusteInstaller in your Windows 10 PC manually. Once you restore TrustedInstaller, you would not get any errors in the future while deleting something from the system. Let's see how can we fix it!

Steps to fix "You need Permission from TrustedInstaller Windows 10."
Step 1:The first thing you need to do is open the File Explorer on your Windows 10 PC. Press Windows Key and E Key simultaneously to open the File Explorer page. e
Step 2:Now, locate the file or folder of which you need ownership.
Step 3:Right click on to that particular file or folder. A new menu will be presented to you from which you need to select Properties option.
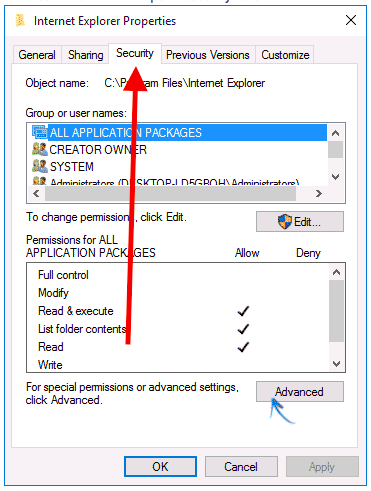
Step 4:Properties page of the selected folder will be presented to you with a few other sections. Kindly select the Security section from here.

Here, you would see an Advanced button, select this button and then select Advanced Security Settings.
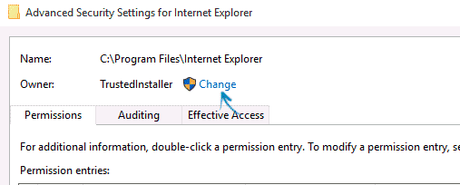
Step 6:You could see the current Owner name with the Change button. Click on to the Change button from here.

You would be presented with a new owner page where you can set up a new owner of that particular file or folder to take its ownership. Kindly enter the "NT Service\TrustedInstaller" as the new owner of the selected folder.
Step 8:At the bottom of the page, you would see Ok button. Make sure to click the Ok button after you finish.
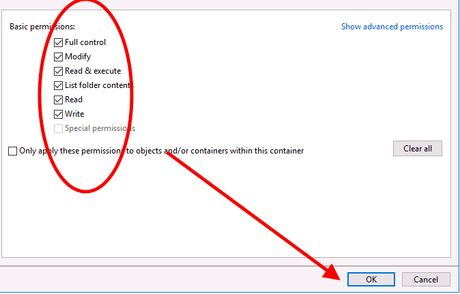
Once you are on the page, you would be presented with a list of permissions that you might require to gain the ownership. You need to checkmark all the options which are essential for you. The pages will show you all the useful options. Make sure you check all the given options well before clicking the Ok button.

After you finish with this, you will be able to delete a particular file or folder on the Windows 10 PC. You will not see any Access denied message from now.
That's all you have to do to restore the ownership of a particular file or folder available in your Windows 10 PC. The process is simple, and by following the above-given steps, you can quickly take the ownership, or we can say restore the ownership.
