
Introduction to Domoticz
Domoticz is a very nice free home automation software. It is not only very functional, but it also has a good looking user interface. What I found really great about it is that Domoticz offers useful functionality and a fun experience for every user, regardless of their level of knowledge about the software and experience with it. Right out of the box it comes packed with many features for the beginner to enjoy, and later, as the user becomes more skilled, automation can be taken to the next level.
As every home automation software, Domoticz takes input data from several sources and sends output data to all kinds of devices. Automatic actions can be added that respond to the input and trigger some kind of output.
Some of the most important inputs (sensors) that are available in Domoticz out of the box are:
- Temperature and humidity sensors
- Light sensors
- Electric meters (voltage, current, power, energy)
- Gas sensors
- Weather sensors (temperature, humidity, pressure, wind, rain, UV, irradiation, air quality, etc.)
- User variables
- Etc.
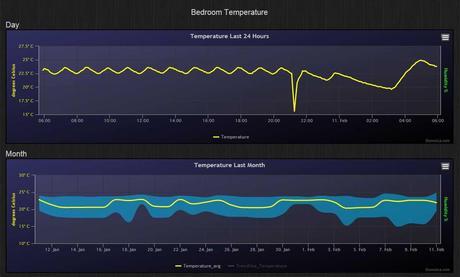
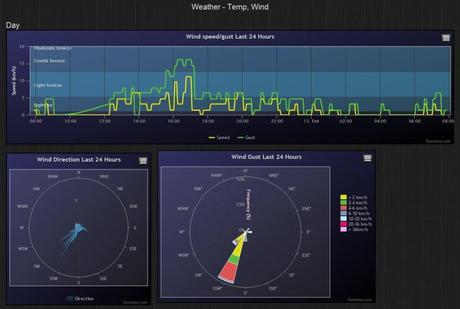
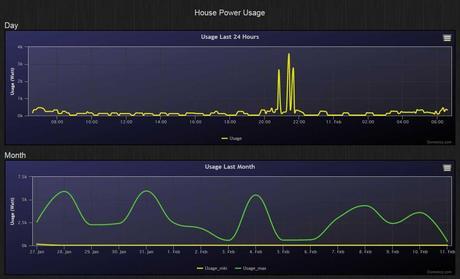
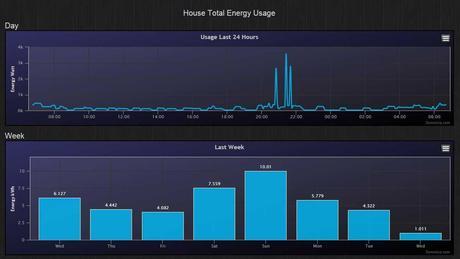
The first very handy thing that can be done with the data taken from these sensors is to visualize them on some extremely good looking graphs:
Temperature (click on the image to enlarge):
Wind (click on the image to enlarge):
Power usage (click on the image to enlarge):
Total energy usage (click on the image to enlarge):
Based on the values shown on these graphs the user can decide to manually trigger some outputs, for example to turn on/off various devices:
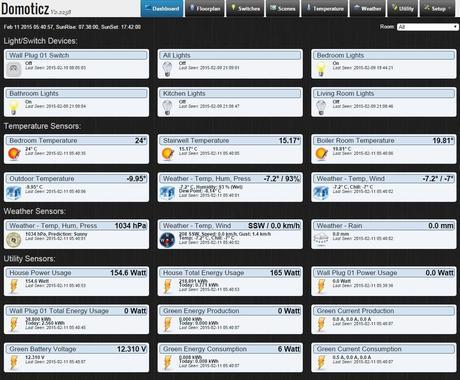
Moreover, the values coming from the sensors can not only be seen on graphs. Widgets that show sensor values and that command devices can be organized into a cool dashboard (for instant access when you access Domoticz)(click on the image to enlarge):
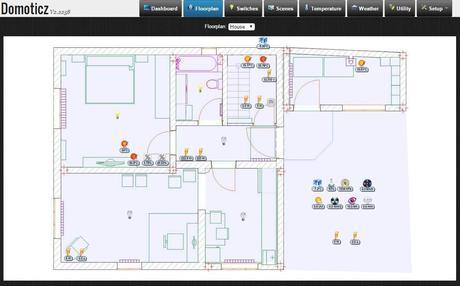
You can even add a floor plan image of your house and see the sensors and devices in their real physical locations (click on the image to enlarge):
As users become accustomed with the software, they can add so called scenes which define automatic actions (for example the boiler can be turned on automatically when the temperature in the house drops below a certain value or the alarm can be triggered when a motion sensor detects the presence of somebody in the house). For those who even this is not enough, there’s a possibility to add automation scripts. These scripts are able to accomplish automation tasks beyond the wildest imagination but require a bit of technical knowledge.
Supported devices
Domoticz supports a lot of devices (hardware and virtual) today, but it is constantly being developed, so the list of supported devices is very likely to grow. Some of the most important devices it can use today:
- All kinds of physical temperature, humidity, pressure and light sensors
- Many types of electric meters
- Solar (photovoltaic) monitors
- Smart lights
- Several weather APIs
- Generic hardware interfaces (including the great Razberry daughter card for Raspberry Pi through OpenZWave)), which can gather data from virtually any sensor.
- USB sticks
- Devices through LAN.
- Motherboard sensors (to collect data from the computer on which it runs).
- Virtual devices
- Etc.
How it works
So Domoticz looks good, works great and supports a lot of devices. But how does it work? Well, the working principle is quite straightforward actually: it runs as a server application which communicates with the hardware through several interfaces and with the user through a web-based interface, which can be accessed through any browser. You just type the address of the computer on which Domoticz is installed and the port number that it listens on and you immediately enjoy the full-featured user interface, which, by the way is nicely optimized both for desktop computers and for mobile devices (phones, tablets). For example from home it can be accessed (depends on the configuration) like this:
192.168.1.21:8080
There are some smart phone applications too that can display a different user interface for it, but the default web-based interface is so nice, that it’s not really tempting to install an extra app.
The only thing that you really need for Domoticz to run is a computer which is up and running 24/7. This would have been a major problem for most folks a few years ago, because a conventional PC is noisy and it also uses a lot of electricity, so you would not want it running all the time. Luckily for us, we are now in the booming age of single-board micro computers, which use very little electricity and are completely noiseless. Installing Domoticz on one of these boards is an ideal solution. And which better single-board micro computer to use then the famous, well supported, easy to use and ultra-cheap Raspberry Pi?
Installing Domoticz on Raspberry Pi
1. Log in as pi (or your preferred user) onto your Raspberry Pi.
2. Create a directory for Domoticz and enter that directory:
mkdir domoticz
cd domoticz
3. Download the binaries into the newly created directory and extract them from the archive:
wget http://domoticz.sourceforge.net/domoticz_linux_armv6l.tgz
tar xvfz domoticz_linux_armv6l.tgz
4. Optionally delete the downloaded archive (you don’t need it anymore):
rm domoticz_linux_armv6l.tgz
5. Configure domoticz to start at boot:
sudo cp domoticz.sh /etc/init.d
sudo chmod +x /etc/init.d/domoticz.sh
sudo update-rc.d domoticz.sh defaults
6. Configure Domoticz to run with your preferred user name, form you installation directory and listen on a specific port:
Open the Domoticz configuration file: nano /etc/init.d/domoticz.sh
Change the user name as necessary in the following line:
USERNAME=pi (change to your preferred user name)
Change the installation directory if you installed it in a place different from your preferred user’s home directory:
DAEMON=/home/$USERNAME/domoticz/$NAME
Change the default port 8080 to something else if you wish (this is the port that will be used to access the Domoticz UI from a web browser)
7. Start the Domoticz service:
sudo service domoticz.sh start
You should see a message confirming that Domoticz is running.
You may stop it or restart it at any time with the commands:
sudo service domoticz.sh stop
sudo service domoticz.sh restart
8. At this point you should be able to access and use Domoticz from a web browser by typing into the web browser’s address bar the address of your Raspberry Pi and the Domoticz port number configured above:
RaspberryPi_IP:Domoticz_Port_Number
For example:
192.168.1.101:8080


