Bolting down a squat rack is a guaranteed way to make lifting safer. Here’s why you should do it, how to do it, and some alternatives for anchoring your rack if you don’t want to bolt it down.

As every lifter will tell you, a squat rack is a truly necessary piece of equipment.
It’s virtually impossible to max out your squat without one, and they facilitate deadlifts, military presses, and so many other exercises that involve a heavily loaded barbell.
If you’re fortunate enough to have space in your home gym for a squat rack, you’ll no doubt want to get started using it the moment you finish setting it up.
But slow your roll, because if you don’t take the simple precaution of bolting it to the floor, you could wind up in real trouble!
Why You Should Bolt Down Your Squat Rack
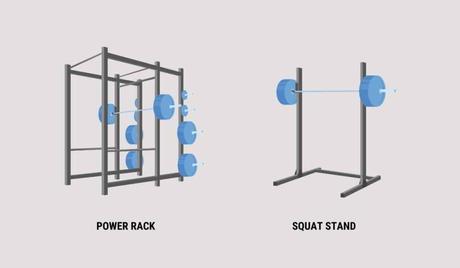
As you know, there are several types of squat racks you’ll typically find for home use:
- Squat stand, which features just two posts and legs. Sometimes they are connected by a bar or anchored to a wall, but many are freestanding and independent of each other.
- Power rack, which features four or six posts and legs, all interlocked and bracing each other.
- Folding squat rack. These are the ultimate space savers, but are ultimately supported by bolting them to the wall (see more: The Best Folding Squat Racks for Small Spaces and Big Workouts).
Even though a four or six-column power rack is exponentially more stable than a squat stand, it can still slide or shift as you use them.

Bolting the rack keeps it from shifting
Every time you drop a heavy weight onto the cradle, there’s a risk that the heavy metal cage will shift. Sure, it may be a minute shift every time (just a millimeter or so), but over time, that can lead to noticeable movement.
Worse, as the heavy steel cage moves, it’s going to damage your floor. That’s not a big deal if you’ve got the squat cage set up on concrete (such as your patio or basement), but a greater problem when the cage is set on vinyl, linoleum, epoxy, or rubber floors.
Over time, the squat cage will move, but its weight can gouge deep furrows into whatever floor it’s resting on. That sort of damage is not easy to repair—ultimately, you may have to replace your entire floor because of the tiny shifts in the squat rack.
Bolting the rack is simply the safer option
Of course, if you have kids at home, I guarantee they’ll one day start climbing on the squat rack. Kids love to climb, it’s just what they do, and the squat rack/cage presents a truly tempting obstacle for them to try and climb.
Even if they’re just swinging on the upper support bars, there’s a risk that they could tip it over (especially if it’s unevenly loaded), and that could be seriously dangerous.
Bolting down your squat rack or squat cage is just the safer, smarter solution that will put you and your family at risk, and decrease the chance your gym equipment will damage your home.
How to Bolt Down a Squat Rack
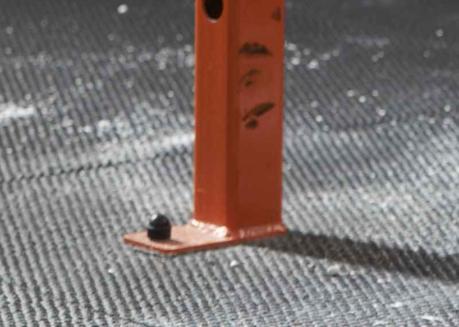
Take a look at every squat rack, and you’ll see that the feet come with pre-drilled holes specifically to use for bolting down the rack. The manufacturers have made it easy to secure the racks, likely even providing the bolts needed for the job.
But the cage and bolts are just the first pieces of the puzzle. There are a few more steps involved and a few additional tools needed to get the job done.
Below, I’ll walk you through the process of getting it set up and bolting the squat rack to the floor.
Step 1: Prepare the floor.
If you’re bolting the rack onto straight concrete, all the prep work is already done. However, if you’re trying to set up the rack in a garage with vinyl, tile, or rubber flooring, you’re going to need to cut away the flooring to ensure the rack sits directly on the concrete. Otherwise, the weight will damage your floors, and over time, that damage could radiate outward.
- For tile flooring, you’ll need an angle grinder with a tile-cutting bit. Mark the outlines of the squat rack’s feet, and cut away the tile to allow you to place the feet directly on concrete.
- For vinyl and rubber flooring, you may be able to use just a cutting knife/razor blade to cut away the flooring. However, if the floor is too thick, you may want to use an oscillating saw or angle grinder with the right bit attached.
Ultimately, the goal is to remove only the flooring where the legs will be placed, so the rest of your gym floor remains intact while the squat rack sits on solid concrete with nothing in between.
Step 2: Drill the anchor holes.
If you have the space to build an entire lifting platform (using wood and metal) to serve as the anchor for the squat rack, great. But if you’re operating with limited space, you’ll have to anchor the rack directly into concrete.
You won’t be able to drill the bolt right into the concrete, but you’ll have to first pre-drill the holes into which you’ll insert a specialized anchor. Set your squat rack into its position, and use a marker to mark the spots where you’ll need the holes.
For drilling, you’ll want a hammer drill with sufficient power to put a hole in concrete. You can start off by drilling with a smaller concrete bit, then switch to a larger one (the size of your bolt) once you have an existing hole.
Or, just start with the wide bit and get drilling, though prepare to spend more time and effort putting a thicker bit into concrete.
Once the holes are drilled, use a vacuum cleaner to suck out any debris or concrete chunks, and insert the anchors for your bolts.
Step 3: Bolt the rack down.
Place the squat rack in the position, with the holes lined up. Insert the bolts into the holes in the legs and use either a wrench, ratchet, or impact driver to secure the bolts to the anchors.
The impact driver will definitely have more power and make the job easier on you. Tighten the bolts as securely as you can.
Step 4: Test for movement.
Once the bolts are as tight as you can make them, lean against the squat rack and see if there is any movement. If there is, tighten the bolts further (using an impact driver). If there is no movement, put some muscle into the effort and try to shake the rack.

Finally, rack the barbell and some weights, and see if you can move it then. If not, you’ve gotten it bolted down properly and you’re ready to get training!
How to Anchor a Squat Rack (without Bolting it Down)
You might be wondering, “How do I stop my squat rack from moving even if I don’t bolt it down?” Maybe you don’t have the tools for the job, or you bought a used rack that didn’t include the proper hardware.
You’ll be glad to know there are a few solutions that will help you anchor your squat rack even if you can’t drill it into your concrete floors:
Solution #1: Secure it to a lifting platform.
A lifting platform is exactly what it sounds like: a platform (built of wood and/or metal) that you use for weightlifting.
You can customize the size of your lifting platform to fit your workout room however you want—you can even make it large enough that it fills an entire half of your home gym, so the rack has no way to move around.
See also: The Best Deadlift Platforms for Home Gyms
It’s much easier to anchor the rack to a wooden platform than concrete, and you won’t need any specialized tools or remove any of your home’s flooring that way.
(Below is a great video of how to install a power rack into a lifting platform without damaging your floor.)
Solution #2: Load it up.
If you don’t have room for a platform and tools to anchor the rack to the floor, you can always rely on a lot of heavy weight to keep it stable and still.
You can load storage pegs on the back of the rack, and fill up those pegs with a lot of heavy weight plates (at least 1-2x the rack’s weight) so it doesn’t move around or tip over.
The more weight you load on the rack, the more stable and less likely to move it will be.
Plus, loading up the back of the rack with your plates keeps your bumpers and cast iron plates off of the floor, keeping your workout area nice and tidy.
Solution #3: Try a flat-foot rack.
A “flat-foot” is a special attachment you connect to the feet of your squat rack, which serves as an extension to increase the rack’s footprint and makes it more stable.
It won’t counteract the sliding/shifting problem, but it will stop your rack from tipping over when using it.
There are also flat foot squat racks that are specifically designed to not be bolted down in your home gym.
Solution #4: Mount it to the wall.
You may not have the tools to bolt the rack to the floor, but it’s far easier to anchor it to the wall. Just make sure that you’re securing the squat rack to the studs in your home, using thick wood bolts.
There is a risk of damaging your wall (which is why it’s not the #1 solution I recommend), but it’s a good way to keep the rack from shifting, moving, or tipping over.
The Bottom Line
At the end of the day, the best, safest, and smartest solution is to bolt down your squat rack. The risk of damage to your home is just too high not to!
Yes, it may cost a bit to invest in the right tools for the job (unless you’ve got a buddy you can borrow them from), but it’s worth the investment because doing it right will give you peace of mind and protect you and your family from injury.
When dealing with heavy weights (hundreds, or even thousands of pounds), you absolutely need to do everything in your power to maximize safety.
Bolting down your squat rack is an excellent way to do exactly that!
More Squat Rack Guides
10 Best Squat Racks for Home and Garage Gyms. A squat rack is the best purchase you can make for your workout goals. Here’s a detailed buyer’s guide and the best squat racks on the market right now for home gyms.
Squat Rack Anatomy: The 7 Parts of a Rack Explained. Squat racks are an excellent tool for safer and more confident weightlifting. Here’s a guide to the different parts of a squat rack.
