In this guide, you are about to learn about the newest Dungeon in Destiny 2. We'll present an in-depth walkthrough of each encounter, secret chests, rewards, and collectables you can acquire to complete your Collection. You will be introduced to the Dungeon's main Mechanic and learn how to handle every encounter step-by-step.
Let's descend further into the spire and find all the secrets beneath the surface of Mars!
How to access the Spire of the Watcher
Before heading into the Spire of the Watcher dungeon, you must meet some prerequisites to be able to launch the activity:
- Complete Witch Queen campaign Introductory Quest - The Arrival Mission.
- You must have a Dungeon Key or Witch Queen Deluxe Edition to access the Dungeon.
- Pick up the "Ares Desperado" Quest from Ikora Rey in the Tower.
With the newly added quest in your inventory, launch the Destination Menu and find the Dungeon in the Savathun's Throne World near the Enclave.
The activity has a recommended power of 1570 on Legend and 1610 on Master. You need a strong fire team, communication, and a potent build to mark the dungeon as an accomplishment.
The matchmaking system is disabled in this activity. If your attempts to find the perfect team lead to no success, you can buy a Destiny 2 boost from KBoosting.com and let the professionals complete the Spire Dungeon for you.
Spire of the Watcher Loot Table
The rewards are predefined for each encounter when you complete the Dungeon on Legend Difficulty. If you are looking to farm a particular weapon or armor piece, you can check out the tables below for encounter-specific loot:
Spire of the Watcher Secret Chests
In the Spire of the Watcher Dungeon, there are only two hidden chests, and you can find them in the following locations:
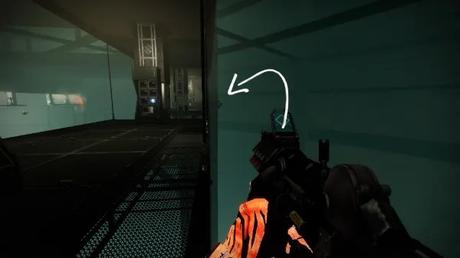
The First bonus chest is before the "Ascend the Spire" encounter when you reach the enormous chasm filled with vex enemies. It is well hidden behind the column on the far left bridge. Use the scaffoldings and proceed to the small platform. Your first bonus reward awaits you in the dark!
The second bonus chest is before the final boss encounter; in the room, you drop after activating the red wires. Defeat all the enemies, but don't drop down just yet! The room has four sets of stairs, and the hidden chest lies below one of them.
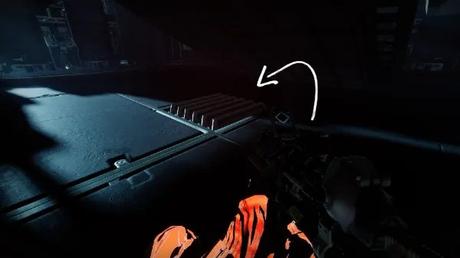
Under each staircase, there is a vent you can destroy, but only one has a secret tunnel to the second bonus reward of the dungeon. Go ahead and grab it!
By collecting all six recordings hidden in the lairs of the Dungeon, you can complete a Triumph required for the Title that also increases the drop chance of the Hierarchy of Needs Exotic Bow. Here are all the locations of the Devilish Recordings, in order:
Devilish Recording 1The first recording can be found at the bottom of the slide. Turn right and climb on the platforms as shown in the picture below:
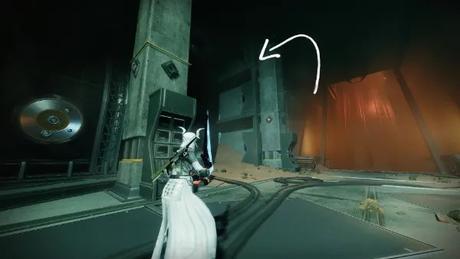
The second collectable of the dungeon is located right before the chasm, under the green-lighted bridge.
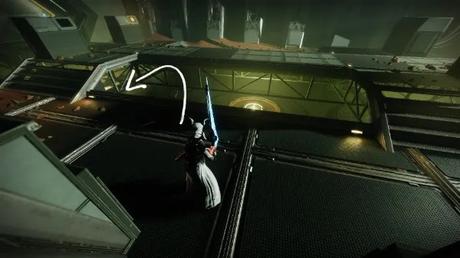
The third recording can be found next to the first secret hidden chest of the dungeon. Once you reach the first part of the bridge, check the computers and grab your collectable.
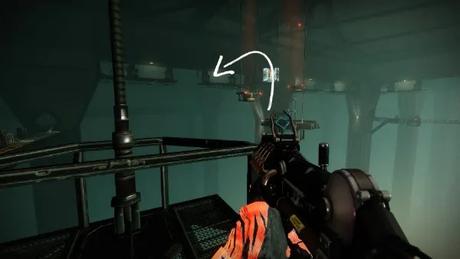
The fourth collectable can be found right before the elevator you must take to get out of the chasm. Once you reach the last bridge, turn left and jump on the hidden platform.
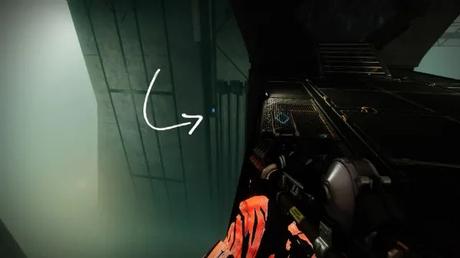
You can find the fifth collectable behind the rally flag where the first encounter begins.

The Dungeon's sixth and last collectable can be found at the end of the first encounter, in the room where you have to open the windows to reach the top of the spire. Follow the outer glass panels until you find the last collectable.
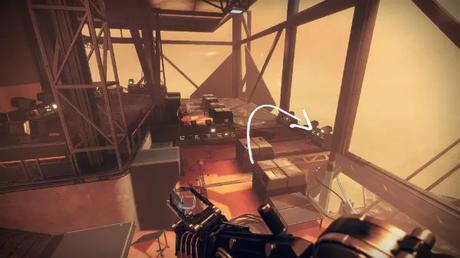
How to prepare for Spire of the Watcher Dungeon
Moving on with our SoW Guide, let's discuss the loadout and subclasses we recommend using in this activity.
Best Subclasses for each Class
Below, you can find the recommended subclasses for efficient DPS and survivability in the SotW Dungeon:
- Hunter: Nightstalker / Arcstrider
- Warlock: Dawnblade: Well of Radiance / Shadebinder
- Titan: Sunbreaker: Hammer of Sol / Striker: Thundercrash
For weapons, a few tips will help you enhance your DPS output and add-clearing in specific encounters, such as:
When you start the Dungeon Activity, you must follow the linear path until you reach multiple buildings with a lot of wires inside and outside connected to a central panel and a door that must be open.
Learning the MechanicThe main mechanic of the Dungeon is the Arctrician buff, which you can acquire for 30 seconds by standing in the Vex Puddles that spawn when killing a Minotaur. The buff allows you to activate the yellow and red wired nodes by damaging them
When you successfully start a node, your buff gets extra 5 seconds on the timer up to 45 seconds maximum. The yellow wires must be activated in the correct sequence, while the red wires can be done in any order, but we'll get into that as we run into them in the following encounters.
How to open the Spire and Reach the First Encounter
You can find four nodes on the central panel that must be activated by completing the sequence, helped by the Arctrician buff we mentioned earlier. Each node has a beginning node and an end node, with more of them in between. Eliminate the Orange-Bar Minotaur(s) with Void Shield and acquire the buff.
When you have the buff active, you must follow the yellow wire to find the starting node (with only one yellow wire connected) and damage it to start the sequence. Then, you must go after the output wire and damage the subsequent nodes in the order.
Note: If you do that correctly, the wire that brought you to that node will turn blue and remain activated. If done incorrectly, the wire will turn itself off quickly and doesn't add extra time to your buff.The opening encounter of this dungeon has multiple types of enemies trying to harass you while trying to open the spire. Complete the sequences on all four nodes on the panel, and the doors will open. Slide down the tunnel and follow the hidden path (jump up on the platforms on the left of the room) out of the seemingly concealed area.
Progress through the corridor, descend on the second hole enlightened by a red light, and head right. At the end of the room, you will find some scaffold you can use to climb up. Run forward on the first bridge, then jump on the second one on your left. Use the platforms and scaffoldings to reach the third bridge.
Turn to your right and then jump around the column opposite to the way you came from and ascend the long elevator. Pass through the newly entered room and use the platforms to climb way further until you reach the first encounter. Outside the large window (near the banner circle) is a platform you can use to reach and start the first encounter of the dungeon.
Let's head into some tips and tricks to help you complete the opening encounter more efficiently and safely!
Cyclops on all corners of the arena, minotaurs, harpies, and goblins are desperately trying to stop you from progressing, but we have some essential tips that may help you!
- When you successfully activate a node, and it turns blue, it cannot be deactivated by any means. Take your time, and do not rush things!
- If your Arctrician buff expires, you can refresh it by killing another Minotaur and standing in the vex puddle.
- If you activate all the wires, leave the finishing nodes deactivated! By doing this, the Supplicant Harpies will not spawn. Once the nodes are prepared, you can shoot the final four on the central panel to open the door.
Spire Ascent Encounter
Note: More Wiring The nodes on this encounter will sometimes be hidden and seemingly out of reach. Take your time and scout all the nodes' locations; some are placed under stairs or scaffoldings!The Spire Ascent Encounter does not feature a boss fight but more of a restless version of the entrance. There will be two sets of nodes and wires per floor, for a total of three floors. Eliminate the Minotaur, grab the Arctrician buff, find each node's starting points, and activate the wires in the correct sequence.
Tips and TricksProgress through each floor and activate the nodes in the sequence, and you will receive your first dungeon reward. Ascend in the newly opened room, jump up on one of the bridges you can find on the sides of the room, and activate the panel.
Akelous, the Siren's Current Boss Fight EncounterHead upwards, and the first boss in the Spire of the Watcher Dungeon will greet you!
- If you complete a floor quickly, you can keep the Arctrician Buff for the entire encounter.
- If you kill the Hydras, the Supplicants will spawn, so it's better to avoid killing them as much as possible throughout the encounter.
This encounter's central aspect consists of four yellow wired nodes you must activate to remove Akelous' shield.
How to remove Akelous' Immunity Shield
This is the first boss encounter of the Spire of the Watcher Dungeon. The only difference is that, now, the nodes start in the middle and correspond to one of the four bridges on the sides of the arena. At each bridge's end, fuel rods must be activated to take down Akelous' Shield.
Eliminate a Minotaur, grab the Arctrician Buff, and activate all the wires in the correct order. When you activate the last node, Akelous' damage phase starts. It will move towards the previously activated node and reveal its "eyes" (like the Consecrated Mind in the Garden of Salvation Raid). Destroy all of them, and you can unload your weapon on the boss's glowing eye in the middle of its body.
Tips for killing AkelousWhen you damage the boss, it will start moving back to the center. Akelous has a damage check bar you have to meet. If you don't reach that point, the boss will close its shield and shoot a shockwave that can kill you or send you off the platforms.
Cleanse and Repeat the Process!
The DescentWe have some tips and tricks you can use to make the encounter easier and faster. Let's check them out:
- Before activating the 4th Node, you can gather your team and eliminate all the harpies on the sides.
- The Damage Phase timer length depends on how fast you are blasting the Akelous' Glowing Eyes.
When you Defeat Akelous, the middle platform will open up and you have to crawl through tight spaces where the Red Wired Nodes greet you for the first time.
Persys, Primordial Ruin Boss Fight EncounterHow to activate the Red Wires
Descent in the first room filled with Vex Enemies, and eliminate them. A Minotaur will spawn on the elevated platform on your right. Kill it and acquire the Arctrician Buff. The Red wires are easier than the yellow ones: They are not chained together in a sequence!
Welcome to the final encounter of the Spire of the Watcher dungeon. At the bottom of the Spire lies Persys, the Primordial Ruin, a massive wyvern that stomps around and shoots blasting lasers trying to stop you. Before taking it down, you need to understand how to remove the Immunity Shield and begin the damage phase. Let's check it out!
How to remove Persys' Immunity Shield
The Final encounter arena is divided into two rooms-one room you already descended into and the reactor room where Persys awaits. The most important aspect of the encounter is to trap Persys in his spawning room while the reactor is melting, to bring down its shield.
As you've already guessed, there are more nodes to connect, and yes, they have both yellow and red wires! Four columns are in the middle of the big starting room, and four nodes are inwards on each column.
The last node can be found above the big central door that leads to the reactor room. Use the Arctrician buff to activate the red wire circuit to open the door. The boss will slowly make his way toward your location to try to stop you.
There are four corresponding yellow nodes on the opposite sides of the pillars. Only two of the four can be activated; follow the yellow wires and shoot them in the correct order. Before activating the final node, wait for the boss to lurk back into the reactor room. When you successfully do that, the reactor will go into meltdown mode, and you will need to return to your starting room.
After you find your way out of the Reactor Room, keep an eye on the red wires you used to open the middle door. Now, you must close it! Activate all five nodes as quickly as possible and wait for the reactor to explode. Persys will become vulnerable for a short period, where you can unload your arsenal into it. Cleanse and repeat the process until Persys is down.
If you manage to take Persys down, you have a chance to get the dungeon-exclusive exotic weapon, Hierarchy of Needs.
How to get Hierarchy of Needs Exotic Bow
As previously mentioned, only the final boss of the SoW dungeon has a chance to drop the Hierarchy of Needs Exotic Solar Bow.
However, you can increase your chances of getting the weapon. Let's find out how, shall we!
Triumphs that Increase your Hierarchy of Needs drop chance
The Exotic Bow has a low drop rate chance, but if you manage to complete a few triumphs within the Dungeon, you can increase the probability of getting it:
- The Magnificent One Triumph - You must complete all encounters in the "Spire of the Watcher" dungeon solo.
- Mind the Vexplosion - You must complete all encounters in the "Spire of the Watcher" dungeon without dying.
- Untarnished Grit - You must complete the "Spire of the Watcher" dungeon solo & without dying.
- Resident Vexpert - Complete the "Spire of the Watcher" on Master Difficulty.
- Devil in the Details - Find and listen to each Devilish Recording throughout the "Spire of the Watcher" dungeon.
The Hierarchy of Needs Exotic Solar Bow has unique perks, which make it the most sought-after weapon in the Dungeon.
The Hierarchy of Needs exotic catalyst improves the weapon's capabilities by increased stats and perks; Panoptic Tessellation - Deploying a Guidance ring or striking a target with a seeking projectile improves draw time and reload speed for a moderate duration.
To complete the masterwork objective of the Hierarchy of Needs' catalyst, you have to defeat 700 targets using this weapon to unlock the upgrade.
In the final part of our guide we present the differences between the two difficulties available for the SoW Dungeon.
Differences between Master and Legend Spire of the Watcher
Note: Artifice Armor is a unique armor type with five socket slots dedicated for an extra mod.As previously stated, the Spire of the Watcher dungeon features two difficulties with different modifiers and rewards. By completing the Master version, you also mark the final triumphs needed for the dungeon Seal and Title - The WANTED . There are a couple of notable differences that are making the dungeon more challenging:
The Master Version of Spire of the Watcher dungeon also drops Artifice Armor upon completion.
Even if the Spire of the Watcher dungeon will resist your attempts on your first runs, our guide will help you master it. It's only a matter of time until you grasp the encounters and have your first dungeon clear at your fingers.
