Wouldn’t it be cool to control things in your home from a web browser? I mean turn on and off the lights, adjust the music volume, open the gate or the garage door, start the garden sprinklers or give the dog a portion of food just by clicking a button in a web browser, perhaps from your smart phone? It certainly would be very exciting! And it is not only possible, but it can also be relatively easy. All you have to do is get a Raspberry Pi, connect some custom hardware which can do your custom task (switch lights on and off, drive motors, send wireless signals to other devices, etc.) to its GPIO pins and write some software which can control the Raspberry Pi’s GPIO pins based on requests received from a web browser. The hardware part heavily depends on what you wish to achieve exactly and will be different for every task. In this article we will address the software part, we will describe a relatively simple way of talking to the Raspberry Pi‘s GPIO pins from a web browser.

Used technologies/languages/frameworks/tools/applications
As you might have already guessed from the image above, we are going to write Java programs, which will run under a Java web server such as Tomcat and listen to requests from browsers. For the user interface that will appear in the browser we are going to use the excellent Vaadin framework. Our weapon of choice for accomplishing the communication with the Raspberry Pi‘s GPIO pins is a very nice little library called Pi4J.
I’m not going to talk about the benefits of using Java, as that may turn into an infinite discussion, but I am going to say a few words about the components that make up our application.
The Pi4J project is a blessing for those of us who prefer to program the Raspberry Pi‘s GPIO pins in Java. It is not only very straightforward to use and easy to understand, but also well structured. I personally prefer to use it because it offers a very clean object-oriented approach to talking to the hardware. Pi4J is essentially a Java wrapper for the WiringPi library (which is written in C). The Pi4J team runs a very nice website which is full of useful resources and contains everything you need to know for making a start with Pi4J.
The Vaadin framework is an easy and yet powerful tool to create user interfaces for Java web applications. I am not a Java expert by far and I don’t know how many other good frameworks of this type are out there. What I do know is that with Vaadin you can write nice, clean UI code very fast and that the resulting UI looks good, so it is my preference to use it.
Application structure
- The Vaadin user interface receives user actions from the web browser.
- The event handlers of the Vaadin UI components call the Java user code in our web application, which runs on the Tomcat sever.
- Our Java code translates the requests to logical GPIO operations and calls functions from the Pi4J library accordingly.
- Pi4J sets the states of the Raspberry Pi‘s GPIO pins as specified.
- The state of the hardware connected to the GPIO pins is changed (an LED is turned on/off, a relay is switched on/off, a speaker is sent a signal, etc.).
According the above steps the user action travels from the web browser, through Vaadin, our Java code and Pi4J to the Raspberry Pi‘s GPIO pins and triggers some hardware action. It is also possible to go in the opposite direction:
- The state of the hardware connected to the GPIO pins changes.
- Pi4J triggers an event based on the change.
- Our Java code receives an event and handles the change by modifying the state of the Vaadin user interface components.
- The Tomcat sever sends a response to the web browser with the modified state of the Vaadin components.
- The web browser displays the change on the user interface (shows a notification, changes the text of some labels, shows/hides some components, etc.).
Example application: Turning an LED on/off from a web browser
We will be using the simplest possible hardware for our example application: an LED connected to GPIO pin 0, which will be turned on/off by clicking a button in a browser:
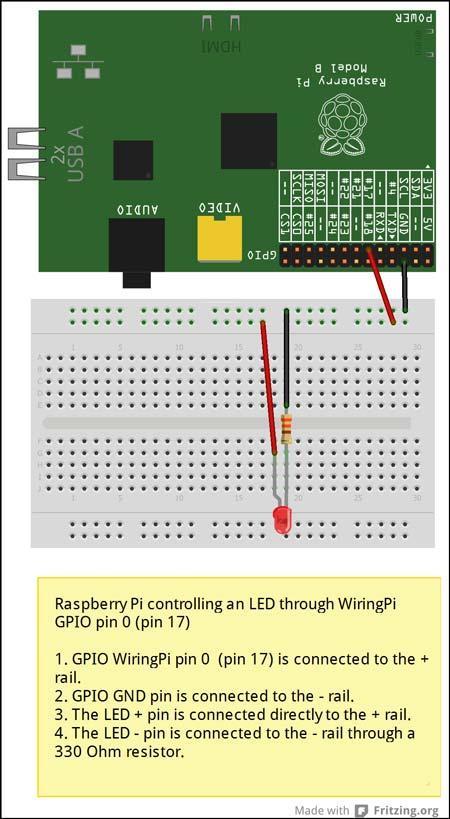
Raspberry Pi model B controlling one LED
Downloading and installing the prerequisites
Step 1: Download and install your preferred version of the Java Development Kit on the machine on which you are going to develop the application In our example we will create the application on a Windows system.
Step 2: Download and install the Eclipse development environment on the machine on which you are going to develop the application.
Step 3: Install Vaadin under Eclipse. Open Eclipse and go to the Eclipse Marketplace (Help -> Eclipse Marketplace…). On the Search tab type Vaadin into the Find box and hit Go. It should find “Vaadin Plugin for Eclipse”. Install it.
Step 4: Download and install the Java Runtime Environment or Java Development Kit of your choice on the Raspberry Pi (OpenJDK for example: apt-get install openjdk-7-jdk).
Step 5: Download and install Tomcat on the Raspberry Pi (apt-get install tomcat7). Configure it to listen on your preferred port (we will use 8080).
The Pi4J library will need root privileges in order to control the GPIO pins, so Tomcat must run under the user root and under the group root. On the Raspberry Pi edit your /etc/default/tomcat7 configuration file. Find the TOMCAT7_USER and TOMCAT7_GROUP variables and make sure they are both set to root:
- TOMCAT7_USER=root
- TOMCAT7_GROUP=root
Restart Tomcat: service tomcat7 restart
Steps to write the Java web application which listens to web browser requests and communicates with the Raspberry Pi’s GPIO pins
Step 1: Create a new Vaadin project.
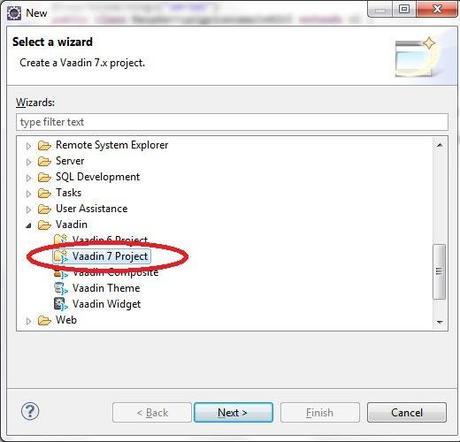
In Eclipse go to File -> New -> Other… and on the window that comes up select Vaadin/Vaadin 7 Project (or Vaadin/Vaadin 6 Project or whatever other version you have installed).
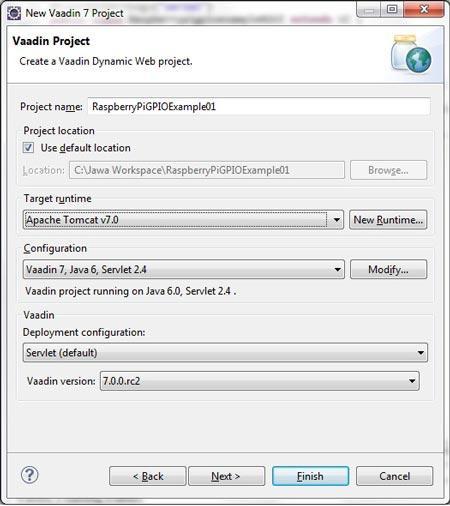
On the Next page enter a name for your new project (we will use RaspberryPiGPIOExample01). Make sure that your Configuration and Vaadin version are set correctly, than hit Finish.
Step 2: Add the Pi4J library to your web application.
- Download Pi4J from here. If you choose the Direct Download option (easiest), you will receive a zip file. Look inside it and find pi4j-core.jar (for example in pi4j-0.0.5-SNAPSHOT/lib/pi4j-core.jar).
- Using your file manager of choice, copy the pi4j-core.jar file into your newly crated project’s WEB-INF/lib directory. For example if your Java work space root directory is called JavaWS, then you need to copy the Pi4J file into JawaWS/RaspberryPiGPIOExample01/WebContent/WEB-INF/lib/ (obviously you will have to use here the project name that you have chosen in the previous step).
- In the Eclipse Project Explorer select the root of your newly created application and refresh it (F5). The Pi4J JAR file should show up under WB-INF/lib.
Step 3: Check out the default Vaadin application code that has been generated automatically. In Eclipse open the Project Explorer and look into your project’s folder, inside Java Resources/src. Open your project’s .java file. You should find something like this:
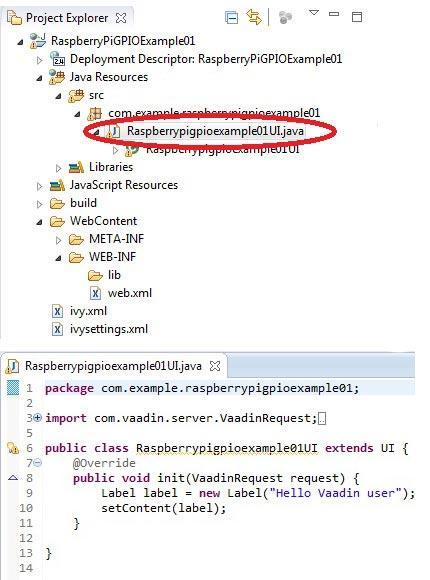
Notice that the init() method, which initializes the Vaadin user interface has been generated and that it already contains a label which says “Hello Vaadin user“. We will replace this label with our button which toggles the LED on/off.
Step 4: Write the code which will allow us to control the LED through the Raspberry Pi’s GPIO pin 0. This is how your code should look like:
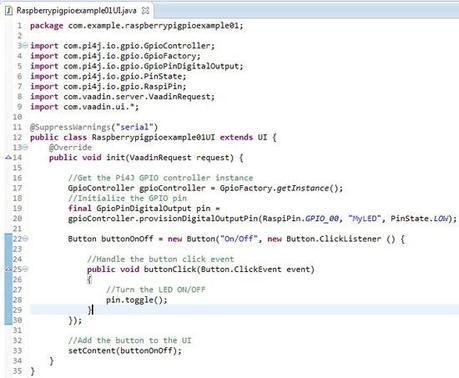
The code can be downloaded from here.
The first essential step in controlling our LED is to acquire an instance of the Pi4J GPIOController class, which will send the signals to the Raspberry Pi‘s GPIO pins:
GpioController gpioController = GpioFactory.getInstance();
Through this instance of the GPIOController we can now initialize (provision) a GPIO pin:
final GpioPinDigitalOutput pin =
gpioController.provisionDigitalOutputPin(RaspiPin.GPIO_00, “MyLED”, PinState.LOW);
We use pin 0, we give it the name “MyLED” and we set it’s initial state to LOW (off)
Now all we have to do in the Vaadin button’s click event handler is to toggle the state of our LED:
pin.toggle();
That’s it! You application code is now ready.
Deploying your web application
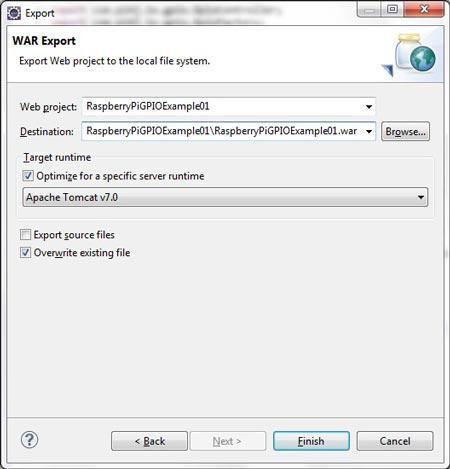
Step1: Export your web application from Eclipse (File -> Export…) into a WAR file:

On the Next page make sure that it has the same name as your project and hit Finish:
Step2: Copy the WAR file to the webapps folder of Tomcat (/var/lib/tomcat7/webapps) onto your Raspberry Pi. For this purpose you can use WinSCP for example.
Step3: Restart Tomcat. This step is most likely not needed, but just in case…
service tomcat7 restart
Give it a minute or two to restart properly.
Testing your web application
Your application should now be ready to use. Open a web browser and type in the address bar the following line:
YourDomainOrYourIP:TomcatPort/YourWebApplication
Substitute the values with your own. Examples:
example.com:8080/RaspberryPiGPIOExample01
1:1:1:1:8080/RaspberryPiGPIOExample01
Be patient the first time you load your application, it will take a few seconds.
You should be able to see in your browser an “On/Off” button. Clicking it should turn the LED which is hooked up to the Raspberry Pi‘s GPIO pin 0 On/Off.
Have fun!
Downloads
- The complete Java example project
- The source code (Java file)
- The binary WAR file


