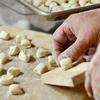
 Dom received a cavatelli maker for his birthday. The metal device looks like a clunky can opener with wooden knobs. After scouring cookbooks to find the perfect recipe and a series of trials (and errors,) we got the proper consistency of dough and the correct technique with the apparatus. Lo and behold! – We had achieved cavatelli perfection.
 If you do not have a handy-dandy mechanism for shaping your cavatelli, you can use a butter/gnocchi paddle, hair comb or even a putty knife along with a “smearing motion,” however, creating uniform macaroni in nearly impossible.

3-4 cups all-purpose flour
2 cups ricotta cheese
2 eggs
pinch of salt
Cake flour for dusting
Put 2 1/2 cups of the flour into a bowl and make a well in the middle. Add 2 eggs and the ricotta cheese and incorporate the flour into the eggs and cheese, and then knead the dough adding more flour as needed until dough is soft but not at all sticky.
Cover the dough with plastic wrap and let it rest for at least 30 minutes (believe us, it makes a big difference.) Roll out on board dusted with flour and make long ropes. Add more flour to the board as needed.
 Flatten ropes a bit before feeding them into the cavatelli maker. If they start to glob together rather than falling freely from the machine, then you will need to incorporate more flour into your dough. Another trick we learned is to place a teaspoon of flour on top of the cavatelli maker, so that a tad falls between the two wooden rollers with each turn of the crank.
If you are hand forming dough: cut into one-inch pieces, rolling them individually into “worms.” Then using a butter paddle or wide-toothed comb with your thumb“smear” each piece away from you rolling the pasta as you smear. Alternatively, you can use a flat surface (a plastic putty knife works best or butter knife) held at a 45-degree angle. Press on each “worm” of dough and “smear” the length of it. You find that the motion causes the dough to curl up the edge of your implement. Both of these techniques take practice!
 Place finished cavatelli on a cookie sheet dusted with cake flour. As you fill up in the cookie sheets, place the whole pan in the freezer for about a half hour (until the pasta is completely frozen and does not stick together.) Then you can easily transfer the frozen cavatelli to a freezer bag and refreeze until you are ready to use them.
To cook, bring a large pot of salted water to a boil and then place frozen cavatelli in the water. They should float to the surface of the water when they are done. It is best to taste one or two before draining. Once drained, immediately add olive oil or pasta sauce to prevent them from sticking together. Serve in plentiful portions and watch them disappear!

