Earlier this summer at WWDC 2018, Apple announced Siri Shortcuts, a new Siri feature that will allow you to extend your app’s capabilities by building custom voice actions.
Siri Shortcuts will be available with the release of iOS 12 later this year.
Let’s get started
This tutorial will focus on understanding and developing a basic application, which will allow our users to book a test drive with their local car showroom through Siri Shortcuts.
To speed up the development process and solely focus on understanding Siri Shortcuts, I have prepared for you a sample project that can be downloaded here
The demo project currently contains 2 ViewControllers, a CatalogViewController for our car list, a BookingConfirmationViewController for our test drive booking confirmation and a DataManager.
Part 1: Enabling Siri Capabilities and adding Inters Extension
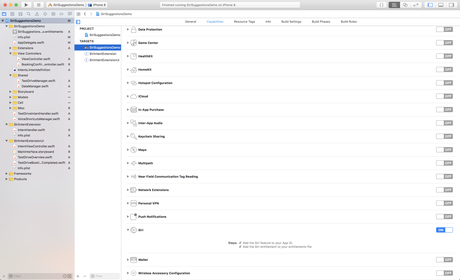
In order to be able to start developing our Siri Shortcuts feature, we need to enable Siri Capabilities in our app. You can do this by opening your project navigator in the “Capabilities” tab. Here you can scroll down to and turn “Siri” on.
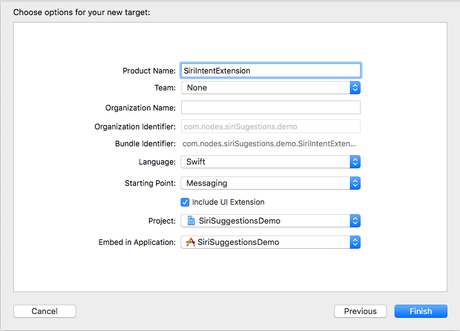
Now that we have enabled Siri, we will need to add the IntentExtension and IntentExtensionUI targets to our app. To do so, click “File” in the Xcode menu, select “New” -> “Target” and then select the “Intent Extension” target. Name your extension SiriIntentExtension and make sure you have checked “Include Intent Extension UI”. This will include SiriIntentExtensionUI automatically to our app’s targets.
Part 2: Request Siri permissions
Include the NSSiriUsageDescription key in your iOS app’s Info.plist file and describes what our users will be allowing “Siri” interaction for.
Then in our CatalogViewController import IntentsUI and add the following functions and call requestSiriAuthorization in viewDidLoad. The requestSiriAuthorization function will ask our users on the first app open to allow access to Siri. Because our app’s main purpose is to demo Siri’s functionality, we can add allowSiriAlert function, that will be called if the user hasn’t allowed Siri permissions yet.
//if user hasn't already allowed Siri permisions, we request the user to authorize Siri
private func requestSiriAuthorization() {
    guard INPreferences.siriAuthorizationStatus() != .authorized else { return }

    INPreferences.requestSiriAuthorization { (status) in
        switch status {
        case .authorized, .notDetermined, .restricted:
            self.makeCatalogActivity()
        case .denied:
            self.allowSiriAlert()
        }
    }
}

private func allowSiriAlert() {
    let alert = UIAlertController(title: "Siri permision needed", message: nil, preferredStyle: .alert)
    let allow = UIAlertAction(title: "Allow", style: .default) { _ in
        guard let settingsUrl = URL(string: UIApplication.openSettingsURLString) else { return }
        if UIApplication.shared.canOpenURL(settingsUrl) {
            UIApplication.shared.open(settingsUrl, options: [:], completionHandler: nil)
        } else {
            print("can't open path")
        }
    }

    let cancel = UIAlertAction(title: "Cancel", style: .default) { _ in
        alert.dismiss(animated: true, completion: nil)
    }

    alert.addAction(allow)
    alert.addAction(cancel)

    present(alert, animated: true, completion: nil)
}
Part 3: Donate Shortcuts
Before Siri can suggest shortcuts for our app, we need to tell Siri about the shortcuts through donations. An app should make donations each time a user performs an action in the app.
Currently there are two types of donations possible:
- Donate a User Activity
- Donate an Interaction
More information about this can be found here.
Part 4: Donating a User Activity
As suggested by Apple NSUserActivity provides a lightweight approach for making a donation that also integrates with other Apple features such as Handoff and Spotlight search. In our project we will use an NSUserActivity to allow our users to find the car catalog from Siri.
To get started define the activity as a type in the NSUserActivityTypes array in our Info.plist. The activity should have a reversed domain name which is unique within the list.
Now in our project, go ahead and create a new Swift file, called NSUserActivity+CatalogActivity. Here we will extend NSUserActivity to create our catalog activity.
To make it easier for future implementation of other custom activities we will create another NSUserActivity extension, where we will hold our identifiers needed for further development.
Your extension should look like this:
extension NSUserActivity {
    struct ActivityKeys {
        static let catalog = "catalogActivity"
    }

    struct ActivityTypes {
        static let catalog = "com.nodes.siriSugestions.demo.catalogActivity"
    }

    struct ActivityTitles {
        static let catalog = "Car Showroom Catalog"
    }

    struct SearchableKeywords {
        static let catalog = ["CAR", "SHOWROOM", "CATALOG", "CARS"]
    }

    struct SearchableName {
        static let catalog = "Car Showroom Catalog"
    }

    struct SearchableDescription {
        static let catalog = "Find the best cars for your testdrive"
    }

    struct InvocationPhrase {
        static let catalog = "Show Catalog"
    }
}
Switch back to NSUserActivity+CatalogActivity and start by extending NSUserActivity and import UIKit and CoreSpotlight.
Now add the following static variable:
import CoreSpotlight
import UIKit

extension NSUserActivity {

    static var catalogActivity: NSUserActivity {
    let activity = NSUserActivity(activityType: NSUserActivity.ActivityTypes.catalog)
    activity.title = NSUserActivity.ActivityTitles.catalog
    activity.isEligibleForSearch = true
    activity.isEligibleForPrediction = true
    activity.persistentIdentifier = NSUserActivityPersistentIdentifier(NSUserActivity.ActivityKeys.catalog)
    activity.suggestedInvocationPhrase = NSUserActivity.InvocationPhrase.catalog

    #if os(iOS)
    let attributes = CSSearchableItemAttributeSet(itemContentType: NSUserActivity.ActivityTypes.catalog)
    attributes.keywords = NSUserActivity.SearchableKeywords.catalog
    attributes.displayName = NSUserActivity.SearchableName.catalog
    attributes.contentDescription = NSUserActivity.SearchableDescription.catalog

    activity.contentAttributeSet = attributes
    #endif

    return activity
    }

}
We have now created a custom NSUserActivity which is both eligible for search and prediction, with a custom suggestedInvocationPhrase to be suggested later for our users when creating a Voice Shortcut. As well we have added a contentAttributeSet to our activity. This will allow our users to find the activity as well via Core Spotlight.
We are now ready to donate this activity to Siri. For this switch back to our CatalogViewController and in our viewDidLoad call userActivity = NSUserActivity.catalogActivity. By simply assigning our custom activity to the ViewController we have now donated it to Siri.
Because the Shortcuts app is not yet released at the time of this tutorial, our users can create a voice command by going to the Settings app and selecting Siri. Here we will be able to see the new shortcut created and create a voice phrase to invoke it.
Part 5: Donating an Interaction
The other way to make a donation is to use an INInteraction object. This involves a bit more work, but gives you more control over defining and handling the action.
Firstly we need to add our project and Siri Intent Definition File. You can do this by going to “File” -> “New” -> “File” and select Siri Intent Definition File. Make sure that you have selected as targets for this all the three targets of our project.
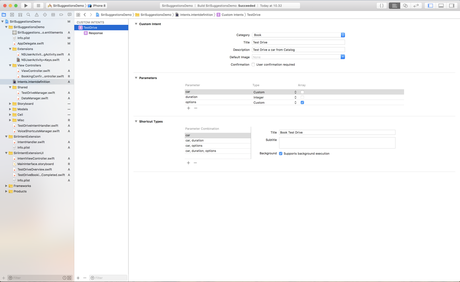
Select the newly created Intents.intentdefinition, here in the bottom left corner select the + icon and then New intent. Now that we have created an Intent let’s name it TestDrive, select the category as Book and add a Title and a Description. As well extra information for this intent can be added. You can add an Image to be shown for the intent and select the option.
Parameters can be defined for the intent to define the shortcut types. A shortcut type has title, subtitle and a set of parameter combinations such as:
- car and duration
- car and options
- car, duration and options
These types define the schema that Siri uses to identify requests the user makes; for example, “Book a test drive for 60 minutes.” The parameter combination for this example is: car and duration.
Your final intent should look like this:
Now that we have created our intent, we must inform our Intent Extensions that our app will support this custom type.
Inside SiriIntentExtensionUI -> Info.plist select NSExtension expand NSExtensionAttributes expand IntentsSupported and add a new item of type String with the value TestDriveIntent.
As well inside SiriIntentExtension -> Info.plist and repeat the previous step.
Now that we have configured our app and our extensions to know about the intent, we can now start focusing on handling it.
Handle the intent
Inside our SiriIntentExtension, select default created IntentHandler and add the following lines of code there:
override func handler(for intent: INIntent) -> Any {
guard intent is TestDriveIntent else {
    fatalError("Intent type not recognised \(intent)")
    }

    return TestDriveIntentHandler()
}
The above function will handle our custom intent. It will first check if the intent is one of our custom intents and then return a new instance of TestDriveIntentHandler. At this moment this will throw an error at compile time, since TestDriveIntentHandler is not yet defined, so lets go ahead and create it now.
Inside your main target create a new Swift file and name it TestDriveIntentHandler (a protocol generated for us from the Intents Definition File) . Select all 3 Target memberships for it (this way our extensions and our app can use the same custom handler) and let’s start coding!
Go ahead and create TestDriveIntentHandler as a class conforming to NSObject and TestDriveIntentHandling. Then add the following functions public func confirm(intent: TestDriveIntent, completion: @escaping (TestDriveIntentResponse) -> Void) which will allow us to perform some final validation on the intent parameters and public func handle(intent: TestDriveIntent, completion: @escaping (TestDriveIntentResponse) -> Void) which will allow us to complete the booking.
Your final class should look like this:
import UIKit
import Intents

class TestDriveIntentHandler: NSObject, TestDriveIntentHandling {
    /// - Tag: confirm_intent
    public func confirm(intent: TestDriveIntent, completion: @escaping (TestDriveIntentResponse) -> Void) {

    /*
    The confirm phase provides an opportunity for you to perform any final validation of the intent parameters and to
    verify that any needed services are available. You might confirm that you can communicate with your company’s server
    */
        guard let car = intent.car,
            let modelId = car.identifier,
            let _ = DataManager.shared.findCar(Int(modelId)!) else {
            completion(TestDriveIntentResponse(code: .failure, userActivity: nil))
            return
        }

        // Once the intent is validated, indicate that the intent is ready to handle.
        completion(TestDriveIntentResponse(code: .ready, userActivity: nil))
    }

    public func handle(intent: TestDriveIntent, completion: @escaping (TestDriveIntentResponse) -> Void) {

        guard
            let order = TestDrive(from: intent)
            else {
                completion(TestDriveIntentResponse(code: .failure, userActivity: nil))
                return
        }

        //  The handle method is also an appropriate place to handle payment via Apple Pay.
        //  A declined payment is another example of a failure case that could take advantage of a custom response.

        TestDriveManager.shared.bookTestDrive(order.car, duration: order.duration)

        //  For the success case, we want to indicate a wait time to the user so that they know when their booking order will be ready.
        //  Ths sample uses a hardcoded value, but your implementation could use a time interval returned by your server.
        completion(TestDriveIntentResponse(code: .success, userActivity: nil))
    }
}
Donating the intent
Now that our app knows how to handle the intent, we are now ready to donate it to Siri, when the user takes the specific action. Siri will then suggest interactions to the user based on how often the user performs the actions and the user will later be able to access the shortcut himself through the shortcuts app or from Siri Settings.
In our TestDriveManager go ahead and declare private func donateInteraction(for testDrive: TestDrive). We will use this function to donate the Interaction and we will call it before the return of our bookTestDrive function.
In order to donate the interaction we need to be able to generate an INInteraction from our TestDrive. To do so we must create a variable called intent in our TestDrive class.
Go ahead and add the following to our TestDrive.swift:
extension TestDrive {
    public var intent: TestDriveIntent {
        let intent = TestDriveIntent()
        intent.car = INObject(identifier: car.modelId.description, display: car.brand + " " + car.modelName)
        intent.duration = duration as NSNumber

        let options: [String: String] = ["fabricationYear": car.fabricationYear.description]
        var intentOptions: [INObject] = []
        options.keys.forEach { (key) in
            let value = options[key]
            intentOptions.append(INObject(identifier: key, display: value!))
        }

        intent.options = intentOptions
        intent.suggestedInvocationPhrase = "Book a test drive for \(car.brand) \(car.modelName)"

        return intent
    }

    public init?(from intent: TestDriveIntent) {
        guard let modelId = intent.car?.identifier,
            let car = DataManager.shared.findCar(Int(modelId)!),
            let duration = intent.duration
            else { return nil }

        self.init(car: car, duration: Int(truncating: duration))
    }
}
Our public var intent: TestDriveIntent is for us a computed property that will create a new intent of previously declared type public var intent: TestDriveIntent based on the information existing already in the TestDrive object. As well we have created a custom init for our class, so that we can convert the received TestDriveIntent to our TestDrive object at a later point.
Every time the user will book a test drive, we will donate an INInteraction to Siri so that she can suggest it to our user.
Now so that we can call our shortcut, we need to go to Settings -> Siri & Search. Here you will be able to find the donated shortcuts at the top of the view. When you tap our donated shortcut, Siri will invite you to create a custom phrase for it, suggesting as a reference point, our intent’s suggestedInvocationPhrase. Record a custom phrase and voila, Siri is now ready for you.
Go ahead and ask Siri to book a test drive for you. This is how it should look like when you ask Siri to book a test drive for you.
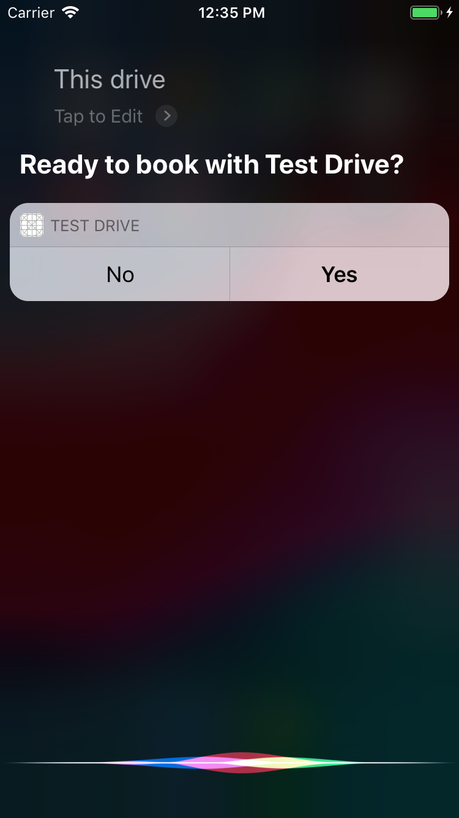
Something doesn’t look quite right here, and that is because our SiriIntentExtensionUI does not know to display anything to the user at the moment. For that to change we need to edit IntentViewController‘s func configureView(for parameters: Set<INParameter>, of interaction: INInteraction, interactiveBehavior: INUIInteractiveBehavior, context: INUIHostedViewContext, completion: @escaping (Bool, Set<INParameter>, CGSize) -> Void) that will prepare the interaction to handle and display the corresponding UI.
In the SiriIntentExtensionUI‘s MainInterface.storyboard you should be able to find TestDriveOverview and TestDriveBookingCompleted, two custom views I have already created and added for you to speed up the integration process. We will need to add these custom views as well in TestDriveBookingCompleted.
Now in IntentViewController add the following functions that will help us display the UI.
/// - Returns: Desired size of the view
private func displayOverview(for testDrive: TestDrive, from intent: TestDriveIntent) -> CGSize {
    overviewView.configure(testDrive)

    view.addSubview(overviewView)

    let width = self.extensionContext?.hostedViewMaximumAllowedSize.width ?? 320
    let frame = CGRect(origin: .zero, size: CGSize(width: width, height: 100))
    overviewView.frame = frame

    return frame.size
}

/// - Returns: Desired size of the view
private func displayOrderConfirmation(for testDrive: TestDrive, from intent: TestDriveIntent, with response:TestDriveIntentResponse) -> CGSize {
    completedView.configure(testDrive)

    view.addSubview(completedView)

    let width = self.extensionContext?.hostedViewMaximumAllowedSize.width ?? 320
    let frame = CGRect(origin: .zero, size: CGSize(width: width, height: 150))
    completedView.frame = frame

    return frame.size
}
We are now ready do display our custom UI for the interaction. Inside our configureView function add the following switch just before the completion call. This will check the status of our intent and display the matching UI.
// Different UIs can be displayed depending if the intent is in the confirmation phase or the handle phase.
var desiredSize = CGSize.zero
switch interaction.intentHandlingStatus {
    case .ready:
        desiredSize = displayOverview(for: testDrive, from: intent)
    case .success:
        if let response = interaction.intentResponse as? TestDriveIntentResponse {
            desiredSize = displayOrderConfirmation(for: testDrive, from: intent, with: response)
        }
    default:
        break
}
Bring Siri up on screen again and call your custom phrase again. Now you should be able to see the custom UI which looks something like this:
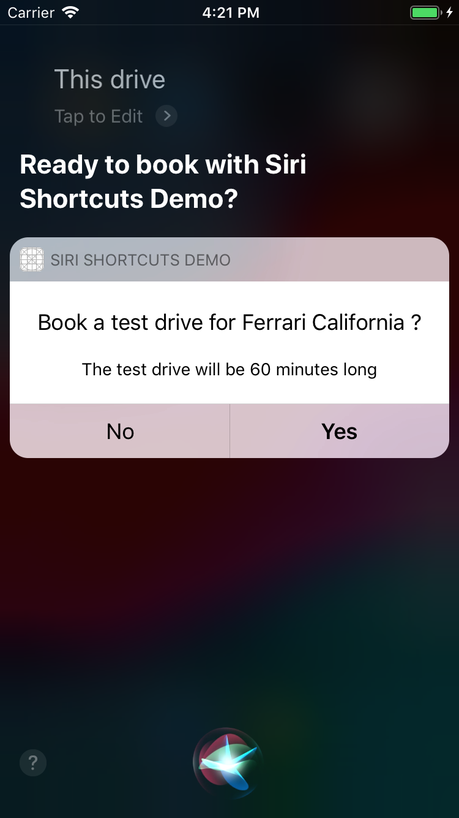
The last thing for us to do before we have completely integrated shortcuts into our app is to handle the intent inside our app as well.
Inside your AppDelegate.swift, go ahead and edit the func application(_ application: UIApplication, as follows:
continue userActivity: NSUserActivity,
restorationHandler: @escaping ([UIUserActivityRestoring]?) -> Void) -> Bool
func application(_ application: UIApplication,

continue userActivity: NSUserActivity,

restorationHandler: @escaping ([UIUserActivityRestoring]?) -> Void) -> Bool {
if let intent = userActivity.interaction?.intent as? TestDriveIntent {
//handle intent
handle(intent)
return true
} else if userActivity.activityType == NSUserActivity.ActivityTypes.catalog {
//handle activity
return true
}
return false
}
private func handle(_ intent: TestDriveIntent) {
let handler = TestDriveIntentHandler()
handler.handle(intent: intent) { (response) in
if response.code != .success {
print("failed handling intent")
} else {
guard let window = self.window,
let rootViewController = window.rootViewController as? UINavigationController,
let vc = rootViewController.viewControllers.first as? ViewController else {
return
}
let storyboard = UIStoryboard(name: "Main", bundle: .main)
let confirmationVC = storyboard.instantiateViewController(withIdentifier: "BookingConfirmationViewController") as! BookingConfirmationViewController
confirmationVC.testDrive = TestDrive(from: intent)
vc.navigationController?.pushViewController(confirmationVC, animated: true)
}
}
}
We have added the handle function that will present to our user BookingConfirmationViewController if we have received a successful intent of type TestDriveIntentHandler.
Part 6: Add Phrases to Siri
Another feature to add to our app, is the option to add phrases to Siri directly from our app. This will make the experience for the user a better one.
For this to happen we will need to create a VoiceShortcutsManager that will have as purpose to update and add voice shortcuts to our intents.
import Foundation
import Intents

public class VoiceShortcutsManager {

    private var voiceShortcuts: [INVoiceShortcut] = []

    public init() {
        updateVoiceShortcuts(completion: nil)
    }

    public func voiceShortcut(for order: TestDrive) -> INVoiceShortcut? {
        let voiceShorcut = voiceShortcuts.first { (voiceShortcut) -> Bool in
            guard let intent = voiceShortcut.__shortcut.intent as? TestDriveIntent,
                let testDrive = TestDrive(from: intent) else {
                return false
            }
            return order == testDrive
        }
        return voiceShorcut
    }

    public func updateVoiceShortcuts(completion: (() -> Void)?) {
        INVoiceShortcutCenter.shared.getAllVoiceShortcuts { (voiceShortcutsFromCenter, error) in
        guard let voiceShortcutsFromCenter = voiceShortcutsFromCenter else {
            if let error = error {
                print("Failed to fetch voice shortcuts with error: \(error.localizedDescription)")
            }
            return
        }
            self.voiceShortcuts = voiceShortcutsFromCenter
            if let completion = completion {
                completion()
            }
        }
    }
}
In our CatalogViewController go ahead and declare a private lazy var voiceShortcutManager = VoiceShortcutsManager.init(). Now let’s allow the user set or edit a voice shortcut everytime it clicks on one of our catalog items. This is not an amazing UX but will make it easier for us to play.
In didSelectRowAt go ahead and add the following block:
if let shortcut = voiceShortcutManager.voiceShortcut(for: testDrive) {
    let editVoiceShortcutViewController = INUIEditVoiceShortcutViewController(voiceShortcut: shortcut)
    editVoiceShortcutViewController.delegate = self
    present(editVoiceShortcutViewController, animated: true, completion: nil)
} else if let shortcut = INShortcut(intent: testDrive.intent) {
    let addVoiceShortcutVC = INUIAddVoiceShortcutViewController(shortcut: shortcut)
    addVoiceShortcutVC.delegate = self
    present(addVoiceShortcutVC, animated: true, completion: nil)
}
Here we check if the voiceShortcutManager knows of a shortcut for our intent and allow the user to create or update the shortcut. As well we need to conform to the delegate methods for INUIAddVoiceShortcutViewControllerDelegate and INUIEditVoiceShortcutViewControllerDelegate, by adding the following:
func updateVoiceShortcuts() {
    voiceShortcutManager.updateVoiceShortcuts(completion: nil)
    dismiss(animated: true, completion: nil)
}
// MARK: - INUIAddVoiceShortcutViewControllerDelegate

extension ViewController: INUIAddVoiceShortcutViewControllerDelegate {

    func addVoiceShortcutViewController(_ controller: INUIAddVoiceShortcutViewController,
    didFinishWith voiceShortcut: INVoiceShortcut?,
    error: Error?) {
        if let error = error {
            print("error adding voice shortcut:\(error.localizedDescription)")
            return
        }
        updateVoiceShortcuts()
    }

    func addVoiceShortcutViewControllerDidCancel(_ controller: INUIAddVoiceShortcutViewController) {
        dismiss(animated: true, completion: nil)
    }
}

// MARK: - INUIEditVoiceShortcutViewControllerDelegate

extension ViewController: INUIEditVoiceShortcutViewControllerDelegate {

    func editVoiceShortcutViewController(_ controller: INUIEditVoiceShortcutViewController,
    didUpdate voiceShortcut: INVoiceShortcut?,
    error: Error?) {
        if let error = error {
            print("error adding voice shortcut:\(error.localizedDescription)")
            return
        }
        updateVoiceShortcuts()
    }

    func editVoiceShortcutViewController(_ controller: INUIEditVoiceShortcutViewController,
    didDeleteVoiceShortcutWithIdentifier deletedVoiceShortcutIdentifier: UUID) {
        updateVoiceShortcuts()
    }

    func editVoiceShortcutViewControllerDidCancel(_ controller: INUIEditVoiceShortcutViewController) {
        dismiss(animated: true, completion: nil)
    }
}
Here the updateVoiceShortcuts will trigger a re-sync of the shortcuts in the system and dismiss INUIEditVoiceShortcutViewController or INUIAddVoiceShortcutViewController.
Final notes
You have now made it all the way to the end of this post, by the end of which, hopefully you will have a clear picture of how to implement and handle interaction to Siri Shortcuts.
Don’t forget to download our final project and compare our results. 🙂
Hope to see you next time!
Indlægget Book a test drive with Siri Shortcuts (a Siri Shortcuts intro) blev først udgivet på Nodes UK.

