Websites are built differently and demand different speed and performance optimization tactics.
The best WP Rocket settings for your website depend on your server architecture, hosting environment, resources, other plugins, themes, etc.
Nonetheless, the WP Rocket configuration guide discussed on this page should work for most websites.
Personal blogs, business websites, eCommerce stores, media-heavy sites, etc..these settings should help you improve page speed and website performance and fix several Google Core web vitals issues.
So, if you're here to learn how to speed up WordPress with WP Rocket, you're in for a ride.
WP Rocket Performance Test
Before we investigate the best setting for the WP Rocket plugin, let me make a bold statement.
The WP Rocket cache setting described in this post is the one that works for this site, making it easier to achieve excellent page speed and Core Web Vitals scores both on desktop and mobile Page Speed Insights reports.
Also, this post is not about regurgitating what's on the developer's website.
Far from echoing the plugin setting documentation, I use WP Rocket on this website and have played around with different settings. After many trials and testing, I finally got the best optimization setting for my blog, which should work for you, too.
Here is how fast this website loads for users. You can see the speed index in the PSI test report.
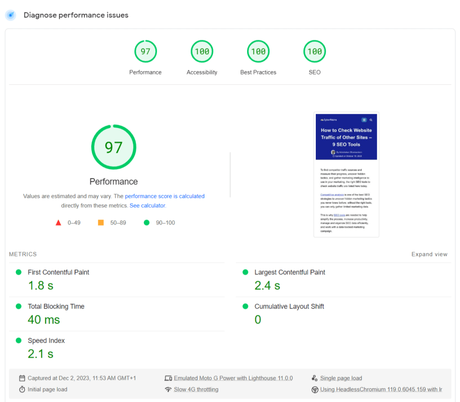
This is how most of my website pages are measured in PSI, GTMetrix, and other website performance testing tools. You can pick a random post/page URL from this website and test yourself.
To achieve such incredible page speed and performance report, you'll need more than just WP Rocket - honestly.
In summary, I took these steps to achieve excellent page speed, good Core web vitals scores, and the optimal website user experience.
- Web hosting - your web host lays the foundation for a fast website. If your web host sucks, no amount of speed optimization will bring significant improvement. I migrated from Namecheap to Cloudways, a step from Shared hosting to a more resourceful and optimized server.
- After migrating to Cloudways, I also minimized the use of plugins to the barest minimum. Too many plugins can also introduce bloats or lead to compatibility issues, which can negatively impact website performance.
- Next, I switched from Astra Pro to Kadence, a more optimized and lightweight WordPress theme. I strongly recommend you go with KadenceWP. Read my KadenceWP Versus Astra Pro to learn why it is a better theme.
- Finally, I installed WP Rocket to improve website speed and complement other optimization efforts.
Now, let's explore the WP Rocket dashboard and the ideal setting for your blog types.
Dashboard
Here, you can access general information about your WP Rocket account and subscription to RockteCDN.
There is a quick fix button to remove the Used CSS cache and reload all cache files. This is helpful if you make changes or update your website, but the changes are not reflected on the front end.
Also, the dashboard contains shortcuts to video tutorials or links to articles on the WP Rocket website. Use the corresponding links to open articles on specific aspects or features of the plugin's settings.
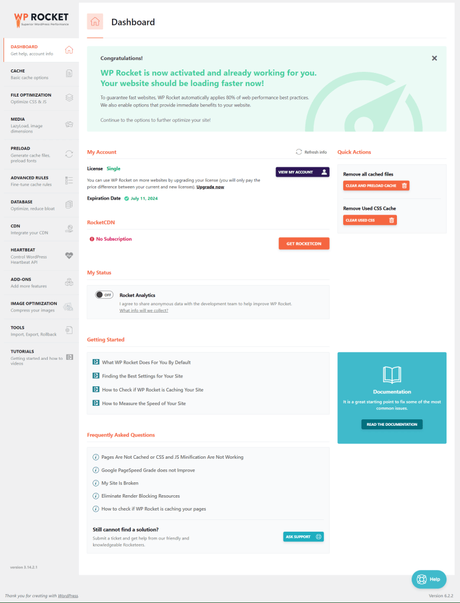
Aside from this information, there's nothing much to do here. I hardly visited the dashboard.
Cache
Caching is the primary function of WP Rocket, which is built-in into the plugin and enabled by default.
However, you may need to turn it off for other options, especially if your web host has its built-in cache mechanism or you find a better plugin.
For example, Cloudways offers its cache plugin - Breeze, which some users prefer. But you don't have to use two cache plugins, which can introduce performance issues and break your website files.
The WP Rocket plugin is sufficient for most WordPress blogs - small, medium, and large businesses. You don't need another option if the WP Rocket cache plugin is working on your blog.
Still, if you must deactivate the WP Rocket cache, you need the helper plugin. More information can be found on the website.
If your web server uses Nginx and Varnish cache, WP Rocket has specific instructions on configuration steps.
Though the plugin works out of the box on the Nginx server and automatically detects the Varnish cache, you will find more information about the rules applied on the page and how it works.
Here are the WP Rocket cache settings you need to review:
- Mobile Cache - (Leave On) Mobile cache should be enabled unless your WordPress theme is not mobile-optimized. And why should you have a website that is not optimized for mobile visitors? If you notice mobile view is being served to desktop users, check the documentation for step-by-step instructions. Alternatively, enable the "separate cache file for mobile devices" option in the plugin setting.
- User Cache - (Leave Off) This option should be turned off for most blogs. However, enabling this option is beneficial if you have content specific for logged-in users, such as forums, membership sites, etc. If you have custom logged/logout pages, you must exclude them from the cache to reduce high CPU usage. You can do this via the Advanced Rules tab. More on that later.
- Cache LifeSpan - The default time is 24 hours. This means that the WP Rocket cache automatically rebuilds after this time. You can reduce the time if you publish multiple times daily; otherwise, leave it as it is. If the caches rebuild frequently, it may drastically increase CPU usage. There is a helper plugin to turn off automatic cache clearing if you want to take control.
File Optimization
WP Rocket recommends enabling minify CSS and JavaScript files for best performance. Also, you should turn on Optimize CSS delivery to eliminate render-blocking resources on the website.
Unless you have a good reason to use separate plugins for file optimization, follow these settings for the best WP Rocket file optimization.
- CSS/JS File Minification - (On) This option should be turned on to remove white space from website codes to reduce file sizes. If you use a file optimization plugin like Autoptimize, you should disable this function in WP Rocket and leave it on in Autoptimize. There may be compatibility issues if you use two plugins having the same function.
- Combine JS files - (Leave Off) WP Rocket automatically turned this setting off. And it is advisable to leave it so. The function combines your site's JS files, 3rd party, and inline JS to reduce HTTP requests. However, if your website uses HTTP/2 or HTTP/3 servers, this setting should be off to avoid unintended connection issues.
- Load JavaScript Deferred - (On) Enabled this setting to eliminate render-blocking resources on the site. It allows the loading of JavaScript resources after the parsing of the page. This will improve load time and user experience.
- Delay JS Execution - (On) This function will delay the execution of 3rd party JS files like Google Analytics until user interaction, like scrolling or mouse clicks, improves website performance and user experience.
Note:
There are options to exclude specific files or resources in each WP Rocket file optimization setting. For example, you can exclude elements/scripts from the Delay JavaScript execution list if you need to load the resources as soon as possible in the user viewport.
In the CSS file minify setting, you can list URLs to exclude from minification. The same goes for the Removed Unused CSS files. Enter the URLs to be excluded from the removed unused CSS list.
If you have JavaScript resources requiring instance visibility or execution on the page, you must exclude them from the minify list. Internal and third-party resources can be excluded here. Wildcard is accepted to exclude all JS files in a URL path.
Another thing is that if removed unused CSS breaks your site or causes design issues, click " Load CSS Asynchronously". This option won't give you the best website performance, and you should test your website with a critical CSS generator tool to ensure everything works as expected.
Finally, the Delay JavaScript execution list eliminates themes, plugins, Analytics, and ad codes from the delay list. If you experience performance issues due to activating the Delay JS execution list, you can exclude the file or resources from being delayed. This will allow immediate user interaction with the resources.
Media
Starting from WP Rocket 3.15, Lazy loading of CSS background images is part of the plugin features. This feature has been long awaited from the plugin.
Note: If you need to exclude specific images from Lazy Loads, such as above-the-fold images, WP Rocket has a simple tutorial on using the code Snippet plugin. This will preload the Largest Contentful Paint images on the page as early as possible.
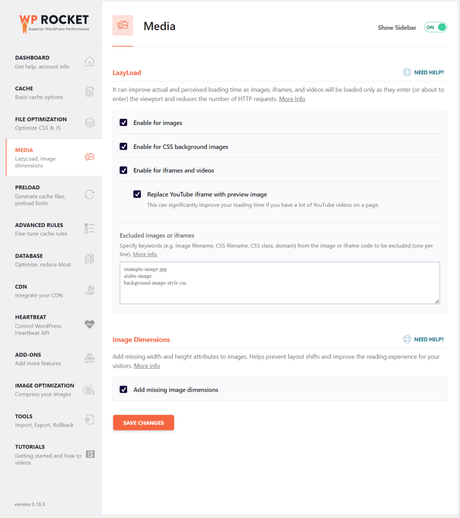
- Enable for Images - (On) - This option should be turned on if you want WP Rocket to Lazy load your website images to improve perceived and actual loading time. Images will only appear in the user viewport when they scroll to the points. This also reduces the number of HTTP requests during the initial loading of the page.
- Enable for CSS Background Images - (On) You should enable this feature to automatically lazy load background CSS images, except for those above the fold. It improves page speed and performance. However, if you experience accessibility issues in PSI after enabling it, contact WP Rocket support for assistance.
- Enable for iFrame and Video - (On) This also provides Lazy load features for iframe and video player. Enabling the page to load more quickly. You should turn it on to allow WP Rocket to act on your website video and iframes.
- Replace YouTube iframe with preview images - (On) This will replace the YouTube video player with an image preview thumbnail. So, the video only plays or loads when the user clicks the play button. It improves the page's loading time and reduces HTTP requests from external URLs. To improve performance and page speed, you should turn this feature on.
- Add missing Image Dimension - (On) WP Rocket will add the missing width and height attributes to the image HTML. It solves layout shift and image elements missing explicit width and height reports in the Google Pagespeed Insights tool. Now, if you view the HTML of your site images, you should see the specific image dimension automatically added.
Note: Enter the images' CSS class, file name, CSS file name, or domain in the space if you want to exclude them/it from Lazy loading by WP Rocket. The option is labelled Exclude images or iframe section.
Preload
WP Rocket preloads your site URLs in the sitemap and reduces CPU usage significantly. This feature allows important posts/pages to be preloaded into the cache, readily available even for first-time visitors.
You can change the crawl interval, preload web font, and disable prefetch domains.
- Activate Preloading - (Leave On) This setting is turned on by default, and it is recommended to leave it as it is. WP Rocket will not wait for a user to visit a page before generating the cached version. It will preload it, making it faster whenever a user visits. If you need to change the crawl interval or want to set up cron jobs to automate crawl limit and time, use the helper plugin described on this page.
- Preload Links - (Leave On) This feature improves the perceived loading time of a page for users. It should be enabled. Preload link fetches a page's HTML in the background when a user hovers or touches a link on the page for 100ms or more. However, it won't improve the PSI score but the perceived user experience. You should leave it on.
- Prefetch DNS Request - You can request the loading of external files/URLs more quickly by entering the domain in the Prefetch DNS request box. You may not need to do anything here. Since most third-party hosted domains on your site are already delayed, using Delay JS execution and WP Rocket pre-connect CDN CNAMES and font gstatic.com automatically, you don't need to use the prefetch DNS request feature.
- Preload Font - Enter the URL of the font file you want to preload as the page renders. For this feature to work, the font must be hosted on your domain or specified in the CDN tab. You don't need to do anything here, as WP Rocket automatically preloads fonts on your site. But if you have a third-party font (not hosted on your server) that you want to load quickly, some plugins or themes host the font locally.
Note:
You will discover fonts to preload in the opportunity section of PageSpeed Insights. Find the font URL that may benefit from preloading, copy and paste it in the WP Rocket text area, and click save.
Warning! Do not preload too many fonts, especially if they are not needed on the page immediately; you may unintentionally cause performance issues.
Also, you can specify URLs (one per line) that are not to be preloaded into the cache. The option is right under the " Activate Preloading " checkbox.
Advanced Rules
For most blogs, you have nothing to do here. Except your situation is unique, and you know what you're doing, leave this tab alone.
WP Rocket is compatible with WooCommerce and other online stores and automatically excludes sensitive pages like login, logout, cart, and checkout from its cache.
Still, here is what each Advanced Rule option means in the best WP Rocket settings tabs.
- Never Cache URL(s) - If you own an eCommerce store and notice WP Rocket does not automatically exclude the shopping cart and other sensitive pages from its cache, enter their URLs here. Membership sites and forums can also use this feature to exclude pages from being cached. WildCards is allowed to enter multiple URLs under a specific path.
- Never Cached Cookies - This applies to websites handling sensitive user identification like cookies, IDs, and tags. You can specify browser cookies to exclude from caching. But you must know the cookies to exclude them. Ask your dev if you are unsure about what cookies are set.
- Never Cache User Agent - If you want to block specific browsers, devices, or applications from accessing cached and optimized pages from your website, enter the corresponding user agent here. The user agent is the crawler, vendor, or browser that sends the request to access the cached or optimized pages.
- Always Purge URL(s) - WP Rocket purges your website homepage, tags, and category pages upon publishing new content. So, technically, you don't need to do anything here. But if you have other pages that need to purge their cache anytime a post is updated, add them here.
- Cache Query String(s) - You may want to cache URLs with query strings or parameters (?anything after this question mark in the URL); in this case, enter the specific URL address in the text field. Note: WP Rocket does not cache these URLs by default, so you must enter their address to generate a cached copy.
Database
I used WP-Optimize for database cleanup, but since WP Rocket 3.15, I have switched.
If you prefer WP-Optimize, which gives more control over the database optimization settings, ensure you don't activate other functions that conflict with WP Rocket.
You will get an error message from WP Rocket for installing WP-Optimize; you can safely ignore and run the database optimization to clean up tables and others.
As a precaution, delete WP-optimize after running the database optimization.

Nonetheless, here are the recommended WP Rocket database cleanup settings.
- Revision - This will delete all post revisions. The downside is that you don't have any revision left for a post in case you want to revert to an earlier version.
- Auto Draft - You can uncheck this box to let WordPress automatically retain a draft copy of your post if you accidentally log out while writing a post.
- Trashed Post - Delete unless you intend to keep trash posts/pages for a purpose.
- Spam Comments - Any comments marked as spam will be deleted automatically on schedule.
- Trash Comments - Same as Spam comments.
- All Transients - You can safely delete all transients from the database. They will be automatically generated if needed by plugins.
- Optimize Tables - WP Rocket automatically optimizes the database tables left by plugins and themes.
- Schedule Automatic Cleanup - Schedule daily, weekly, or monthly automatic database cleanup. This will run all optimization settings on schedule.
CDN
How you set up Cloudflare or other CDN networks with WP Rocket depends on your web host or the content delivery network configuration steps.
If you host with Cloudways, you don't need to configure the settings in the WP Rocket plugin. The connection is automatically configured for compatibility. No need to enter your Cloudflare zone ID or API keys.
However, if you use another web host and are required to configure the CDN within the plugin CDN module, WP Rocket has comprehensive tutorials you can follow.
For more information on using Cloudflare with WP Rocket, you can check this help document.
WP Rocket has its content delivery network powered by BonnyCDN, which provides seamless integration with the plugin. Learn more about RocketCDN and how it can help improve content delivery and user experience.
HeartBeat
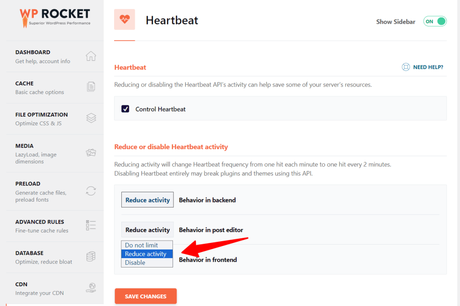
WordPress HeartBeat API provides real-time data connections between your server and browser. Making it possible to receive several notifications within WordPress's backend and frontend.
When you get post schedule notifications, autosave, revision, other users working on a post, etc, these notifications are handled by the WordPress heartbeat API.
It runs several background tasks every 15 -60 seconds, depending on how often; this could lead to high CPU usage on some web hosts.
You can safely reduce the Heartbeat activity for a single-author blog. If you run multiple authors or e-commerce sites, set it to reduce activity.
WP Rocket recommends not disabling the Heartbeat API altogether, as it may break plugins or themes using the Heartbeat API calls.
Add-ons
Here, you can turn on the add-on you use to extend the WP Rocket plugin features and compatibility.
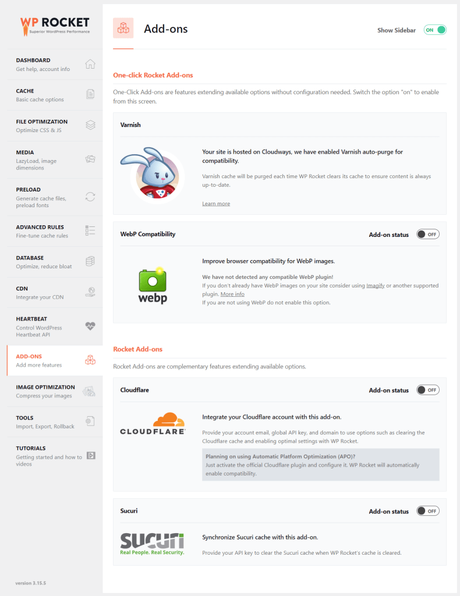
- Varnish - This is automatically turned on if your web host uses a Varnish cache. WP Rocket auto-detects it on your server and clears its cache to synchronize with the Varnish cache. I use Cloudways, so I don't have to do anything to make the compatibility and purging of the Varnish cache.
- WebP Compatibility - This feature is for compatibility issues only; WP Rocket does not create WebP image format. If using any of these WebP image converters, Imagify, ShortPixel, EWWW, or Optimus, WP Rocket auto-detects their presence and provides compatibility on the fly. Check this docs page for more information on WebP image add-on features in WP Rocket.
- Cloudflare - If you have a Cloudflare account to connect with the WP Rocket plugin, you can do so via this add-on. You must enter your Cloudflare API keys, Zone ID, email account, and domain. If you're using Cloudflare APO, you must install the Cloudflare official plugin, and WP Rocket will automatically detect the connection for compatibility.
- Sucuri - You only need this if you're using the Sucuri firewall service. The Sucuri Firewall cache will be cleared each time the WP Rocket cache is cleared to ensure content is always up-to-date and compatible. You'll need to provide your Sucuri API key to make the connection.
Image Optimization
WP Rocket does not provide image optimization features within its plugin. Instead, you need another service to optimize your website images.
Imagify is the recommended plugin by WP Rocket, their image optimization plugin; that's why you'd see it in the settings.
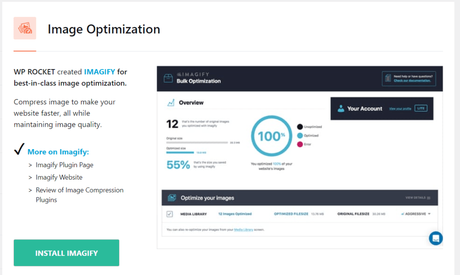
You can upload your images to the Imagify online service and optimize, resize, and download them anywhere. Or you can use the plugin directly within WordPress, and it continuously optimizes your images.
Imagify creates WebP format of your site's images and compresses images in bulk, but it currently does not support AVIF image file format.
Though Imagify uses its server to optimize your images and then return the optimized version to your server, freeing your server of the workload, it does not server images or use a CDN.
You can use Cloudflare Polish and Mirage, better image optimization services than Imagify.
Cloudflare Polish reduces your site image size through Lossless or Lossy compression to improve image loading time. It also converts images to WebP versions for supported browsers.
While Polish only works on images hosted by your sites, Cloudflare Mirage acts upon any image found on your site. Mirage automatically optimizes images based on the client's browser type and device. This can significantly improve user experience on mobile devices.
Cloudways users benefit from Cloudflare Polish and Mirage since both services are integrated with Cloudways hosting. You do not need to worry about image optimization using Cloudways as your web host and subscribe to its Cloudflare Enterprise add-on for $4.99 monthly per domain.
Tools
Unless you're an advanced user and know exactly what you're doing here, most users have no business looking into this section.
But, for this tutorial on the best WP Rocket setting for Core Web Vitals, let me explain what each setting or feature does.
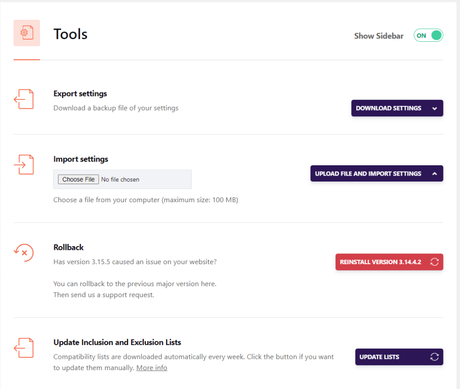
- Export Setting - WP Rocket allows you to download a backup of the plugin setting anytime on other sites.
- Import Setting - Upload the best WP Rocket plugin setting from another website.
- Rollback - If you notice performance issues with your sites after updating to the current WP Rocket plugin version, you can roll back to the previous version to resolve the issue.
- Update Inclusion and Exclusion Lists - This feature automatically downloads the exclusion and inclusion list for WP Rocket plugin compatibility with your site theme and other resources. Do not tamper with this feature unless you know what you're doing.
Tutorials
Lastly, the tutorial section lists helpful video instructions or explainers teaching you how to make the best of your WP Rocket plugin.
These video tutorials contain helpful information on improving essential website performance metrics such as LCP, CLS, and FID. It also contains a video on detecting if WP Rocket works on your site and other troubleshooting guides.
There is nothing to set up or configure here; it is all about learning about the plugin's functionality and features.
Try Cloudways + WP Rocket + Kadence Theme.
Achieving a faster website goes beyond one aspect of optimization; you need a combination of a high-quality hosting server stack, a powerful cache + CDN, and a lightweight, optimized theme.
Getting these right means users will experience an optimized website with fast page loading, and your web page may benefit from increased search engine visibility.
I have tried a few web hosts; the Cloudways + Cloudflare Enterprises add-on delivers incredible speed and an excellent time to first bytes (TTFB). Your web host is primarily responsible for time to first byte.
If it takes ages for your web server to respond to requests, no amount of optimization efforts will make a difference. You must upgrade to a more resourceful and highly optimized server to experience faster website pages.
Subscribing to Cloudways also gives you access to benefits from the Cloudways Enterprise add-on solution, which comes with several advanced features like
- Polish - Automatically reduce image file size through lossless or lossy compression.
- Mirage - Optimizes and provides lazy loads for every image file on your website. Improving image performance on mobile devices.
- Edge Page Caching - Cloudflare will cache your site's dynamic content and serve the entire website from its global network of servers, improving TTFB and
- Image optimization
- Early Hints - Cloudflare Edge will send 103 early hints response codes to browsers to preload links before 200 ok status. This improves response time and enables faster page rendering.
- Minification - Removes white space, unnecessary comments from HTML/JS, and CSS codes on the fly. Automatically reading file size without affecting functionality.
- Caching - Cloudflare will cache static content, such as images, CSS, and JS files, inside its global content delivery network (CDN) servers.
- ScrapeShield - Prevent bots and spammers from harvesting the email address displayed on your website.
You get 20% Off your first month's invoice with the code " CYBERNAI20" during registration. After that, I advise you to get the WP Rocket plugin and the Kadence themes.
No brainer; you already know much about the best WP Rocket setting, so you can follow through once you buy the plugin. Per Kadence's theme, I strongly recommend it if you care more about theme performance than bells and whistles.
Another WordPress theme to consider is Astra Pro. Astra Pro and Kadence are lightweight and fast-loading and will support your optimization efforts.
However, the last time I compared both themes - Astra and Kadence - on this blog, Kadence was more optimized to help you pass Core Web Vitals, especially Cumulative Layout Shift.
Conclusion - Best WP Rocket Settings
If you follow the WP Rocket configuration described in this post and your website is hosted on high-performance server infrastructure, you should see significant improvements in page speed.
Also, your website Core Web Vitals cores should improve drastically across mobile and desktop.
However, if you still want to test other WP Rocket alternatives, NitroPack is an excellent option. Check my post, where I compared both plugins and weighed their pros and cons.
If you have any concerns or questions about the best WP Rocket setting for your blog, don't hesitate to reach out via the comment box.
