An embroidered box in German Brick Stitch | #LRCrafts - DIY Passion: if you can think it, you can make it
Over time, German Brick Stitch has become an embroidery technique I list among my favourites. I like to count threads to follow the geometric pattern: it’s predictable, relaxing, and also convenient while travelling, since you need to carry with you just a bunch of colors. I can’t believe I almost dropped my first German Brick Stitch project!
After completing a Medieval purse and a needle roll, I felt this had become a language I was comfortable speaking, one that I wanted to explore further, beyond flat textiles and familiar shapes.
What I wanted was a new project I could carry with me on vacation, and one day I stumbled upon a box made by a Medieval reenactor. That was exactly the idea I’ve been looking for! The perfect excuse for this embroidery stitch: a functional and decorative piece I could show off during Medieval reenactments, a great conversation-starter! I could already see my embroidered box on display at living history events, my historical sewing tools inside…
Now I want to take you through the process behind this making: my choices, the challenges I encountered and how I managed to overcome them.
Embroidery and sewing
Click for the finished project detailed photos
The pattern sources

Embroidered Hanging, late 14th century, with detail of the chosen pattern for the embroidered box. From the Met Cloisters. Object number 69.106

Embroidered Hanging, late 14th century, detail of the chosen pattern for the embroidered box. From the Met Cloisters. Object number 69.106
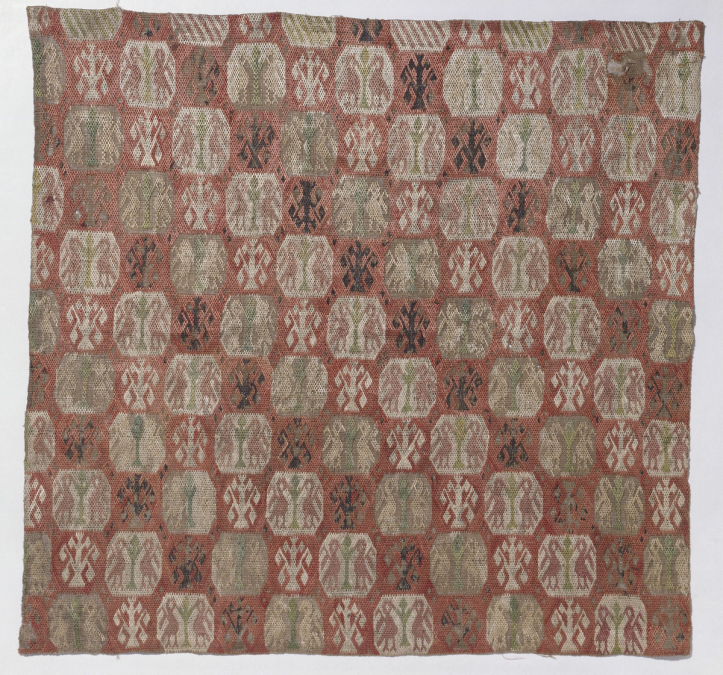
Hand embroidery with silk thread and bast fiber thread on plain weave linen fabric. National Museum of Art, Architecture and Design, Oslo, Norway. Object number: OK-04910
First of all, the pattern choices. As for my previous projects, I wanted my geometric designs to be inspired by extant finds.
For the side of the box, I chose a pattern designed by fellow reenactor Alanna, drawn from a large embroidered hanging now preserved at the Metropolitan Museum of Art and dating to the late 14th century. It is a piece I particularly love, and one I plan to return to as a reference for future projects.
The pattern for the lid came instead from Wymarc, based on an early 15th-century embroidered fragment now held at the National Museum of Art, Architecture and Design in Oslo. As with my previous German Brick Stitch projects, Wymarc.com is my primary reference for German brick stitch patterns, I warmly recommend it to anyone interested in this technique.
Unlike my previous work, this design includes figurative elements. Although highly stylised, it marked my first attempt at working figurative motifs in German Brick Stitch.
Choosing the box
I couldn’t begin the embroidery without first choosing the box. The size of the container would determine the size of the embroidery, and not the other way around. From the start, I was hoping to find a round wooden box, similar to those depicted in Medieval frescoes. As it turns out, that was not easy to find or to make one before our family vacation.
That’s when my husband came up with a clever and practical solution. While rummaging around in the garage, he found a perfectly sized metal tin that had once held paint. Not the most historically accurate base, of course, but I knew I would be covering it completely with fabric anyway.
He cut it in half, since it was a bit tall, carefully sanded the surface to remove any roughness and then wrapped the box in a thin layer of soft foam. This extra layer would protect the embroidery from wear and provide a slightly cushioned surface for the fabric to sit on. With the box prepared and ready, I finally had the measurements I needed, and I was ready to begin the embroidery.

The metal tin we chose to become our embroidered box

Adapting the size of the box we chose for our embroidery

Upholstering the metal tin to protect the fabric

Upholstering the metal tin to protect the fabric

Upholstering the metal tin to protect the fabric

Upholstering the metal tin to protect the fabric
The embroiderying process
The side of the box

Preparing my embroidery fabric to stay for long on its frame
I started my long embroidery journey from the box side. I first needed to prepare the fabric and the working setup. I used the same custom embroidery frame my husband had made for me the previous summer, out of a wooden ruler, when I needed a frame and had none at hand. It turned out to be perfect for this project as well.
I cut a strip of fabric whose height fit inside the frame, which conveniently corresponded to the height I needed to cover the box and have room to spare. To prevent fraying, I reinforced the edges by sewing a strong white fabric all around it. This added fabric would also serve to dress the frame and make mounting the embroidery more secure.
I then stitched the top and bottom edges of my embroidery fabric to the frame to hold it firmly in place. The strip was intentionally longer than the frame, to cover the box side in one lenght, so I rolled the excess fabric around the two sides. My plan was to embroider one section at a time: stitch the first area, then unmount the fabric, unroll it, remount it on the frame, and continue with the next section.
By repeating this process three times, I could embroider the entire length needed to wrap around the box, while always working on a manageable and well-tensioned area.
With the frame mounted, I was finally ready to begin the embroidery itself. When it came to colour choices, I stayed close to the original sources. I selected red and green as the main colours, with a very light yellow (almost a cream) used for the smaller details.
As expected, embroidering the sides of the box was a long process. It accompanied me from our August vacation all the way through to the end of January. And that is exactly what I love about projects like this: they stay with you for a long time, quietly growing stitch by stitch.
My embroidery frame became a faithful companion during every spare moment. I took it with me to the beach, on my daily commute to work, during lunch breaks, at the airport, and even while mountain hiking or attending reenactment festivals. Of course, I stitched at home as well. Wherever I had a bit of time, the embroidery was there with me, steadily taking shape.


The lid

Coloring the printed design guide as a reference
When the side of the box was finished, I set it aside, without removing the white protection fabric, and I moved on to embroidering the lid. For this part, I chose this pattern I mentioned earlier with a repeatable design: alternating stylised figures of a tree of life and a pair of birds flanking a tree.
Rather than embroidering the full repeat, I decided to focus on a single unit composed of four figures. I placed the bird-and-tree motif in the top left and bottom right corners, a green tree of life in the top right corner, and the same tree rendered in white in the bottom left corner. This limited arrangement allowed the pattern to breathe and suited the smaller surface of the lid.
My color choices were inspired by the original source, but slightly adapted to match with the rest of the box. In the original embroidery, the birds are red, while I chose to embroider them in green, and to render their tree in yellow instead of green. I also used green for one of the trees of life, as the original color appeared too dark for my overall palette. The remaining background of the lid was embroidered entirely in red, in keeping with the original piece.
This was my first attempt at a figurative design in German Brick Stitch, and working with such stylised forms was deeply satisfying. At the same time, it required extra care: with such symmetrical figures, even a small counting mistake becomes immediately visible.
To help me stay on track, I printed the Wymarc pattern in black and white and colored it by hand using my chosen palette, adding a legend with the number codes of my threads. This was super handy especially at the beginning, when I was still getting acquainted with the design. I followed the counted pattern color by color, and quickly gained confidence. After an initial phase of trial and error, with stitches made, removed, and re-done, I was able to work faster and rely less and less on the printed guide.


Assembling the box

Ready to assemble my German Brick Stitch embroidered box

Lining the lid of my my German Brick Stitch embroidered box

Lining the lid of my my German Brick Stitch embroidered box

Lining the lid of my my German Brick Stitch embroidered box

Lining the lid of my my German Brick Stitch embroidered box

Lining the lid of my my German Brick Stitch embroidered box

Lining the lid of my my German Brick Stitch embroidered box
With all the embroidery finally finished, it was time to move on to assembling the box. I gathered all the materials needed for mounting and construction, and my husband suggested to add a layer of soft foam to the lid as well, to protect the embroidery and give it a slightly padded feel.
It’s indeed from the lid that I began. I cut a round piece of yellow fabric to line the inside of the lid, almost double size, and sewed it all around tightly. I then placed the embroidered fabric on top of it and carefully aligned the design in the center. I folded the non-embroidered fabric inside and sewed the two layers together with an invisible ladder stitch.
Even though I took care to make the stitches invisible, I planned to cover up the joining of the two fabrics. As I did for joining the two sides of my embroidered needle roll, I made a yellow cotton cord using my lucet, then sewed it all around the lid.
For mounting the embroidered side of the box, I decided to keep the protective fabric in place for as long as possible. I feared the embroidery was still vulnerable at this stage, and I wanted to avoid fraying until everything was safely enclosed.
I began by cutting a strip of yellow fabric for the lining of the inside wall of the box. I hand-sewed it along the top edge of the embroidered fabric using a backstitch, which gave me the best control over stitch placement. Once joined, I stitched together the short sides of the embroidered fabric, forming a sort of fabric “sock” that could be slipped over the box.
At this point, I carefully removed the protective fabric from the top edge of the embroidery. The previously exposed ends would now sit safely inside the box, protected by the yellow lining. With the protection fabric gone, I measured the inside circumference of the box so I could close the short side of the yellow lining fabric as well. At the same time, I measured the final height of the lining, from the top rim of the box to the bottom.


Lining the inside of my my German Brick Stitch embroidered box

Lining the inside of my my German Brick Stitch embroidered box

20251031_133922

Lining the inside of my my German Brick Stitch embroidered box

Lining the inside of my my German Brick Stitch embroidered box

Lining the inside of my my German Brick Stitch embroidered box
The most challenging part came next: closing the bottom of the lining by adding a circular piece of yellow fabric. I measured carefully and stitched it in place by hand with a backstitch, but the first attempt was slightly uneven. I had to unpick and redo this step twice before achieving a satisfactory result.
Many of the embroidered brick stitch boxes I had read about were mounted on wooden boxes with removable bottoms, which makes fitting the embroidery considerably easier. I didn’t have such a box, and I also felt that a box made of separate pieces might be more delicate in use, so I accepted that my solution would require more effort.
When reworking the lining, I also modified the way I constructed the inner side wall lining. Instead of using a single long strip of fabric, I cut it into two pieces. I realised that the foam padding inside the box made the interior narrower than the exterior, and that it tapered slightly towards the bottom. To accommodate this shape, I gradually reduced the width of the lining on two opposite sides as I sewed, avoiding unsightly wrinkles in the yellow fabric.
With this adjustment, the second attempt was successful. I finally had a sock-like lining that could be slipped neatly onto the box, ready for the last stage of assembly: finishing the exterior bottom.
For closing the bottom, I proceeded much as I had for the lid. First, I removed the last remaining piece of protective fabric from the embroidery. I then measured and cut a circular piece of yellow fabric, slipped the assembled “sock” onto my box and hand-sewed it to the bottom edge of the embroidery using a backstitch.
This time, I re-checked my measurements as I went, bit by bit, to make sure I wouldn’t have to redo the stitching yet again. Since the embroidered “sock” was already mounted on the box, sewing the bottom was slightly uncomfortable, but ultimately far less challenging than I had anticipated.
And with that final seam in place, the box was complete.


What's next?
This was my third project embroidered in German Brick Stitch, and it took far less time than the previous ones (less than six months), even though it was the most challenging so far because of the assembly process. The lining inside the box is not perfectly fitted, but in the end that doesn’t trouble me too much.
The box is now part of my Medieval sewing kit. It holds my wooden thread spools and sits alongside the needle roll and the small embroidered bag that contains my other sewing tools. Together, they form a kit that I use and also enjoy displaying during reenactment events: a perfect conversation starter!
Would you like to see my complete Medieval sewing kit assembled? Leave a comment below and let me know what you’d like me to share. And if you have your own Medieval embroidery, sewing tools or historically inspired projects, feel free to tell me about them: let’s inspire the historical crafting community together.
by Rici86.