If you are that kind that loves simple design that also has style, you will know by now that mobilepress is the best mobile theme to run to give your mobile users more exciting experience. But first, why did I say “best” mobile theme? The simple reasons why I said that is because; it is 100% free, it is trusted and safe to use, it is highly customizable (compare to other mobile themes) and you can also integrate mobile adsense or any other ad code easily without stress or strong knowledge of coding.

Must Read: How To Transfer Your Blogger Blog From One Account To The Other
If you are using a responsive theme and you love how your theme looks on mobile, then you shouldn’t bother using the mobilepress theme. But if you want more freedom and control over your blog’s mobile view and you also want your blog to look neat on java phones, sybian phones, and opera-mini, then you should consider a mobile theme because to be honest with you, responsive themes don’t look good on those mentioned platforms (true fact). But hey! You do not need to be bothered about that, right?
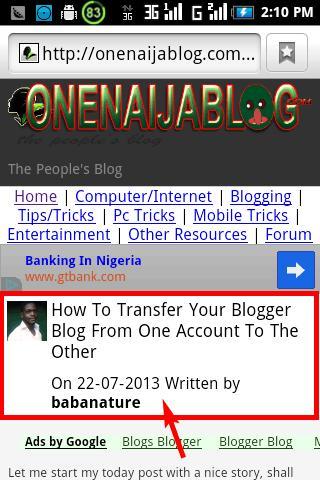
Adding Post Title, Written By and Author’s Gravatar In post Of Mobilepress
A friend who I’ve known for a long time now, asked me how I enable the written by and author gravatar above my posts. Instead of given him a brief answer, I decided to make the answer my today’s post. I do know that aside him, many other bloggers who uses mobilepress would also love to know how i enabled this feature on my blog, right? So friends, the answer is very easy and in a few, I am going to show you the simple steps of achieving this.

Note: I am going to do this tutorial in two steps – on the first step, I will give out the tutorial for those bloggers who knows how to play with codes (the techie kinds) and on the second step, I will give out the script for those who do not know how to edit their codes.
Step One:
Must Read: My Greatest Traffic Tip And Strategy Ever
By following this tutorial, we are assuming that you have already downloaded the mobilepress and have activated it, right?
Now go to your c-panel (where your wordpress folder is) >>> Click “wp-content”>>> plugins>>> mobilepress>>> system>>> theme>>> default/
Are you there now? If you’re there, you will see all the php files that makes up the mobilepress. Now locate and click the “single.php” file to edit it with your cpanel editor, or you can extract the file to to a folder and edit it with your Dreamweaver editor.
Remember: Before thinking of editing any file in your c-panel or blog admin panel, always do a backup, so when you make a mistake, you can always revert back to normal.
Now let’s continue with the show, shall we?
Now locate the codes below.
<div id="title">

<h2><?php the_title(); ?></h2>

</div>
Have you seen it? Now replace the above code with the below code
<div class = " onestyle " >

<h2><strong><?php the_title(); ?></strong></h2>

<?php if ( function_exists( 'rdfa_breadcrumb' ) ) {

rdfa_breadcrumb();

} ?>

</div>
Have you done that, now let’s proceed to the second procedure. Here is the part where we call out the “authors’ gravatar” and our “written by”- just like the image above.

Now simply search for the below codes
<?php endif; ?>
Have you seen it? If No, here is a hint: The <?php endif; ?> tag is seen 6 times, but we are going to paste the below code below the second tag. Hope you understand
Now, right below the above code, paste the below codes.
 <br/>

<div class = " onestyle ">

<h2><strong>Author: <?php the_author_meta( 'display_name' ); ?></strong></h2>

<div style="float: left; padding: 5px;">

<?php echo get_avatar( get_the_author_meta('ID'), 48 ); ?>

</div>

<?php the_author_description(); ?>

</div>

<br/>
Have you done that? If yes, save you work and you are perfectly done with your edit. Now tell me how cool can it get

Step Two:
Must Read: How To Win As A Blogger
Ahhh… for those who do not know how to play with code, I have not forgotten about you. You can still make yours possible as well by following the simple steps below.
First off, download the single.php script here. (The “single.php” file is in a zip format so you should unzip before proceeding)
Now go to your c-panel (where your wordpress folder is) >>> Click “wp-content”>>> plugins>>> mobilepress>>> system>>> theme>>> default/
Are you there? If you are there now, download the above zip file and unzip it.
Now click upload in your cpanel and also make sure you thick the “Overwrite existing files” box, so it can upload successfully.
Now click the “Upload” button and you’re done. Go look you mobile view now and see the difference you’ve made

Now do tell me how nicer can this get?
Finalizing:
It looks like I have said so much about so much

Do you have questions regarding your blogs mobile view or any other mobilepress question? Do you have thoughts you’d love to share with us? Do you just want to make that a comment? Then please do by using the comment box below and we will surely get back to you ASAP.
Must Read: Adding Google Adsense Smartly To Improve Your Earning: for Blogger Blog
Can this post be helpful to others? Then do click the like box, share us and recommend us to friends because you will never know who among your friends might be in need of a lovely post like this. And do not forget to subscribe to our feed (if you have not done so) and be the first to get our bloging tips (as soon as it comes out) straight to your e-mail
Don't Miss Any Post Again. Subscribe To Our Feed And Be Updated
Enter your email address below:
Powered by OnenaijaBlog

