The Domoticz home automation software contains, among many other nice features, complete support for a home security system. Any security system consists of five main component types:
- Sensors to detect intrusion
- Cameras to record the unwanted events
- Sirens to sound the alarm
- Arming/disarming devices (such as keypads, RFID tags, etc.)
- A main unit to coordinate all the other components
Domoticz comes more or less equipped with the latter three. The software itself acts as the main unit, which communicates with the sensors, sirens, etc. It handles all the events and dispatches the necessary messages accordingly.
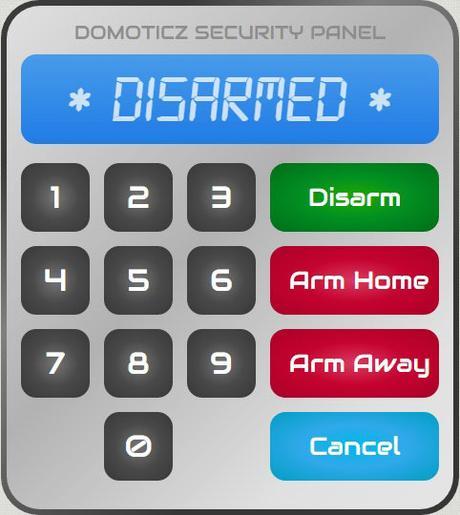
For arming and disarming the security system, it offers a software keypad, which can be accessed from Setup -> More Options -> Security Panel:

In this panel the user can trigger the home arming, away arming and disarming procedure by entering the security code which was previously set in Setup -> Settings -> System (in the Security Panel section). The delay of the arming (the beeping time frame) can also be changed in the same section of the settings.
A shortcut for accessing the security panel is the security device:

Perhaps the most important component of the security system is the one which notifies the owner (and/or the police, security company) about breaches. In a conventional setup there is usually a siren meant to alert those who are nearby and most systems are also connected to a phone line which is used to call the police, security company and the owner. Wireless sirens can be connected to Domoticz. Getting notified about alarms is also easy. All that needs to be done is to set up an event, which sends an SMS, email or other type of notification when the status of the Security Panel device is armed and when a sensor signals intrusion.
Events can be created in Setup -> More Options -> Events quite easily using the Blockly visual programming component, which makes simple programming accessible to everybody. All you have to do is drag some puzzle-like pieces together to form an “if-this-than-that” type of rule. Here is an example of an event which tells Domoticz to send an email to the owner and to the police if the kitchen motion sensor is triggered while the security status is “Armed Away”:

It is equally simple to send other types of notifications (like SMS, etc) instead of emails, but for that you will have to set up an appropriate notification service and use it in Domoticz. SMS sending services are usually not free, but cheap enough, so if you’re considering building a security system based on Domoticz, you should probably consider investing into one. The various notifications can be configured in Setup -> Settings -> Notifications.
A nice (but optional) touch to a home security system is adding a camera to see what’s going on in the building and also to record unwanted events. With Domoticz this is as easy as connecting a cheap webcam (or some more expensive Full HD camera) to a USB port of the computer on which Domoticz is installed. Of course, wireless cameras may also be used. Configuring the cameras can be done in Setup -> More options -> Cameras. There you can also view the stream from each camera.
Finally we arrive to the one type of essential component in each security system which Domoticz doesn’t and cannot supply by default: sensors which detect intrusion. These can be many types of devices, such as:
- motion sensors
- door/window sensors
- glass breaking sensors
- etc
In the simplest of configurations we will check how Domoticz works with a wireless motion sensor.
The Fibaro motion (multi) sensor

One of the nicest motion sensors that I ever had the pleasure to come across is the Fibaro motion (multi) sensor. It is a Z-Wave device, which works well with Domoticz. To learn how to build a cost effective Z-Wave server based on a Raspberry Pi and Domoticz, read this article.
The Fibaro motion sensor is actually a device which incorporates four different sensors:
- a motion sensor
- a light intensity sensor
- a temperature sensor
- a tampering sensor (accelerometer)
This combination makes is much more powerful than a regular movement detector. Of course it’s primary role is to work as a motion sensor, but the other three sensors complement this function nicely. For example the tampering sensor can trigger the alarm even if the intruder manages to somehow avoid the motion sensor’s line of sight and attempts to disable it. When the sensor is touched and slightly moved, the tampering sensor is activated and the alarm is triggered. The light intensity sensor can be used to automatically detect day/night and activate the security system as necessary. It also helps to know if there is enough light in the room, making it possible to automate turning the lights on and off based on movement. The temperature sensor is simply a convenient thing because if you install a device in a room anyway (for motion sensing purposes), it’s great that it can report the temperature too and you don’t need to install a separate sensor for that. Because of this the Fibaro motion sensor can also be used in automated home heating systems.
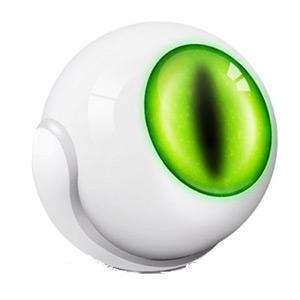
So this sensor is very functional. But it is also extremely nice looking. To be honest, I haven’t found one that is more elegant. It kid of looks like a cat’s eye (nice touch!) which lights up in different colors when motion is sensed. It can be configured to always glow in a given color, but the nicest way to set it up is to change its color based on the measured temperature. That way whenever you move in your room, you can just look at the sensor and know the approximate temperature based on the color it glows in. Very nice!
The sensor is also very discreet, almost completely white and very small. Works with a CR123A battery, which is expected to last for about 2 years under average operating conditions. Comes with two wall mounting options: a screw and a small but very strong transparent double sided sticky dot. Either way, the mounting point is out of sight.
The line of sight and range is pretty good, one sensor can more or less cover an entire large room. The motion detection works well, it is configurable and it can automatically filter out pets. However it can easily be fooled by moving hot air, so it’s not a good idea to install it directly above a heat source.
A detailed manual of the device can be found here.
Using the Fibaro motion (multi) sensor with Domoticz

Since this motion sensor is a Z-Wave device, before you can use it with Domoticz, you first have to configure Domoticz to interact with a Z-Wave controller. Details about a cost effective and yet very functional option for this can be found here. In the very same article it is explained how to add new Z-Wave devices to the Z-Wave network. Follow those steps to include the Fibaro motion sensor into the Z-Wave network. When the controller is in learning mode, you will have to press the button located inside the sensor (you’ll have to open it by unscrewing the two half spheres) three times quickly. Domoticz should display a notification stating that a new device has been added.
After the sensor has been included into the Z-Wave network, it will show up in the list of unused devices in Domoticz (Setup – > Devices -> Not Used) as several devices. The motion sensor and tampering sensor will appear as switches, the temperature sensor will appear as a thermometer and the light intensity sensor will be a light sensor. To exact types and sub types are as follows:
- Motion sensor: Lighting 2, ZWave
- Tampering sensor: Lighting 2, ZWave
- Temperature sensor: Temp, TFA 30.3133
- Light sensor: Lux, Lux
Activate the devices in Domoticz by clicking the green arrow icons next to them in their corresponding rows. After that you will be able to find the motion and tampering sensor in the “Switches” section, the temperature sensor in the “Temperature” section and the light senor in the “Utility” group.


You may add them to your Dashboard by clicking the star icon on each of these devices.
Note that the motion and tampering switches are “read-only” switches, meaning that their state cannot be changed by the user, they simply reflect the physical state of the respective sensors (whether the motion alarm or tampering alarm has been triggered or not). Also note that the Fibaro motion sensor does not seem to be 100% compatible with the Raspberry Pi + Razberry + Domoticz Z-Wave server combination, in the sense that the tampering sensor is shown as always on, making it pretty much useless. But the other three sensors (motion, light and temperature) work just fine.
In case you wish to fine tune the Z-Wave parameters of the Fibaro motion sensor, this can be done in Domoticz by going to Setup -> Hardware, selecting the Razberry Z-Wave controller from the hardware list and clicking the “Setup” button next to it. A list will come up with the associated Z-Wave devices (which are included in the network) and there you may select the desired Fibaro motion sensor. Doing so will display its Z-Wave parameters below it. the values of the parameters can be acquired and saved using the “Request current stored values from device” and “Apply configuration for this device” buttons. Since these are battery operated devices, they are configured to wake up rarely (once in every one or two hours) in order to prolong battery life. The settings will only be acquired and saved during such a wake up, so don’t expect them to show up and take effect immediately.


