Most days are spent frantically watching ones waistline. Not to mention being caught in the everyday whirlwind of work & chores, so it comes as no surprise that lovely afternoon tea cakes are a bit of a vanished species.
But fortunately, not altogether!
Because nothing makes a cheat-day special than a real, proper home-made sponge cake. It's just the thing for a sunny weekend or a summer afternoon tea.
In fact it is the very reason I long awaited the arrival of my Kitchen Aid stand mixer. And when it did arrive, I got right down to making a sponge cake. But you see, a perfect sponge cake can be rather elusive and it's taken several trial and errors perfecting a recipe. If there's one thing I'm learning is that a sponge cake is small on ingredient list and big on technique. But by jove, we've got it!
As it were, I am not at all surprised that my final salvation was found at the hands of Delia Smith. If it weren't for her, Keith Floyd and Mary Berry - all pillars in the British culinary world, I would have been forever lost during my formative years, pottering around in the kitchen.
This wonderful Victoria sponge cake, was named after Queen Victoria, who favoured a slice of the sponge cake with her afternoon tea. A typical Victoria sponge consists of raspberryjam and whipped cream.
Here, fresh whipped cream and sun ripened strawberries sandwiched between feather light sponges makes one delicious teatime treat. Flavor per calorie count? Off the charts, my dearies!
Good to know~
- Size of the cake pans DO matter here. This cake is designed for 2 qty 9" round cake pans.
- Measure all ingredients using a kitchen scale and be precise. All quantities are by weight not volume
Preheat the oven to 375 deg F
Gather the ingredients:

Cake - (Butter, sugar & flour in equal quantities by weight) 12 oz unsalted softened butter, 12 oz all-purpose flour, 12 oz sugar, 3 large eggs & 1-1/2 tsp baking powder
To finish: 20 ripe, fresh strawberries, 1-1/2 cups heavy whipping cream, 2 oz cream cheese (optional), 2 tbs lemon curd, 4 tbs icing or confectioners sugar & more for dusting on top of cake.
Line 2 qty 9" cake pans with parchment paper. Use some non-stick baking spray to adhere the sheets to the bottom of the pans.

- In a medium-sized mixing bowl or electric stand mixer, cream the butter and sugar together until you get a pale, fluffy mixture that drops off the spoon easily.
- Then in a separate jug beat the eggs thoroughly with a whisk.
- Add the eggs 2 tbs at a time into the creamed butter & sugar mixture, thoroughly combining before adding the next bit.
- Why not dump the whole lot of eggs in?
- Adding the eggs in a little at a time won't allow the mixture to curdle. And the reason this is important in a sponge cake is because some of the hidden air that by now has been beaten into the mixture will escape if the mixture 'breaks' and as air is what makes a cake light, curdling will make the cake heavier.
- When the eggs have been incorporated, keep a metal tablespoon or a rubber spatula handy.

- Have the measured flour & baking powder in a sieve resting on a plate, then lift the sieve high above the bowl and sift about a quarter of it on to the mixture - then replace the sieve on the plate and lightly and gently fold the flour into the mixture (if you beat the flour in, you'll lose some of the precious air).
- Then repeat this until all the flour is incorporated: lifting the sieve up high above the bowl will ensure the flour gets a good airing before it reaches the mixture.
- Now the flour has been added you should have a mixture that will drop off the spoon easily when you tap it on the side of the bowl. If not, add some hot water, 1-2 tsp as needed.
- Now divide the mixture equally between the cake pans. You don't need to weigh the cake mixtures because as long as one is fractionally larger than the other, it shouldn't matter.
- Place them on the center shelf of the oven, and they'll take about 25-30 minutes to cook.
- Good to know: Under no circumstances open the oven door and steal a peek or that'll be the end of your sponge cakes for they simply won't rise once you let the cold outside air into the oven.
- When they are cooked, the centres will feel springy when lightly touched with a little fingertip and no imprint remain.
- Remove the cakes from then oven and allow to cool for a few minutes. Then turn them out on to a wire cooling tray, loosening them around the edges with a palette knife first. Then carefully peel off the parchment papers and leave the cakes to cool completely.
- Good to know: Once the cakes have been allowed to cool for a few hours, they can be stored in airtight cake tins till needed for up to 2-3 days on the counter top. They can also be wrapped in wax papers and a zip-loc bag and stored on the counter top. They should not be refrigerated. Once the cakes have been assembled with cream and filling, they need to be refrigerated immediately and consumed in a day or two.
Filling:

- Strawberries: Wash and pat dry. Cut away the tops and slice lengthwise into slices. Place in a mixing bowl. Sprinkle with 2 tbs icing or confectioners sugar. Slowly stir with spoon and set aside till ready to use.
- Cream filling: In a food processor, whip the cream (the cream must be cold and straight out of the refrigerator) & sugar for a few minutes till soft peaks are formed. Add the cream cheese and lemon curd (if using) and whip to stiff peaks.
- Place both baked cakes on a clean work surface or cutting boards. Using a clean bread knife, choose the cake with the smallest dome and slice a little of the top off to give it a flat top.
- Invert the cake on the final platter or cake plate or cake stand so the cut side is down and bottom is facing up.
- Smear all but 2 tbs of cream in a thick layer of cream especially going right up to the edges.
- Arrange the strawberry slices, pointed ends facing in along the entire surface of the cake. I used 2 layers of strawberries.
- Turn the second cake upside down and smear the final 2 tbs of the cream on the bottom of the cake to give it a thing veneer of cream. This will act as a glue as it sits on top of the strawberries.
- Place the cake over the strawberries sandwiching the cakes together with cream and strawberries. Make sure the cakes are aligned one on top of the other and gently press down.
- Place some icing or confectioners sugar in a sieve and sprinkle some sugar all over the surface of the cake. Refrigerate till ready to use and enjoy with a wonderful pot of tea or coffee.
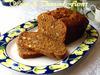
 A Good & Proper Victoria Sponge Cake
Fluffy soft sponge cake, fresh strawberries, a heavenly fresh whipped cream, all with a hint of sweetness and not cloyingly so is the best accompaniment to a lovely sunny afternoon this summer.
Such a staple recipe, it will be your 'go-to' just as it is mine with countless possibilities with fillings and flavors.
Recipe for
A Good and Proper Victoria Sponge Cake for this warm weather
Preparation time - 30 minutes
Baking time: 30 minutes
Shopping list
Cake - (Butter, sugar & flour in equal quantities by weight)
12 oz unsalted softened butter
12 oz all-purpose flour
12 oz sugar
3 large eggs
1-1/2 tsp baking powder
Filling:
20 ripe, fresh strawberries
2 tbs confectioners or icing sugar
Cream:
1-1/2 cups heavy whipping cream
2 oz cream cheese (optional)
2 tbs lemon curd (optional)
2 tbs icing or confectioners sugar & more for dusting on top of cake.
Method:
- Line 2 qty 9" cake pans with parchment paper. Use some non-stick baking spray to adhere the sheets to the bottom of the pans.
- In a medium-sized mixing bowl or electric stand mixer, cream the butter and sugar together until you get a pale, fluffy mixture that drops off the spoon easily.
- Then in a separate jug beat the eggs thoroughly with a whisk.
- Add the eggs 2 tbs at a time into the creamed butter & sugar mixture, throughly combining before adding the next bit.
- Why not dump the whole lot of eggs in? Adding the eggs in a little at a time won't allow the mixture to curdle. And the reason this is important in a sponge cake is because some of the hidden air that by now has been beaten into the mixture will escape if the mixture 'breaks' and as air is what makes a cake light, curdling will make the cake heavier.
- When the eggs have been incorporated, keep a metal tablespoon or a rubber spatula handy. Have the measured flour & baking powder in a sieve resting on a plate, then lift the sieve high above the bowl and sift about a quarter of it on to the mixture - then replace the sieve on the plate and lightly and gently fold the flour into the mixture (if you beat the flour in, you'll lose some of the precious air).
- Then repeat this until all the flour is incorporated: lifting the sieve up high above the bowl will ensure the flour gets a good airing before it reaches the mixture.
- Now that the flour has been added you should have a mixture that will drop off the spoon easily when you tap it on the side of the bowl. If not, add some hot water, 1-2 tsp as needed.
- Divide the mixture equally between the cake pans. You don't need to weigh the cake mixtures because as long as one is fractionally larger than the other, it shouldn't matter.
- Place them on the center shelf of the oven, and they'll take about 25-30 minutes to cook. Good to know: Under no circumstances open the oven door and steal a peek or that'll be the end of your sponge cakes for they simply won't rise once you let the cold outside air into the oven.
- When they are cooked, the centres will feel springy when lightly touched with a little fingertip and no imprint remain. Remove the cakes from then oven and allow to cool for a few minutes. Then turn them out on to a wire cooling tray, loosening them around the edges with a palette knife first. Then carefully peel off the parchment papers and leave the cakes to cool completely.
- Good to know: Once the cakes have been allowed to cool for a few hours, they can be stored in airtight cake tins till needed for up to 2-3 days on the counter top. They can also be wrapped in wax papers and a zip loc bag and stored on the counter top. They should not be refrigerated. Once the cakes have been assembled with cream and filling, they need to be refrigerated immediately and consumed in a day or two.
- Strawberries: Wash and pat dry. Cut away the tops and slice lengthwise into slices. Place in a mixing bowl. Sprinkle with 2 tbs icing or confectioners sugar. Slowly stir with spoon and set aside till ready to use.
- Cream filling: In a food processor, whip the cream (the cream must be cold and straight out of the refrigerator) & sugar for a few minutes till soft peaks are formed. Add the cream cheese and lemon curd (if using) and whip to stiff peaks.
- Place both baked cakes on a clean work surface or cutting boards. Using a clean bread knife, choose the cake with the smallest dome and slice a little of the top off to give it a flat top. Invert the cake on the final platter or cake plate or cake stand so the cut side is down and bottom is facing up.
- Smear all but 2 tbs of cream in a thick layer of cream especially going right up to the edges. Arrange the strawberry slices, pointed ends facing in along the entire surface of the cake. I used 2 layers of strawberries. Turn the second cake upside down and smear the final 2 tbs of the cream on the bottom of the cake to give it a thing veneer of cream. This will act as a glue as it sits on top of the strawberries.
- Place the cake over the strawberries sandwiching the cakes together with cream and strawberries. Make sure the cakes are aligned one on top of the other and gently press down.
- Place some icing or confectioners sugar in a sieve and sprinkle some sugar all over the surface of the cake. Refrigerate till ready to use.
Enjoy with a wonderful pot of tea or coffee!