A Christmas Nativity diorama in an ancient steamer trunk (part 1, the restoration) - from #LRCrafts - DIY Passion: if you can think it, you can make it by Rici86.
This year, our Christmas preparations started early. I mean, really early. Actually, in July.
Yes, and the project is not destined to be finished this Christmas, either. When we planned it and embarked on this adventure, we knew it had to be a multi-year project: we want to put any effort and the greatest care in this big diorama.
This project will be a huge Nativity scene, a proper diorama with the Nativity scene and the rest, all set in Bethlehem the night Jesus Christ was born. It will have LED lights, epoxy resin, home-made buildings, loads of details. And it will involve an ancient steamer trunk.
One day exploring my great-uncle’s house, we found this old wooden trunk that belonged to his mother and we took it home with us. Days and days of planning and discussing and finally we started its proper restoration to make it the container of our biggest diorama ever.
Stay tuned, the work on this will take long, and it will need more than one post to know all about it.
Dioramas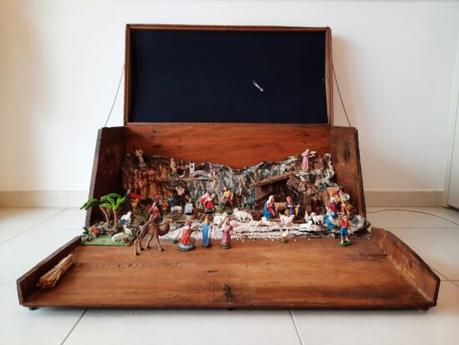
The project after the first phase: trunk restored, LED sky mounted, not yet a proper landscape
Where we started: the steamer trunk
First things first. The steamer trunk and its history.
In my grand-uncle’s old stonewalled house there’s a steep stair leading under the roof. As a child I love it and always wanted to climb it to discover a magic world up there, but my parents refused to let me go. It was too steep and narrow for a child’s footsteps, moreover no one had climbed up there for ages.
Now I am grown and my uncle doesn’t live in that house anymore. So we decided it was time to all go up there and see what uncle left upstairs. Indeed we discovered the promised magic world.
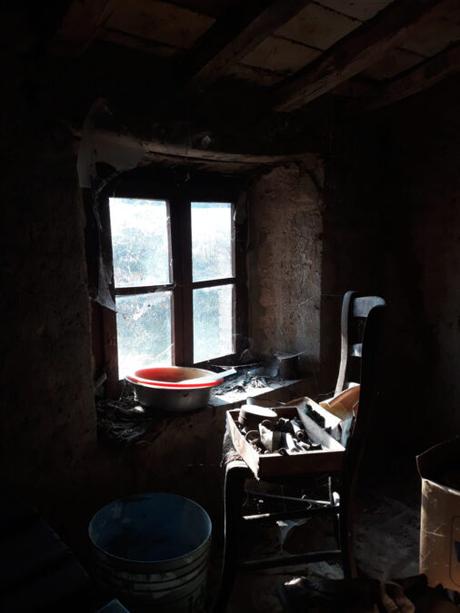
That room under the roof is a step back in time, a bedroom that had remained frozen for many years. Even when my 90-years-old uncle lived in his childhood home, that room was unoccupied, left as it used to be decades before.
We found on the wooden door writings from 1925, and inside mysterious tools, book, letters, documents from 1864… What hit my attention most was the chair looking out the window, full of small everyday objects from a past life. It was a step back in the history of my family. We learnt that the room was left untouched indeed in that 1925 when the occupant, a family friend, incised notes on the door, about debts to be paid.
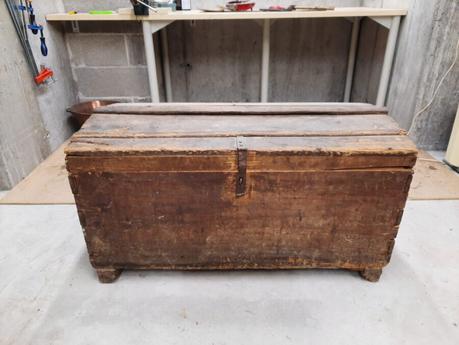
There, we found also the old steamer trunk. It belonged to my great-uncle’s mother, her initials G.M. incised on the lid, destined to go with her to America before she changed her mind and left it empty upstairs.
Beginning the restoration
The trunk remained for many years in an unfavorable environment. It was solid, but battered. We had to disassemble most of it to reinforce it, adding glue and nails here and there.
I’m glad we could keep the original nails, they are so peculiar, they seem handmade.
While reinforcing the structure, my husband wanted also to add wheels. Since we expected the final project to be quite heavy, he wanted to be sure he could move it around easily. If you slide through the photos, you’ll also find a glimpse on the first sketch of the final landscape. We wanted it to be as close to the original as possible. Here in Italy you see most of the times Nativity scenes with snow and moss, but we wanted to set it in Bethlehem, with sand, an oasis, the inn and the stable where Mary and Joseph found shelter.
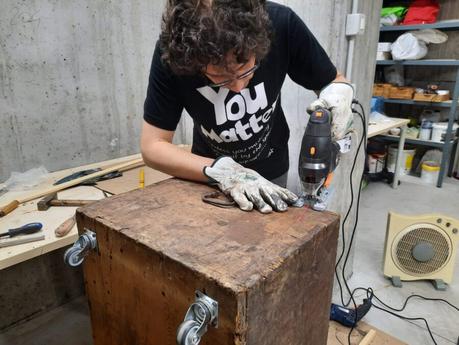
After the wheels, the cutting. The plan was to cut the front open so we could open it with hinges and thus enlarge the space for the diorama.
Planning this part was not easy: we had to consider the appearance and functionality of the trunk when open and we wanted it to remain recognisable when closed, as original as possible. After long tests on paper, we came up with the final solution. First, we made a vertical cut on the short sides, a couple of centimetres from the front corner. This was to avoid cutting the corner itself, it would have mined the stability of all the trunk, since the four sides are tightly clamped together.
That was not enough, though: the diorama would have been too “closed” and constraint. We made other oblique cuts, thus removing a triangle from each short side. We could insert those two triangles back where they came from when we wanted to close the trunk.
Next, we took care of refinishing the trunk: just a little sanding, not too much to avoid erasing the original wood texture, then painting. We chose a dark paint close to the original one. It seems darker, but that’s because paint on the main faces of the trunk had faded with time. We painted just the outside: we chose to take care of the inner surface when working on the diorama features.
Paint dry, we could start my favorite part: the LED sky panel. We wanted the lid to host the night sky, with loads of stars in different sizes and a comet that wasn’t the standard one you see painted in most Nativity scenes, but like a real comet, such as one you could see from your window on a clear night.
We planned to add a wooden panel inside the lid, behind which hiding wires and electrical stuff, with a tiny hole on the back for the main wire to come out. First step, we glued little spacers on the inside of the lid to accomodate the future panel.
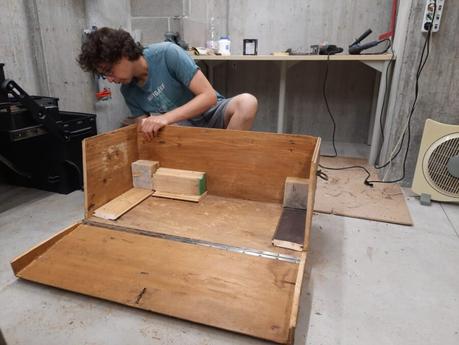
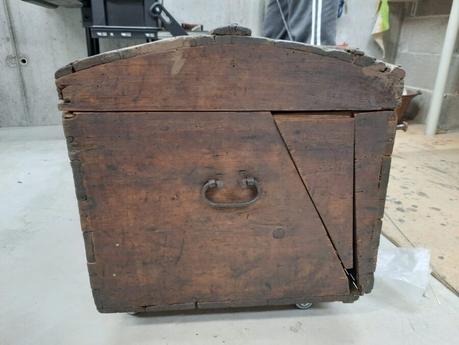
While the sky was in the making, we had another problem to solve: how do we keep the trunk in place, when open and when closed? After all our cuttings, we needed a way to keep the lid in position while the diorama was on display, and also a way to keep the trunk parts together when closed, since we opened it all up.
The best way to accomplish this in style with the whole project, was with chains. We secured them using old split pins from our stash and original nails from other places around the trunk. This way we had a chain holding the lid open at a certain angle, plus another chain to keep the front closed. The two triangles that we cut out from the short sides could fit back in place, so when the trunk is closed you have the impression that it’s still a normal wooden steamer trunk.
But the greatest part of the restaration, in my opinion, is the panel for the stars.
We chose a pine wood board to be cut to size to fit inside the lid, bending slightly to follow the natural curve of the lid itself. The idea was to make a sky as real as possibile, so my husband patiently drilled 200 holes in different sizes (or more, I think after a while he got carried away by the drilling…), one for each LED light.
He painted the panel black, then attached every single LED one by one. For the lights to stand out, he added aluminum foil on the back, also to prevent light from going backward and securing the LEDs.
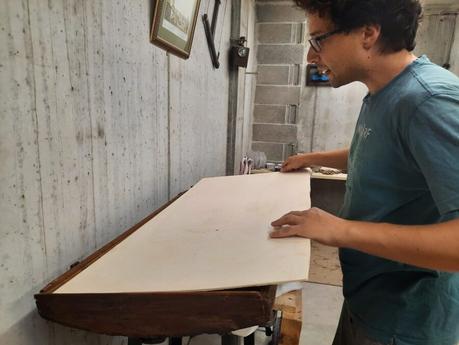
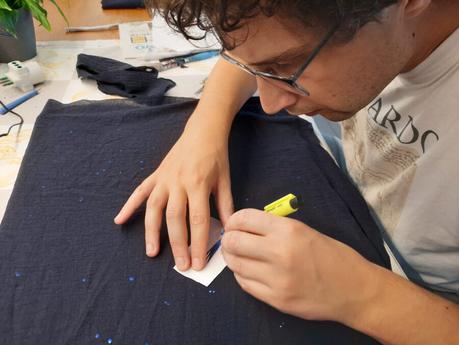
To make the comet realistic, he cut out its shape, then added a diffuser, gotten from a broken monitor.
The final touch was for the sky texture: we looked for a dark blue fabric to cover the front of the panel, to mask the LEDs a little so they seemed more natural. After a couple of tests on small samples, we glued it to the whole panel.
In the end, we mounted the sky on the lid. We embedded the panel inside, letting the wire coming out from its pre-drilled hole on the back. The panel rested on the spacers and, to keep it in place and make it follow the lid curvature, we hammered two of the original nails in the middle of the short sides.
And that is part one of our Nativity diorama.
For its first Christmas, we diplayed in our home with the old statues I inherited from my family, the same ones I saw each Christmas as a child. For the future, the plan is to find size-appropriate statues and build a proper landscape, constructing the buildings, pouring epoxy resin for water and, obviously, adding more lights where needed.
Let’s see how long it takes to complete this multi-year multi-material project!

