Buying a squat rack is one of the best things you can do for your training goals. Here are the key things to know when looking for a new squat rack for your home or garage gym.

Investing in a squat rack is one of the best things you can do for your physical health and training goals.
While squat racks are relatively straightforward—hold some weights, provide a spot, lift all of your favorite lifts—there are some important things to know about function and form before choosing one.
Below is a breakdown of all of the key things you need to know before buying the best squat rack.
Read on and let’s get to squattin’!
1. Squat Rack Dimensions
The biggest piece of workout equipment you will ever own is a squat rack.
Having the right amount of space for the rack and to be able to properly access it means pulling out the old measuring tape and breaking down the numbers.
Take measurements of your workout area, including width, depth, and height.


Remember to add extra width to your measurements for barbells (which can be just over 7’ in length) and room to access the rack from the sides.
2. Steel Thickness (Gauge)
When you read the description of a squat rack you will notice that they measure toughness by load capacity.
But the maximum amount of weight only tells part of the story, the true measure of the strength of a squat rack is by the thickness of the steel, which is measured by gauge.
Most squat racks are made with 11 or 12-gauge steel, which is more than suitable for a majority of lifters.
Squat racks list maximum weight capacity, but a better indicator of the strength of a rack is looking at how thick the steel is in the frame.
Specialized squat racks such as combo racks, which are certified for powerlifting competitions, are built with 7-gauge steel, which is as thick as it gets and is overkill for 99.99% of people who lift weights.
3. The Different Kinds of Squat Racks
Squat racks refer to a group of racks, including power racks, half racks, squat stands, and also wall-mounted and folding squat racks.
Here’s a quick look at each kind and its key features:

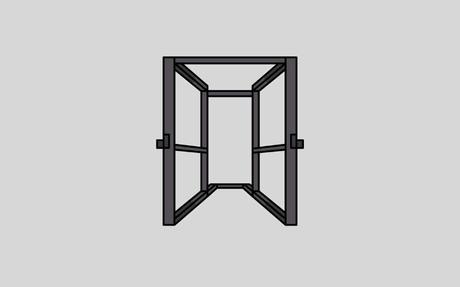
These are full-size squat racks, with four or even six columns. Power racks are excellent for those who want to lift safely with spotter pins or safety straps.
The main benefits of these racks are the ability to squat and lift inside the cage and a much higher degree of customization with various attachments and accessories.
Because of their wide and stable base, and a multitude of columns, you can attach a huge range of equipment to it, including lat pulldown machines, dip bars, and so on.

As you can probably guess by the name, a half rack is the end result of someone slicing a power rack in half. It’s an open-facing rack, which means you don’t get the same benefit of sturdy safety pins and straps.
That said, half racks are a great choice for lifters who are comfortable enough with their form and technique to not require advanced spotting and safety features. Half racks have room for some accessories like pull-up bars and dip stations.
Keep in mind that half squat racks and full-size squat racks have nearly the same footprint, so while it looks smaller, a half rack is going to take up nearly the same amount of square footage.

Squat stands are two individual uprights that can be used for presses and squats.
Also known as “indys,” squat stands are portable, can be moved to customize hook placement width, and are generally the least expensive option for squat racks.
Definitely for the more experienced lifter as squat stands don’t have safety bars.

Finally, we have the new kid on the block, the fancy-pants folding squat racks.
Perfect for tight workout spaces, folding squat racks—when installed properly, obviously—are stronger than you might think.
Because they take up a tiny amount of space when folded up (Rogue’s R-3W takes up just five inches from the wall when collapsed), they are perfect for multi-function areas in your home like a garage or basement.
4. Accessories and Attachments
Squat racks, despite their name, are a tool for a full inventory of exercises. With a squat rack you can also do presses, rack pulls, lunges, and so on.
A squat rack can turn into a bonafide home gym as you begin to accessorize it. Pull-up bar, landmine attachment, lat pulldown pulleys, dip stations; the list is almost endless.
On top of that, there are also the safety features that you can attach to it. J-cups are the standard tool for holding a barbell up on the rack, but there is the option for safety pins, spotter straps, roller j-cups, and more.
Some of the add-ons that you can add to a squat rack include:
- Pulley system
- Lat pulldown machine
- Seated row
- Cable crossover attachment
- Chin-up bars (including multi-grip variations)
- J-hooks and roller cups
- Safety pins
- Spotter straps
- Monolifts
- Dip station
The list goes on and on.
Squat racks are for more than just squats—with the right accessories and attachments, you can turn it into a true home gym.
The Rogue Monster lineup of racks, for example, has over sixty different accessories and attachments.
5. Storage for Plates, Bars, and More
Squat racks are not just a tool for getting ridiculously in shape, but they are the hub of your home gym, including storage.
Vertical barbell holders keep your barbell out of the way when not in use. Barbells can take up a lot of room, and by keeping them off the ground less, you extend the bar’s life by reducing exposure to condensation.
Weight plate pegs keep bumpers and iron plates off the ground. Stacking plates on your squat rack also increase the load to the rack, which reduces wobbling and increases overall rack stability.
Having a couple of spare J-hooks or pegs are also great for keeping other equipment, like resistance bands and weightlifting belts, out of the way and off the ground.
6. Frame Thickness
The uprights and crossbars are what give a squat rack structural integrity. They absorb the weight being dropped on safety straps, they hold loaded barbells up for you between sets, and so on.
The thickness of the frame—which we touched on earlier talking about gauge—is another key component when choosing the right squat rack for you.
First, because a thicker frame will be appropriately stronger, but secondly, you want to match up future accessories correctly to the rack.
Most squat racks have a column thickness of 2″ by 2″. This is sturdy enough for a majority of lifters.
Cheaper, Amazon-third-party racks have a column thickness of 2” x 2” which is suitable for a majority of people.
Heavy duty racks have a column thickness of 3” x 3”, and some brands, like Bells of Steel’s 5.1 racks, have unique column thicknesses like 2.3” x 2.3”. There are also 2” x 3” frames out there too, but they are less common.
Ultimately, the rack you choose should be strong and ready for more accessories and attachments down the road.
7. Hole Spacing
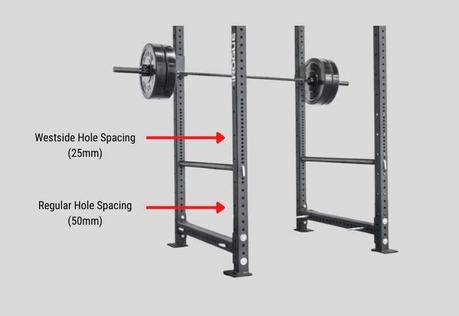
On the columns the squat rack, and on the horizontal bars down below, you will see holes dotted down the middle of the steel shaft. These holes are spread out, typically with a 50mm space between them.
In recent years, Westside hole spacing has become very popular with squat racks, powerlifting benches, and various rigs.
Westside hole spacing simply brings the holes closer together—25mm—giving lifters double the options for where they want to place the safety pins and J-hooks.

This gives lifters more flexibility in where they want to place safety equipment or begin their lift.
If you plan on doing a lot of different lifts over the course of your workouts, which requires moving the J-hooks frequently, look for a rack that has numbered holes along the uprights so that you can quickly line up the hooks and pins.
8. Anchors
Squat racks are designed to handle a TON of weight. (Well, not literally, but you know what I mean…)
But that doesn’t mean they aren’t prone to sliding, moving, or worst-case scenario, teetering and toppling over.
For this reason, most squat manufacturers will recommend that you bolt it down to the floor. This can be done relatively simply with concrete anchors, which are sometimes included with squat racks upon purchase.
A simple way to stabilize your squat rack is adding weight plate pegs to the lower third of the rack and filling it with your weight plates to “weigh down” the rack.
If you are adamant about not anchoring the squat rack to the floor, look for a flat-footed squat rack. And as always, use the safety bars on the inside of the rack to negate the risk of tipping.
If you plan on doing banded lifts, or you plan on using the safety bars on the outside of the rack, you will absolutely want to bolt it down.
Best case scenario, you bolt the rack down through a lifting platform (carpet, plywood, and then horse stall mats provides the ultimate protection for your floor) into the floor, protecting both your home, your lifting equipment, and keeping things safe.
9. Price and budget
Finally, we have cost.
Squat racks, and their line of variations, including squat stands, cages and half racks, start at around $300 and quickly go up there. There are plenty of excellent options in the $800 to $1,000 range, suitable for a majority of lifters and athletes.
And of course, if you want to spend a little more and really build out an epic home gym, there are the elite options, like the six-column Rogue RM-6 Monster Rack, one of my favorites of all-time (and also the last squat rack you will ever have to buy), with the price starting at about $3,000.
Squat racks are pricey, but they are only part of the investment. Still to come are barbells, weight plates, and accessories.
Choosing the Right Squat Rack
Now that we’ve covered the ins and outs of how to choose an epic squat rack, check out this full list of the best squat racks for home gyms.
It’s a big list, including the top squat racks of every type, including full-sized racks, half racks, squat stands, folding squat racks, and much more.
