One of the most useful productivity tools available today is the ability to take a screenshot. However, individuals don't hesitate to make the most of Print Screen (Prt sc).
You might not be aware that there are several different ways to take a screenshot on your laptop. Each method is distinct and has benefits and drawbacks.
We'll cover four distinct methods in this article for taking screenshots on your laptop. We hope you'll be able to decide how to utilize this underutilized productivity tool to its fullest.
4 Ways to take Screenshots on Your Laptop

Method 1: Press the PrtSc button
If you're unsure of how to take screenshots on your laptop, the PrtSc key on your keyboard will record every piece of information visible on your screen. The file will be stored on your laptop's clipboard. This implies that to save it, you must paste it onto another image-editing program.
If you don't want to overwrite your current screen capture, be careful not to press the PrtSc key once again. MS Paint or MS Word are the two easiest programs to utilize using the PrtSc button.
The PrtSc key on your laptop can be used as follows:
- To capture a screenshot of your entire screen, use the PrtSc key on your keyboard.
- Press Alt + PrtSc to capture a screenshot of just one window. The image will be saved in your clipboard.
- Open MS Word or MS Paint and paste the snapshot by pressing Ctrl + V. In these programs, you can edit, crop, and resize the image.
To save the image after editing, hit Ctrl + S.
Although this is not the most effective approach, the steps are for those who wish to further edit the screenshots in another program. By simultaneously pressing the Windows key and the PrtSc key, you can save the screenshot automatically to your computer.
At the same moment, press Fn, Windows, and PrtSc. Try PrtSc + Fn, PrtSc + Alt, or Alt + PrtSc + Fn if the combination doesn't work. When the screenshot is saved on your computer, this should trigger an animation that notifies you of its completion.
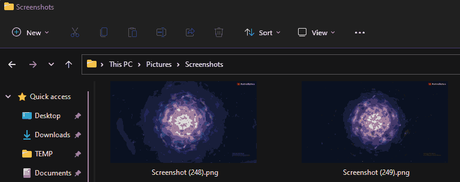
Go to User > Pictures > Screenshots on your laptop to find the screenshot. You'll observe that the folder has all of your screenshots organized by the time and date they were taken.

To take a screenshot on your laptop without a PrtSc key, try hitting Winkey + Fn + Space.
Read: Are Laptops Good for Gaming? Laptops Vs Desktops
Method 2: The Snipping Tool's Additional Options
The simplest method for taking a screenshot is by using the PrtSc function. But occasionally, you might want to do more than just snap a picture of your complete screen.
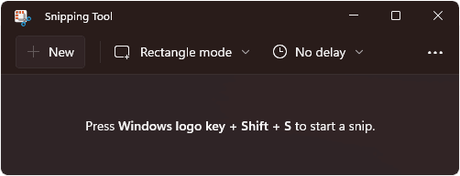
You can snap a screenshot of a specific region of your screen by using the Snipping tool. This implies that you can delete undesired portions of the photograph without editing or cropping it. To create GIFs, you may also utilize the Snipping Tool to capture screenshots of scrolling or moving screens.
Fortunately, all Windows laptops and desktops come with the useful Snipping Tool. On Windows 10, it's known as the Snip&Sketch.
- The Snipping tool has two configuration options: Mode and Delay.

- You can modify the screenshot's scope using the Adjusting Mode.
- Fully framed captures a whole screenshot
- Screenshots of a particular window
- Drag the cursor over the chosen region in a rectangle.
- Draw a free-form shape around the region you've chosen.
Using Adjusting Delay, you can select a time interval between 1 and 5 seconds to capture a screenshot of a different window.
The Snipping tool can be used in the following ways:
- After pressing the WinKey, type "Snipping Tool" into the search box. Users using Windows 10 should search for Snip & Sketch.
- When the software opens, select New.
- Choose your chosen settings for Mode and Delay.
- To take a screenshot, use the cursor.
- To save it to a folder on your computer, click Save Snip.
Method 3: Exchange screenshots
This technique is for you if you want a quick way to share screenshots without having to store the images on your computer.
To instantly share screenshots, adhere to the following steps:
- Open the window that you wish to screenshot.
- Press WinKey and H simultaneously. You should see sharing choices on the right side of your screen.
- To send your screenshot quickly, choose the sharing option you prefer.
Method 4: Obtain a browser extension or plugin integration
Few people are aware that you may access more advanced screenshot features by using browser plugins or extensions. The majority of screen capture extensions available through the Chrome store come with extra capabilities, including photo editing tools, cropping, resizing, sharing, highlighting, blurring, and saving the image in the format of your choice.
The Google Chrome store typically has free extensions. Additionally, you can utilize Google Chrome extensions on different browsers, including Opera, Firefox, and UC Browser.
If you're unsure of which screenshot extensions to purchase, consider one of these tried-and-true programs:
The majority of laptops running Windows normally include the same screenshot functionality. There are numerous ways to snap a screenshot on your laptop, but not many users are aware of them.
The time and work required for each of these many approaches to complete the screen capture varies. Additionally, being aware of the various methods for taking screenshots on your laptop will enable you to determine whether you require additional software for photo editing, cropping, sharing, and other tasks.
Using the PrtSc keys will be sufficient if you just want to snap a quick screenshot of your full screen. However, employing the Snipping Tool will be useful for you if you want to capture only a piece of your screen. The Win + H key will increase efficiency if you need to share a lot of screenshots.
You might look for reputable screenshot browser addons on the Chrome Store if taking screenshots of websites is your top priority.
