If you have recently purchased a Mac and want to use your hard drive (formatted in Windows) on your new Apple computer, you will run into some problems in terms of compatibility. Most external hard drives are sold in a format called NTFS, which works in Windows, but is not compatible with Mac. Mac reads/writes a format called HFS+ and can, in fact, read what’s on a NTFS-formatted drive, but can’t write. HFS+ is, naturally, unusable in Windows.
However, there is a fix for this. Both Windows and Mac use the FAT32 format and here’s how to go from NTFS to FAT32.
Warning: Formatting your drive will erase ALL data on your hard drive. It’s recommended that you back up everything beforehand.

FAT32 format is, luckily, compatible with both operating systems.
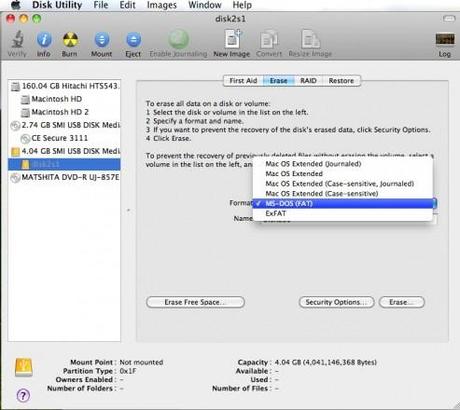
1. Launch Disk Utility by clicking Finder>Applications>Utilities.
2. Click the name of the drive you want to format (check if it’s the right disk because all data will be deleted).
3. Click on the “Erase” tab near the top of the window.
4. In the “Volume Format” drop-down menu select MS-DOS (FAT).
5. Click on the “Erase” button near the bottom to start formatting your hard drive.
Voilà! Your hard drive is now compatible with Mac OS. You can access and use it from either Mac or Windows, because both are compatible with FAT32.


