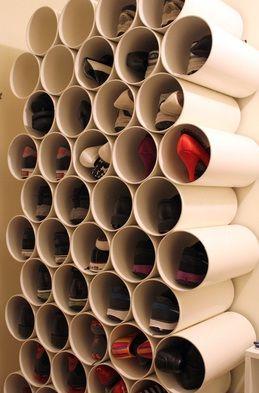
If you encounter troubles storing the shoes in your home and have too many shoes, which seem to be misplaced and scattered in your hallway, I have a crafty solution to this problem. In this article, I am going to show you how to make a DIY genius shoes storage solution. This project can be made easily and doesn't require special skills or expensive materials. The instruments and materials needed can be found in any hardware of DIY store.

Cardboard is cheaper, but if you prefer you can do it from PVC which is more durable. Make certain to choose long and wide enough tubes to store your shoes inside.
Cut tubes in the same length to be sure they are long enough to store your shoes without hanging out. Make some measurements before cutting to estimate the needed universal size for all pairs of shoes.
The next step is to glue the tubes to one another with glue for wood and piling them in an upward position. The tubes should fit in your closet and not be too large if you want to make your shoe organizer is handy and practical. Glue the tubes and make sure you don't glue more than five tubes high, otherwise you may have to secure your shoe storage structure to the wall.
After the glue dries out you can place your DIY shoe rack in the closet and store your shoes.
The same steps are repeated with the PVC tubes with the only difference being that the glue you use should be for PVC materials.
Slight variations to the shoe storage project include:
- Decorate the tubes by painting them in colours of your choice to match the room in which it will be set.
- Easily paint your cardboard or PVC tubes by placing them in a ventilator and use a spray to paint them very quickly.
- Use a paint and brush combination to decorate the tubes.
- Paint every tube in a different colour if you prefer. Y
- Add patterns to the tubing when painting.
- And you can use these shoe racks to store your slippers and all kinds of shoes.
Why not create a shoe rack from recycled cardboard?
For this project, you will need cardboard sheets, glue for cardboard (silicone glue works too) and a model knife or scissors. Make the measurements for rectangular boxes with two missing opposite sides. You will need to make sure that the opposite sides of the boxes are exactly the same. Glue the cardboard sheets to one another putting glue in the rims of the plasterboard sheets. Create the rectangular boxes large enough that your shoes fit in them. It is better to use hot glue gun to put the glue on the proper places without too much effort. Make as many boxes as you wish to store each pair of your shoes. Place the boxes next to each other on two, three or more layers as you prefer. Glue them to one another to make sure they become one structure. Decorate and paint the shoe rack in a colour of your choice.
Decorate and paint the shoe rack.
Tip: Cleaning your shoes regularly is important before placing them in the shoe rack. This way the rack won't get dirty and will serve you longer. I also recommend frequent and well cleaning of the hallway and the room you use to store your shoes.
For more incredible shoe storage ideas visit my Pinterest board!
Follow HomeSpirations's board Shoe Storage Solutions & Creations on Pinterest.
