Till today many bloggers (newbie) still don’t know how to setup a menu bar with their wordpress blog. Setting up or adding a menu bar is essential and very important to have in whatever website or blog you are running.
Must Read: ADDING CATEGORIES TO YOUR BLOGGER BLOG
How menu helps blogs/ website? Ok almost all blogs that I have been to or explore have a menu system and the reason is; so readers can find their way through the blog and it also makes it easier to navigate. Menu helps reduce bounce rate, menu helps your reader to stay in track, should I keep mentioning?
Ok maybe the reason you don’t have menu is because you don’t know how to, right? Put your mind at rest ease because you’re going to see the easiest way of menu-lizing your wordpress blog

ADDING CATEGORIES AND MENU TO YOUR WORDPRESS BLOG
How do you want your menu? Just a simple step will give you the perfect phase… This tutorial I am about to drop, is a request or should I say popular demand from my readers, so I’ll just have to break it down.
2 STEPS OF ACHIEVING OUR GOAL:
1. You will need to create a category first and copy the link to a notepad.
But how do you create a category?
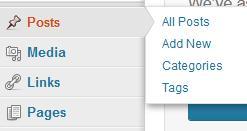
Go to your wordpress dashboard and hover your mouse to where the “Posts” is. A list will come out, on the list, click “categories” to take you to its panel (see image below)

Are you in the categories section? Now fill in all the necessary fields >>> If you’re done filling the necessary field, click “Add New Category”
Note: you can leave the description empty if you don’t know what to write there. It’s advisable to leave it blank anyways
Yes! You have successfully created your category. Now let’s move on to the next phase.
Must Read: HOW I ADD MENU TO MY BLOGGER BLOGSPOT
2. Now that we have created our category, let’s make it appear at the top of our blog. To do that, you will need to download and install “Page Links To plugin”. You can click here to download the plugin
Have you downloaded and install the Page Links To Plugin? If yes! Let’s proceed…
Hope you’re still at your blog dashboard? Now click “Pages” >>> Click “Add New”. Type just the title (e.g. “About me”) on the new page that comes out.
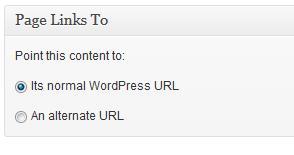
Scroll down to the bottom of the page. There, you’ll see something like the below image…

Tick “An alternate URL” this will bring out a URL box, now copy the link you pasted in a notepad earlier on and paste it in the provided box given.
Have you done that? Now click the “Publish” button.
You have successfully completed putting menu to your tab.
Note that you can do this as many times as you want (depends on how many categories you want in your menu) and remember that some premium themes already have a spot for all this but it is still useful for those who needs it.
Must Read: 9 WORDPRESS PLUGINS THAT CAN BOOST READER’S ENGAGEMENT
Was the tutorial helpful? You can drop your comments and thoughts using the comment box below. Do you still have questions regarding the topic? Use the comment box below to drop them and I’ll sure get back to you.
Do you like this post? Then do click the like button, share us and recommend us to friends because you’ll never know who among your friends might need it. Do not forget to subscribe to our feed for your latest updates sent to your email directly.
Don't Miss Any Post Again. Subscribe To Our Feed And Be Updated
Enter your email address below:
Powered by OnenaijaBlog

