White Blouse
16 x 12

White Blouse 2
14 x 11
Every single choice that you make in an oil painting is visible, in some way, in the final work and toning is the usually the first choice that a painter makes. For me, it's the decision that usually takes the longest because I know it will launch a painting down a path and I have to decide which path that should be.
There are no rules about color choice when toning a support, but here are some routes that are worth exploring:
-Tone to the color of the light. So, if the light is warm, tone warm. If you're in green, forest shade, tone green etc.
- Tone to the brightest color in the motif. If you're trying to depict the vivid orange of a pumpkin, it will be easier if you're working on a support that's toned orange; nothing will interfere with the special color or gray it.
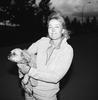
- Tone to the complement of the most important color. This is the opposite of the above choice: if you're trying to show off the orange pumpkin, tone blue so that orange will really pop. This toning requires you to work very opaquely to counteract the neutralizing tone under your star color. The first painting above is toned in this way: the most important color was the warmth on the figure's face and body, so I toned the board green. You can see that this choice has helped to pop the warmth, but it has also resulted in an overall cool painting. The warm mixtures of the flesh are all dimmed by the green undertone.
- Tone in an earthy color such as umber. This choice will automatically launch your painting into something earthy and, possibly, traditional in feel. It's a natural choice for tonal painters but not for colourists who struggle to create pure mixtures on top of the rather dirty start.
- Tone gray. This works as a useful mid tone without being a color statement. You'll end up working opaquely on this, and your colours - even complex mixtures - will look rich on the neutral ground.
- Tone to the opposite temperature of the general temperature of the scene. This is related to complementary toning, and is often used by landscape painters. If they're painting a cold, snow scene, they may use a warm toning underneath to balance the painting and avoid excessive coolness in the final work. Many plein air painters take out red-toned supports as a matter of course because the elements of landscapes - trees, mountains, water - tend to cool colours, and the red fills out and balances the scene on the canvas.
- Tone bright if you intend to paint dull. That's the choice I made in the second painting above; I used a strong yellow tone under an earthy palette of black, ocher, terra rosa, and ultramarine. There may have been a touch of cad red light for some of the hot spots on the flesh - I'm not certain - but, overall, it's a dull, tonal palette, and one that doesn't really suit my eye. I need a hit of brighter color to keep myself interested, so I toned strong.
- Yes, you guessed it: tone dull if you intend to paint bright. This helps to keep works from becoming too candy coloured, because the dull tone will take the edge off of high chroma mixtures.
There are, I'm certain, a lot of other toning choices to be made, but these are the ones I consider most often when I'm planning a painting.
In general, I tone to about a value 3 (if 1 is white and 10 is black), and I make sure that my tone is lean, but not too lean. A medium composed of a 50/50 mix of oil and solvent will make a good paint film, but anything leaner will result in an underbound layer and you'll be able to rub it off even after it's dry. I avoid flowing the paint on and, instead, scrub it on with a stiff brush and a small amount of paint. Then I give it a good wipe to remove excess paint and medium and to even out the scratchy application.
I also consider the drying time of my toning pigment and try to use fast dryers like umbers and raw sienna, or I add them to a slower drying pigment to help speed it up. The last thing you want is to have a wet tone under a dry painting. It's the surest way to a cracked work. Drying times of some common colours are available on the Winsor Newton site and, probably on the sites of other major manufacturers.
If I don't want the color to contaminate the paint layer, I'll let the tone dry completely before starting to paint, but there's also something interesting about letting the wet tone mingle with the first paint layer. There are no rules.
If you've got any thoughts on other toning possibilities, I'd love to hear them and learn.
Happy painting!
-