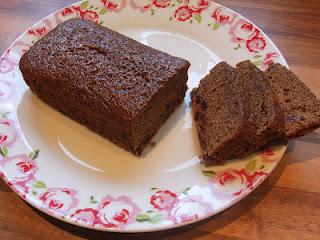
Some years ago I went through a malt loaf craze; I ate it almost every single day! I was forever on some sort of diet and considered malt loaves to be a low fat treat. However, the fact that I ate four or five slices a day could explain why I rarely lost any weight!
It never occurred to me that I could make my own malt loaves, so I'd regularly buy it pre-cut from the shop. If I attempted to slice it myself it would become so squashed that a slice would be little bigger than a postage stamp! In time, I came across a recipe for malt loaf in an old and unused baking book. The recipe proved to be so much nicer than the shop bought variety; it was delicious. In the end I ate so many malt loaves that I sickened myself and I have not touched one for years! I was a little concerned about trying Mary's recipe. Would it restart my addiction?!
After turning on the oven and setting it to a low heat I dug out my loaf liners. I have just one 1lb loaf tin and this recipe requires two. I decided to use my 2lb tin for the second malt loaf. To fill the gap at the end of the tin I simply shoved in a ball of foil! I would end up with a fatter loaf but I could hardly see that being an issue!
It suddenly dawned on me that I should have had some cold tea ready for this cake; I had forgotten, whoops! I quickly boiled some water and threw a teabag into a measuring jug. The tea needed to be cold before I could use it, so I thought I might as well throw teabags into mugs too! Neil and I could sit and enjoy a cuppa while I waited. It seemed to take ages for the tea in the jug to lose its heat. Funny how my own cups of tea seem to go cold instantly!
Finally the jug of tea was stone cold and I could head back to the kitchen to make the cake. First of all I weighed the plain flour, along with a small quantity of bicarbonate of soda and baking powder. Next, I stirred in the all important sultanas. Instead of saving the remaining sultanas for another recipe, I couldn't resist picking at them. Soon I'd scoffed all the leftovers! Before starting this recipe I hadn't realised that I would need to heat the sugar, malt extract and treacle in a saucepan. One day I might just learn to read the entire recipe through first. I wasn't very happy at the prospect of extra washing up, but my spirits were soon lifted when I saw that I'd be making use of Demerara sugar. I rarely get to use this grainy sugar unless it's for sprinkling over rock cakes or biscuits. Finally it would get a chance to play a leading role!
After adding the small amount of Demerara sugar to the saucepan I moved on to the malt extract. I had forgotten how runny and sticky malt extract is; I was soon smothered! As I measured it in to the pan, thin ribbons of sugary syrup stretched from the saucepan to the side of the jar – it looked like an intricate spider’s web. I collected the sticky tin of treacle from the shelf and grabbed a tablespoon from a drawer. Thankfully, measuring out just one tablespoonful of treacle was pretty easy to deal with and I didn't encounter any more mess! Whilst the thick dark mixture heated on the hob, I broke two eggs into a bowl and quickly beat them together with a fork. Mary doesn't mention that the hot malty mixture should be left to cool before adding to the flour, so I went ahead and poured it straight in, praying that it wouldn't make the flour go lumpy. To avoid a possible scrambled egg situation I added the cold tea before pouring in the beaten eggs!!
Once all the ingredients were in the bowl I could mix it all together with my wooden spoon. Thankfully the flour did not go lumpy and the mixture was soon perfectly smooth. Not only was it smooth but it was also VERY runny; it was almost like water!! Mary says to pour rather than spoon the mixture into the tins, so this reassured me that it was supposed to be runny! Unfortunately not all the mixture found its way into the tins; a good quantity dripped merrily onto the worktop! Finally I was able to slide both tins into the oven.
The loaves would take about an hour to cook. I checked on the cakes after half an hour and saw that they had barely risen. After the hour was up, I was delighted to find that the loaves were perfectly cooked through. I left them to cool in the tin for the suggested ten minutes and then turned them out onto a wire rack to cool completely.
I was very good and resisted having a slice until the following day. Mary insists that the malt loaves are best left for a few days before eating. The following day the surface of the loaves became shiny and sticky, just like gingerbread. Unlike a shop bought malt loaf, I found it easy to slice and it kept its shape beautifully. I am afraid I am once more addicted! I had three slices one after the other. It had a gorgeous malty flavor and the sultanas sweetened each bite. The loaf was moist and very slightly chewy. Neil tried some shortly after me and he is now also addicted. He can't stop going back for more. We may have to fight for the last piece. I have the sharpest elbows!

Sticky Malt Loaf - quick, grab the butter!

