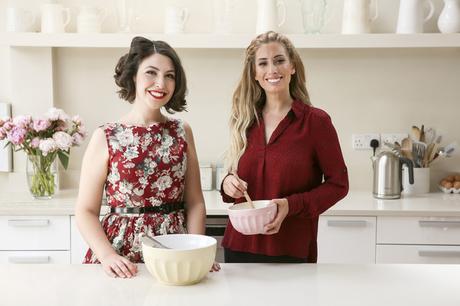
With Great British Bake Off in full swing, Dr Oetker has teamed with X-Factor star Stacey Solomon and baking blogger Emily Leary in a series of fun baking tutorials.
From matering the art of cake decorating to whipping up delicious treats to impress friends and family, each tutorial will help people at home perfect their skills and techniques to become an Even Better Baker.
The pop sensation and mom of two is also joined by Emily Leary, creator of a blog 'A Mummy Too,' as part of Dr Oetker's Even Better Baking Team. Each week, the baking duo takes popular recipes and showcases the best hints, tips and techniques to help make them 'Even Better.'
Commenting on her involvement, Stacey said; "I absolutely love to bake and was so excited when Dr Oetker asked me to join their Even Better Baking Team. For me, baking is all about having fun with the kids. I love to experiment and try new recipes with my boys even if they don't turn out the best, so it's been great to learn tips that actually make a difference to my bakes. From Fondant Fancies to Chocolate Cakes and more, the tutorials are packed with easy to follow recipe instructions and tips to help bakers of all levels improve their skills."
Emily Leary added: "I love baking and sharing recipes, so I'm really pleased to be part of the Even Better Baking Team. I know that sometimes people look at pictures of beautiful bakes and think, 'I could never do that!' so I jumped at the chance to be involved in a campaign that shows how easily people at home can produce great bakes with just a little guidance."
The Even Better Baking tutorials will run until Wednesday 7th October. To keep up to date with all the latest Even Better Baking news, follow @droetkerbakes on Twitter, DrOetkerBaking on YouTube or like www.facebook.com/DrOetkerBaking

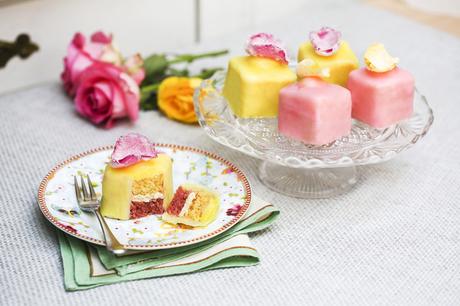
*Rose and Lemon Fondant Fancies*Makes 16Printable Recipe
Pretty little cakes from Dr Oetker.
115g of margarine (1/2 cup)115g of caster sugar (9 TBS plus 2 tsp)2 medium eggs, beaten115g plain flour (3/4 cup plus 1 1/2 TBS)1 1/2 tsp Dr Oetker Baking Powder1/2 tsp rose flavour1/2 tsp Sicilian Lemon ExtractDr Oetker Hot Pink Gel Food Colour
To decorate:1 sachet of Dr Oetker Free Range Egg White Powder (1 sachet is the equivalent of 1 egg white)75g of caster sugar (6 1/2 TBS8 each of both pink and yellow rose petals115g of unsalted butter, softened (1/2 cup)200g of icing sugar, plus extra for dusting (1 1/2 cups)453g of Dr Oetker ready to roll marzipan (scant pound)600g Dr Oetker ready to roll white icing (1 1/4 pound)Dr Oetker Sunshine Yellow Gel Food ColourDr Oetker Hot Pink Gel Food Colour
1. Preheat the oven to 190*C/375*F/ gas 5. Grease and line 2 (7 inch) square cake tins with baking paper. In a mixing bowl, beat the margarine with the sugar until pale and creamy light in texture. Gradually whisk in the eggs, then sift the flour and baking powder on top. Carefully mix the ingredients together.
2. Divide the mixture in half and add the Sicilian Lemon Extract to one half and the Rose Flavour to the other along with a few drops of hot pink gel food color and carefully mix in until well blended. Spoon into separate tins, smooth the tops and bake for 10 to 12 minutes until risen and firm to thetouch. Turn onto a wire rack to cool.
·
3. Meanwhile, prepare the decoration. Make up the Egg White Powder as directed on the sachet; put the caster sugar on a plate. Working on one petal at a time, hold the petal at one end with a pair of tweezers and lightly dip in the diluted egg white. Shake off the excess, and brush away any froth using a paint brush. Lay the petal on the sugar, and then cover with sugar using a teaspoon. Lift the rose petal off the sugar and place on a board lined with baking parchment. Continue to cover all the petals and leave in a warm dry place for at least an hour until dry enough to handle – you may have to leave the petals for a longer period of time if the atmosphere is damp.
4. Meanwhile, put the butter in a mixing bowl and beat until soft. Gradually sieve in the icing sugar, beating well after each addition, to make a smooth, spreadable icing. Set aside.
5. Trim the crusts from both cakes and sandwich together with a thin layer of the butter icing. Cut into 16 neat squares.
6. Lightly dust the work surface with icing sugar and knead the Marzipan until pliable. Using a tape measure, measure round the outside of one of the squares, and measure the depth. Set aside 150g (5oz) marzipan, and then half the remaining marzipan, and roll each portion out thinly to form rectangles as wide as the circumference of the cake square added together. Cut 8 strips of marzipan from each, as wide as the depth of the cake square – as a guide, roll out to approx. 28 x12cm (9 ½ x 4 ¾ inch).
7. Working on one strip at a time, lightly spread a marzipan strip with a little butter icing and stick round the outside of a cake square. When all the cakes are covered in this way, roll out the reserved marzipan thinly and cut out 16 squares to cover the tops of the cakes, spreading with a little butter icing to stick the marzipan down. Smooth the marzipan all over to ensure a neat finish and place the cakes on a wire rack over a tray or board.
8. Load the remaining butter icing into a small uncut piping bag, snip off about 1cm (1/2 inch) from the end of the bag and pipe a neat blob on top of each cake. Chill for 30 minutes to firm up.
9. Put half the chopped Regal-Ice in a saucepan and add 40ml (10 tsp) water. Heat very gently, stirring occasionally, until melted together. Remove from the heat, mix in a few drops of Sunshine Yellow Gel Food Colour and working quickly, spoon or ladle liquid fondant over 8 cakes to coat the top and sides – use a flat bladed knife to quickly cover any bare areas. THis icing sets quickly once off the heat, but can be gently re-melted if necessary.
10. Melt the remaining Regal-Ice with some water in the same way and color with Hot Pink Gel Food colour, and cover the remaining 8 cakes in the same way. Leave for about an hour to set.
11. To serve, carefully trim the icing drips from the bases of the cake and place on a serving plate. Lightly dab the back of each petal with a drop of water and place on top of each fondant fancy. Your pretty little cakes are now ready to serve and enjoy!

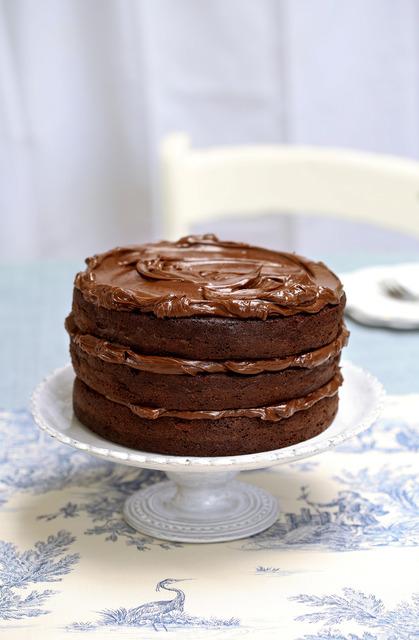
*Ultimate Chocolate Fudge Layer Cake*Makes 12 servingsPrintable Recipe
It's chocolate. It's delicious. Its a fabulously fudgy three layer cake. From Dr Oetker.
For the cake:100g of Dr Oetker Fine Cooks 72% Extra Dark Chocolate (7 ounces)100g Dr Oetker Fine Cooks 35% Milk Chocolate (7 ounces)275g of caster sugar (scant 1 1/2 cup)300ml of buttermilk (1 1/4 cup)125g of unsalted butter, softened (1/2 cup)3 medium eggs, beaten2 tsp Dr Oetker Bicarbonate of Soda1 tsp Dr Oetker Madagascan Vanilla Extract
To Decorate:100g Dr Oetker Fine Cooks 72% Extra Dark Chocolate (7 ounces)100g Dr Oetker Fine Cooks 35% Milk Chocolate (7 ounces)450ml of Double Cream (2 cups) at room temperature
Preheat the oven to 180°C (160°C Fan, Gas Mark 4). Grease and line 3 x 20cm (8 inch) Victoria sandwich tins.
Break the Dark Chocolate into pieces and place in a large heatproof bowl. Put the bowl over a saucepan of barely simmering water and leave to melt. Remove the bowl from the pan of water and leave aside for 10 minutes to cool.Meanwhile, put all the other ingredients, except the decoration ingredients, in a large bowl and mix well together until well combined. Beat in the melted chocolate.
Divide the mixture between the prepared tins and smooth the tops. Put the tins on shelves in the oven and bake for 25-30 minutes until risen and firm to the touch. Cool for 10 minutes before removing from the tins and transferring to a wire rack to cool completely.
To decorate, break the Dark and Milk Chocolate into a large heatproof bowl and melt as above. Remove the bowl from the pan of water and leave to cool for about 20 minutes until slightly warm. Whilst whisking the chocolate, gradually pour in the cream, whisking until thick and glossy.
Sandwich the 3 sponges together using 2/3 of the chocolate cream and place on a serving plate. Spread the remaining cream on top and leave in a cool place for several minutes to firm before serving. For a firm finish, chill the cake for 30 minutes before serving.

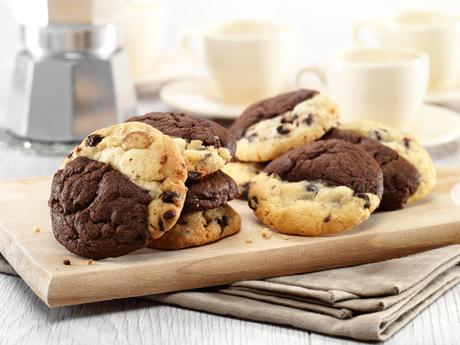
*Browkies*Makes 24Printable RecipeHalf cookie half brownie. Moreish. From Dr. Oetker.For the chocolate dough:
115g of Dr Oetker Fine Cooks' 72% Extra Dark Chocolate (4 oz)65g unsalted butter (1/4 cup plus 1 TBS)2 medium egg, beaten100g soft dark brown sugar (12 cup packed)1 tsp Dr Oetker Madagascan Vanilla Extract 125g of plain flour (3/4 cup plus 2 1/2 TBS)1 sachet of Dr Oetker Baking Powder (1 tsp)For the cookie dough:100g unsalted butter (7 TBS)75g of caster sugar (6 1/2 TBS)125g of plain flour (3/4 cup plus 2 1/2 TBS)1 sachet of Dr Oetker Baking powder (1 tsp)100g Dr Oetker Dark Chocolate Chips (generous half cup)
1. First make up the brownie mix. Break up the Extra Dark Chocolate into a heatproof bowl. Add the butter and place over a saucepan of barely simmering water until melted. Remove from the water and cool for 10 minutes.
2. Put the egg, sugar and Vanilla Paste in a bowl and whisk until well blended and creamy in texture. Beat in the melted chocolate.
3. Now make the cookie dough. Line 3 large baking trays with baking parchment. In a bowl, beat together the butter and sugar until creamy and well blended. Beat in the egg yolk.
4. Sift the flour and Baking Powder on top and add the Chocolate Chips. Mix together to form a fairly firm dough.
5. Divide the mixture into 12 equal portions and roll each into a ball. Cut the balls in half and arrange these spaced well apart on the trays, pressing each half down slightly to make chunky half circle shapes. Chill until required.
6. When ready to cook, preheat the oven to 180˚C (160˚C fan assisted oven, 350˚F, gas mark 4). Using a teaspoon, scoop a portion of the brownie mixture and place, overlapping slightly, next to each cookie portion. Press down a little to join the 2 mixtures together then form into an overall rough round shape, but without flattening the brownie part.
7. Bake for about 15 minutes until risen, just firm and the cookie part is pale golden – the center of the brownie should remain soft. Leave to cool for 5 minutes then transfer to wire racks to cool. Delicious served warm or cold.

