I was invited to partake in a guest post series about Dream Nurseries by the ever fab
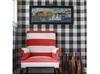
Dina of Honey & Fitz. As I began my nursery mood board and it all centered around this rug:
 It feels fresh, graphic, can work in many settings, and was perfect for a little guy's nursery.
(Please hop over here to H& F to see my final nursery scheme and be sure to check out all the other designs in her series while you are there too!)
I had saved the above image to my file of designer porn and as it turns out I had no resource for it. I searched and searched the internet for hours, and came up empty.
I wasn't going to change my nursery scheme and I was way too obsessed with this flipping rug, so I decided I would just have to figure out how to make it for you. Turns out to be really easy.
Here is the HOW TO: 1. Get down to your local carpet place and get an off-white remnant and some discontinued samples in a similar color/ material to test on. There was a $40 5.5' x 8' remnant at the store that I plan on doing the full treatment to shortly. Most places will bind the remnant to the size you need for an additional fee, but if you are feeling frugal here is a site that teaches you several ways to do it yourself.
2. Start with some RIT dye in your color of choice. I tested with Navy, didn't like (too purple/black) and switched to plain Black for the final rug sample.

I got a couple rug samples. Some stores charge $2 for old samples, others give them away for free. (Thank you Bass River Flooring!) The one one the right had a subtle pattern, but that was fine since it was a "tester". Both samples are made from Nylon, so I followed the instructions on the dye bottle and added vinegar to the solution. For extra permeability heat the solution. (I didn't.)
 I highly recommend testing this out on swatches first until you get the hang of it and the look/color you want.
I tried a bunch of techniques: splatter painting, spots...
 and even zebra.
(p.s. this is actually the Navy color dye here- not very blue right?):
and even zebra.
(p.s. this is actually the Navy color dye here- not very blue right?):
 In the end I decided to go with my first choice,
SPOTS.
In the end I decided to go with my first choice,
SPOTS.
3. I printed out the inspiration image to make sure I kept the same feel, gathered my brush, rug and dye & wore gloves. You can also use black paint that has been diluted 1:1 part with water. The final result is much stiffer though.
You will also need old rags or towels. (more on that later) I put a piece of plastic under my rug and began painting on the spots:

 I used the flat edge of the brush to get a feathered look on the edges:
 When I was happy with it I stopped. It took me about 25 minutes to do this 25"x17" piece, but the good news is I got much faster once I figured out my technique.

4. Now, about the old rags or towels... I used them to blot off the excess dye. This makes for a softer, faded look and keeps excess dye from rubbing off on your feet. It also dries MUCH faster.
I laid the towel over the rug and pressed everywhere. A rolling pin covered in foil works great here.
 Pull off it off and you have a matching towel... yikes!

I let it dry for a day and did a rub test:
 This is all that came off, not bad.
If you use diluted black paint it isn't even an issue.
This is all that came off, not bad.
If you use diluted black paint it isn't even an issue.
 Finished pattern (actually makes a sassy little doormat):
 Up close:
 It feels soft, not crunchy.
FYI- You can also achieve this with Sharpie markers, just takes a lot longer!
Check out this tutorial for vinyl seat covers.
It feels soft, not crunchy.
FYI- You can also achieve this with Sharpie markers, just takes a lot longer!
Check out this tutorial for vinyl seat covers.
 I am really excited about the finished product and so happy to know my rug obsession can become a reality. I am off to get myself that remnant to make a runner for my hallway or maybe a rug for the office! Hmmmm.... decisions.