If you're new here, you may want to subscribe to my RSS feed. Thanks for visiting!

Well, the start of any good birthday party is coming up with the perfect invitation. Now I could go to the store and buy invitations, or even order something online. But remember, I’m running out of time. I didn’t have time to order something and it has been my experience that my vision is sometimes either way ahead of the times or way behind the times. Finding an invitation with just the right theme in mind isn’t always possible.
So I have given up on purchasing invitations for the most part. I tend to make my own. I have used my computer to make invites, but honestly I’m not very tech savvy. So getting things to print out just right usually takes a lot of paper and a lot of ink. So for me that usually means a far too high price tag. When I can make that work I can make some very spectacular invitations though.
I am all about making things simple too. So when my daughter decided on a One Direction party I began thinking how can I do these invitations? And it hit me. I could do something which I’ve done once before for my oldest daughter when she had her Hannah Montana birthday party. It was simple and came out really nice. And it’s something that you don’t have to use for either Hannah Montana or One Direction. Any musical themed party would work great with this invitation.
 One Direction Party Invite

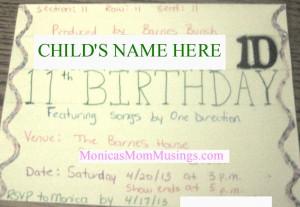
A concert ticket. So simple and so brilliant if I do say so myself. You can get all of the information on one 4×5 card. Here’s how I did it.
What You Need
- cardstock
- gel pens or multi-color pens
- glitter glue
- scissors
- ruler
- pencil
- stickers (optional)
Instructions
- Cut your card stock into the size of an invitation. A good size that will fit into an invitation envelope is 4×5-1/2.
- On these particular cards I used stickers to make the 1D symbol. I measured my stickers which were 3/4 of an inch. I used that as my guide to figure out how large of a font I wanted to use for the birthday message. Then I measured out some lines with my ruler to try to keep things straight. I carefully drew lines with my pencil.
- On this particular card I placed the sticker first. I didn’t want it too close to the edge because I knew I wanted to add a little decorative piece down the sides. Then I wrote my daughter’s name with a green pen (her favorite color) in a similar looking font to the stickers and mentioned that it was her 11th birthday too.
- Next I began filling in the rest of the information with a few things to make them look more ticket like in different colors just to make it more festive. Concert tickets usually contain things like where your seat is and who produced the concert. So on the top I wrote the section, row, and seat were all 11 (since that’s how old my daughter will be). Since we are the ones “producing” this party I used our family name as our production company.
- I included a venue (location) with our address and a date of the concert with a start time and end time for the show and of course ended it with an RSVP number.
- Finally I added some glitter glue in squiggly lines just because what 11 year old girl doesn’t love glitter?
And that’s it. It made a fun and functional invitation. This is one of those things where you really could easily take creative license with it and do it for just about anything you would need a ticket for. Having a sports party? A ticket for a sporting event. You don’t have to use the colors or the glitter glue. I think it makes them look kind of girly so if you have a son you might want to cut back on the pinks and purples and sparkles. Adding “Admit One” to the invite might be fun too. I’m sure these could be printed on the computer as well if you are more tech savvy than me or know how to print tickets.
See, so many options for a simple and inexpensive invitation. I personally usually have this stuff on hand. I did have to buy more glitter glue and paper, but all of this stuff will be used for other projects. The sheet of stickers I got to put the 1D on these invites was the most expensive, but again I have a bunch of other stickers I’m sure I’ll find a use for somewhere. All in all I would have to say to make 10 of these invitations it cost me total about $5. Without the stickers it would have been about half that cost.
So what do you think, would you come to this One Direction party with concert ticket in hand?
