All Domainers should take advantage of a FREE option to use at your disposal by adding a responsive contact form directly on your domain name.
Sedo, Flippa, Domain Name Sales, Afternic, GoDaddy and many allow to sell your domain names, but I often think the BEST place to sell your domain names is right on the domain name itself.
A simple contact form can be all you need to gain interest and sell it (at least start the process) and save some $$$ in commission.
One thing I have noticed in all my years domaining is the lack of “control” with all those services and simply adding a simple contact form on your domain name is a pain in the ass and it really shouldn’t be. Well, if you have had that problem and want to put a simple contact form on your domain name the way you want it to work/look without paying for web hosting or knowing any code…. for FREE… here you go!
JotForm.com (sign up, it’s FREE) This is not an affiliate link.
Building your perfect contact form:
After signing up and logging into your account at JotForm: Click Build Form (Orange button on left)
You then have 3 options: Blank Form, Use Template, Import Form (pick one) I will start with a Blank Form and click Create. (Note: you can select, Use Template and search: domain name as I added a template form that I use to make it all that more easy for you so you can skip the below if you choose)
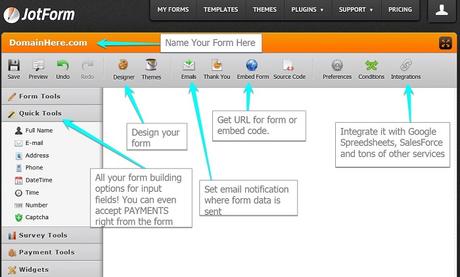
If you continue to Build (which I would suggest to do, so you get familiar with the options) then will see a screen like this (which I have added a bunch of notes and arrows to help you navigate).

Name your form. Since this form is going on a specific domain name, name it that domain name!
I then use the “Form Tools” tab and mainly always just use the following:
- “Heading” ~ Inquire Today About DomainHere.com
- “Text Box” ~ 4 of those for: Full Name, Email Address, Offer Amount (all 3 of those required) and Phone or Skype ID (not required). You can also use the Quick Tools option for this, I just like using the Form Tools options.
- “Radio Button” ~ Use 3 options (default): Purchasing | Leasing | Both
- “Text Box” ~ Message
- “Captcha” ~ Cuts down on spam
- “Submit” ~Submit Button
- “Widgets” ~ The options are near limitless here but I always use the following, which are hidden fields in the form to grab user data:
- Mobile Responsive (so the form works on a mobile device properly ~ Google Analytics (enter unique code)
Note: Upon user submission, the form automatically grabs the users IP address.
Tips
Don’t over think all the above! Put what is needed on the form and only that (fields the user needs to fill out). You can put what you feel you need in hidden fields to help you detect who the potential interested party is. That is really key info for you to have!
With each added field you create, there is a little “Gear” symbol. That allows you to make a field “Required” to fill out. It also allows you to set the width of the in-put box and many other things.
Integration ~ Again, with integration’s (one of the very powerful things about JotForm IMO) your options are near limitless. If you wish to keep track of all your inquires, I’d suggest integrating your contact form with Google Sheets so all your contact data is in one spot, live and accessible as long as you can access the web. Salesforce, Dropbox and more are options.
Designer ~ A little hard to find the option if you are “building the form”.. so click My Forms again, select your specific form and click Edit Form. Then on the top is the Designer feature. Again, options are limitless here with color, width of form, logos, background image etc. One thing I like to do here is to “scrunch” the form to make it smaller/compact so the user doesn’t feel overwhelmed by a long contact form. In order to do this, go to the Line Layout. I put line spacing at 0px and vertical padding to 3px. Save and Preview.
Embed Form ~ This is where you will get the URL or Embed code for the form. The “easy” thing to do IMO is to get the URL, go to your domain name registrar with it and 301/302 redirect your domain name to the provided URL. Use Masking and it will appear the form is directly on the domain name. You can also make your form Secure if needed, and simply check the box next to the provided URL when clicking Embed Form.
Emails ~ You will get a email notification each time a form is filled out. The JotForm system defaults to the email address you signed up with, but you have the options here to select where those notifications are sent. You can also customize things here.
View Submissions ~ You can do this directly in your JotForm account for each specific form you create. Visit the specific form, click it, then More on the far right and View Submissions.
Account Details ~ As mentioned above, this is FREE, but everything is limited when it comes to free. The free account allows you to create as many forms as you wish. Limitations come into play based on how submissions you intake. The free account allows 100 form submissions per month. If you are going over that, then you will need to upgrade to the “Bronze” package which allows 1,000 submissions per month among other options. Bronze is $19 per month, Silver (10,000 submissions) is $39/mo and the Gold package is $99/mo for 100K submissions etc. You can view all pricing/packages here.
More Than One ~ Once you have created a form you are happy with, simply click that form in your account and on the right, click More / Clone Form. Change the domain name in the Heading, set your unique code in Google Analytics and you have created a new form for a different domain. This should only take you seconds to add a contact form to any domain name you own then!
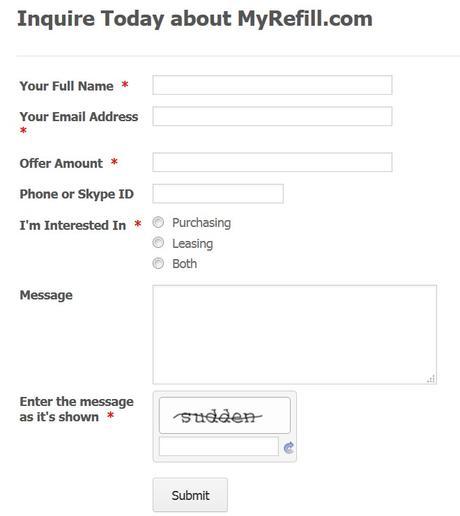
So how does the form look? Again, this will depend on what you do with the “Designer” feature but I like to keep mine as plain and simple as can be so there is little to no distractions. So nothing fancy here, just functional! Here is how it looks (keep in mind this is also mobile responsive, so it will work on a mobile device and there are several hidden fields delivering me good information with each submission)

I hope this article was helpful to you and provides you with another option to use in selling your domain names!
