How to customize pencils with creative carving | #LRCrafts - DIY Passion: if you can think it, you can make it
Leggi in italianoMy passion for wood decorations stemmed from one of the simplest moments of my childhood, when my grandfather would take me to the forest behind our house to gather chestnuts or blackberries. After stocking up on forest treasures, he would sit with his trusty pocket knife, carving simple and evocative shapes on fallen branches. The contrast between the dark bark and the delicate engraved spirals deeply fascinated me.
Perhaps that’s why even today, when my husband and I think about creating something new at home, wood is our first choice. My husband also shares a special bond with wood, and we both adore the myriad of possibilities it offers.
During my school years, I discovered a passion for decorating my pencils. I could say that this is how my first handmade crafts were born, inspired by my grandfather’s skill in wood carving. My favorite pencils have always been the classic ones with the hexagonal cross-section, on which I carefully carved triangles in alternate rows. Simple geometric shapes, just like my grandfather did on his walking sticks.
Recently, I rediscovered one of my carved pencils at the bottom of a drawer, and nostalgia prompted me to revisit this old technique, which I now want to share with you.
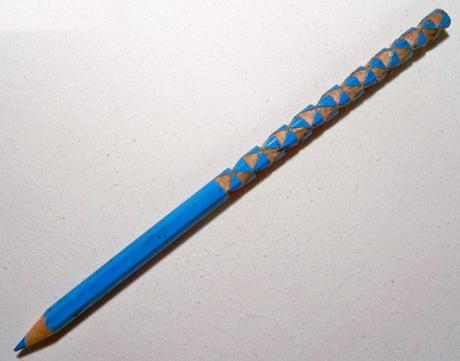
What you need:
- A craft knife or a thin-bladed pocket knife (choose whichever is most comfortable for you).
- A ruler.
- A colored pencil with a hexagonal section to carve.
- Another pencil to draw guidelines, if needed.
The carving process involves incising a series of isosceles triangles along the six sides of the hexagonal pencil. The carved triangles will have the vertex facing upwards, while the spared ones will be oriented downwards. These triangles will alternate in each row.
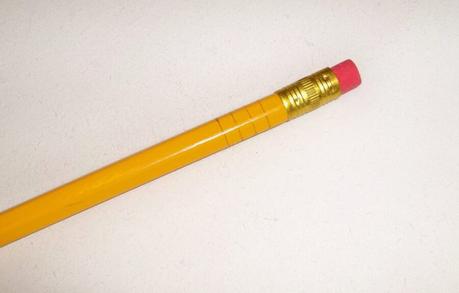
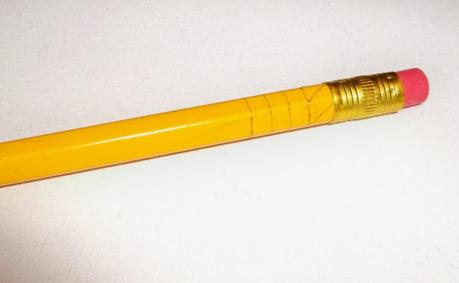
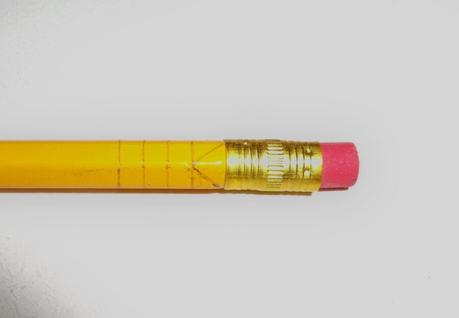
I usually don’t draw guidelines for the incisions, but it might be helpful, especially the first few times. To begin, you need to determine the height of each row, which will determine the height of the triangles. With this measurement, equidistant horizontal lines should be drawn on the pencil.
To trace the triangles, visually guide yourself with the corners of the pencil: each corner constitutes the median line (the height) of the triangles. Start from the intersection between a corner and the top of the pencil, from here draw a line inclined at 45° until the intersection between the horizontal line just below and the adjacent corner. Draw the lines towards both the right and left corners, repeating for each corner until you have filled the entire first row with triangles.
Observing the technique from photos is simpler than reading and following written instructions (and it’s easier done than said!).
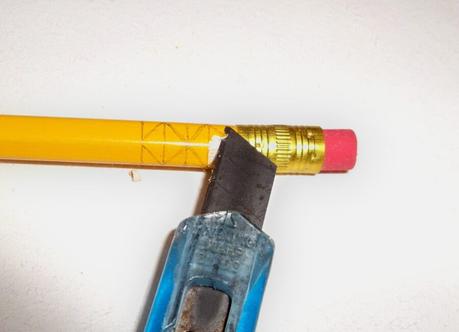
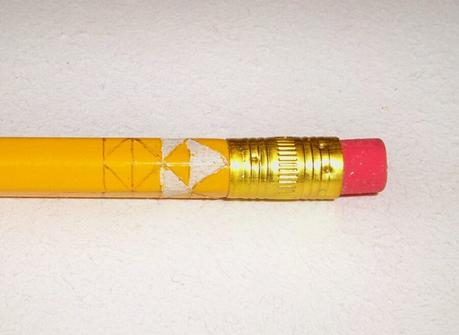
Once the design is completed, we move on to carving. Lightly incise the guidelines drawn in pencil. Then, delicately scratch away the colored coating of the pencil inside the upward-facing triangles. If the color peels off where it shouldn’t, don’t worry: a felt-tip pen can easily fix the problem.
After the incision, the colorless triangles should be more concave than the spared ones. Carve more deeply into the base of each triangle until the two base angles are joined by a straight line. Finally, smooth out the surface of the triangle, passing the blade of the craft knife from the vertex to the base, so that it becomes smooth and even.
The most challenging part of carving is precisely this sanding phase, but with a bit of patience and attention, you will achieve surprising results! It’s all about practice: compare your first pencil with the subsequent ones, and you will notice a significant improvement from pencil to pencil.
Personalizing pencils with carving is a simple and rewarding way to transform a common writing instrument into a personalized craft. This project not only provides an opportunity to express creativity, but can also become a unique and meaningful gift for school-age children. With customized pencils, losing them becomes less likely, and the experience of bringing something made with love and care to school adds a special touch to daily life.
Older kids can also be involved in the process and create their own pencils with their own hands.
Have you tried this technique? Share with me and the other crafters your experiments with personalized pencils! If you have any questions or doubts, don’t hesitate to ask in the comments section below.
by Rici86.

