Thinking about bowling fairly often? If you are, chances are you’re looking for a nice pair of bowling shoes. Other than a bowling ball, all you need are some quality shoes to start the game rolling. Assuming you’re barely getting into the sport, any pair of bowling shoes would be a lot better than what you would rent on a night out. But what exactly should you look for in a pair of shoes? This really depends on your needs, preferences, and frequency of play. There are also a few things you should look for in a shoe, such as what features are important, the significance of the right soles, and finding the perfect fit for you. With that being said, here is how to choose bowling shoes. Let’s roll!
How to Choose Bowling Shoes Infographic

How to Choose Bowling Shoes: In-Depth
Step 1: Discover the Anatomy


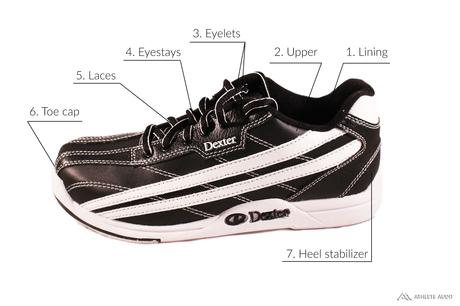
- Lining – A sock-like lining on the inside of the shoe, vamp, and quarter provides added comfort
- Upper – Most bowling shoe have leather or synthetic leather uppers, although more breathable materials can also be used. Some shoe uppers can also have perforations in them for added breathability
- Eyelets – Holes near the top of the upper guides the laces in place
- Eyestays – Houses the eyelets and laces
- Laces – Laces are commonly used, although shoes with velcro straps can also be found
- Toe cap – Helps to prevent wear on the toe when pivoting
- Heel stabilizer – Keeps heel stable and secure
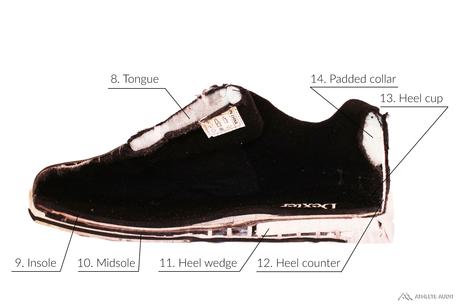
- Tongue – A padded tongue provides comfort (and possibly some protection in any case you drop a bowling ball on your foot. Ouch!)
- Insole – A footbed for your feet for comfort and support. Often thin and some can be removed to add your own
- Midsole – Located between the insole and outsole, provides cushioning
- Heel wedge – Helps to keep your feet in a position ready for pivoting. Less ankle flexion is required
- Heel counter – A tough plastic insert provides structure and support for the heel
- Heel cup – Locks the heel in place
- Padded collar – A heavily padded collar provides comfort and ankle support, keeping your feet secure in the shoe
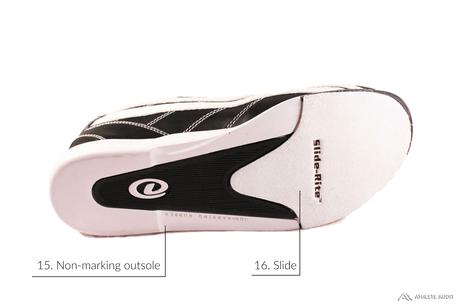
- Non-marking outsole – A flat, non-marking outsole provides traction on smooth lanes but doesn’t mark up the floors
- Slide – A very important part of a bowling shoe that should be given a lot of consideration. Lets you slide and brake on floors when throwing the ball
Step 2: Understand Your Sole

After learning about the anatomy of a bowling shoe, you’re probably having questions about the sole. If you’ve ever picked up a pair of bowling shoes (or rented a pair), you’ve probably noticed how different the soles are from normal shoes. So what exactly is it for? We’ll give you a little clue as we continue teaching you how to choose bowling shoes.
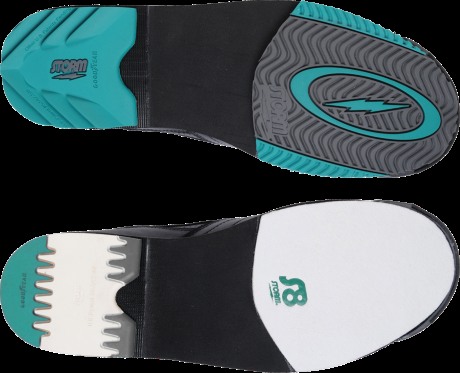
Sliding Shoe – Shoes with smooth soles are meant for sliding, which helps you with your delivery of the ball and improves your approach and follow-through. The problem with sliding too much, however, is that you don’t want to go past the foul line. That’s why a lot of mid-range to high-end bowling shoes feature interchangeable soles and heels, which allows you to adjust how much slide you get. This feature is invaluable for the regular bowler. While beginner and cheaper bowling shoes will have sliding soles on both shoes that may not be removable, more expensive shoes will feature one adjustable sliding sole and one traction sole.
Traction Shoe – A shoe with traction is key to producing more power in your throw, while also allowing you to pivot more easily during your delivery. It should also be able to comfortably bend at the ball of your foot. These types of shoes are recommended for bowlers who want to improve or play fairly often. However, traction shoes are often only featured on more expensive and competitive shoes. Therefore, if you’re not a regular at the alley, these might just be overkill.
***NOTE: If you are looking for higher end bowling shoes with traction, a pair will consist of one sliding sole and one traction sole. The shoe with the sliding sole should be on the leading foot of your dominant hand, while the traction sole should be on the other.***
Step 3: Find the Right Fit
Signs of a Perfect Fit
- Fits the width and volume of your foot
- No pain, discomfort, or chafing the foot
- Roughly 1/8″ of space in the toe with a snug forefoot and heel that doesn’t slip
Tips for Fitting Bowling Shoes
- Try bending in shoes to ensure comfort. There should be even pressure over the arches
- Shop in-store and in the afternoon for an accurate fit
- Consider adding your own insoles or orthotics for comfort or a better fit
- Try multiple sizes of the same shoes to determine the best fit for you
- Wear socks you intend to play with while sizing for shoes
- Consider whether materials will stretch; real leathers stretch, synthetics don’t

