If you know me, then you know that my curls are my babies. So much so that I avoided heat like the plague for the first few years of being natural. Fast forward to my wedding this past summer, which (between hair trials and the many events leading up to up it) meant using more heat than I have ever have used since going natural. My hair thankfully came out unscathed, but I've decided to go heat-free for the remainder of the year.
This goal presents a bit of a dilemma because while I do want to avoid using heat, I do love having the option of straight hair. Enter Luvme Hair!
Luvme is an affordable wig line with styles ranging from chic bobs to waist-length tresses. In addition to being at a great price point, the hair quality is fantastic! I tried out Luvme's headband wig for fashion week/my birthday weekend, and it was a game-changer! I was able to wear a straight hairstyle all weekend without using heat on my hair. The only visible part of my hair was my edges.
How I prepped my hair
I have very thick hair. So, I needed to get it as flat as possible so that the wig looked natural. I did a twist out on my hair to stretch my curls. This made my hair easy to comb through and put into four cornrows. Well, that's what we'll call them (lol). I would have included a photo for reference, but my struggle cornrows are best left off the internet.
PS - the next time I wear the wig, I would likely do six or eight cornrows instead. While my results were pretty flat, I think smaller braids would lead to better results
Putting the wig on
This was only my second time wearing a wig. So, there was some trial and error when putting the wig on and figuring out the right positioning. Once I got the hang out of it, it was smooth sailing!
I start by putting on the wig cap that was provided and laying my baby hair down. Then I put the wig on. I secure it with the combs inside and fasten the Velcro on the headband. Lastly, I put a scarf over my edges to set them while I do my makeup,
After completing my makeup, I style the wig. I wore it either flipped or curled under. Even though it's not my hair, I always use a heat protectant to ensure that the wig lasts.
Incorporating into my looks
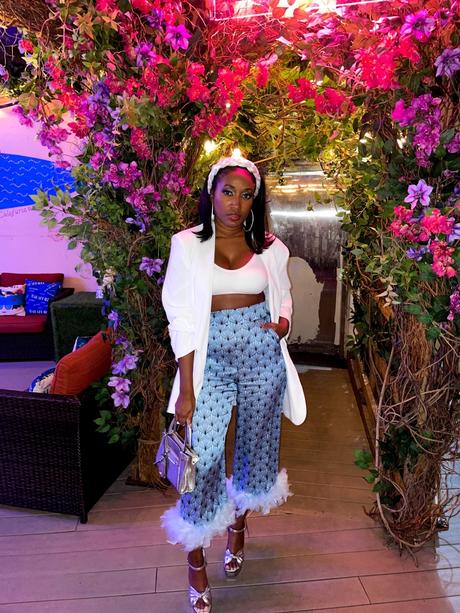
I love my afro, but sometimes I want to switch things up for a sleeker vibe. I'm a strong proponent of using hairstyles and glam to complete a look. For fashion week/my birthday weekend, I was channeling 60s/70s glam. The headband wig was the perfect way to do it!
NYFW: Flipped with a roped statement headband

I only went to one show this season. So, I had to make it count from head to toe. I was excited to do a flipped hairstyle to add a bit of volume/edge. It paired perfectly with my 60s-inspired statement pants. It took the look to another level.
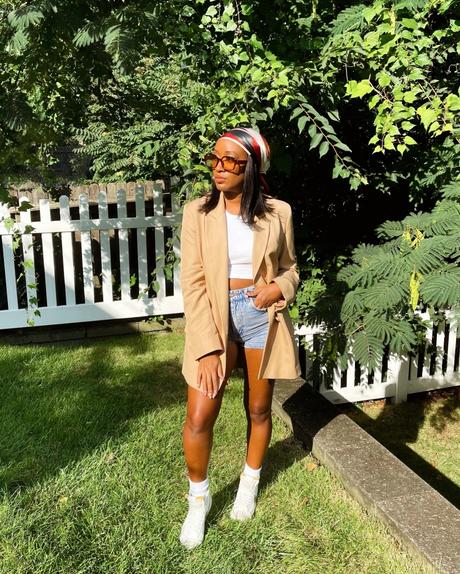
Backyard BBQ: Printed headscarf with flip

When I received this wig, my first thought was I could wear it with headscarves and hats. Its intended use is, of course, to wear with headbands, but we love options. I wore a printed headband to elevate my other minimalist look. I added some rounded square tinted shades to give it a real 70s vibe.
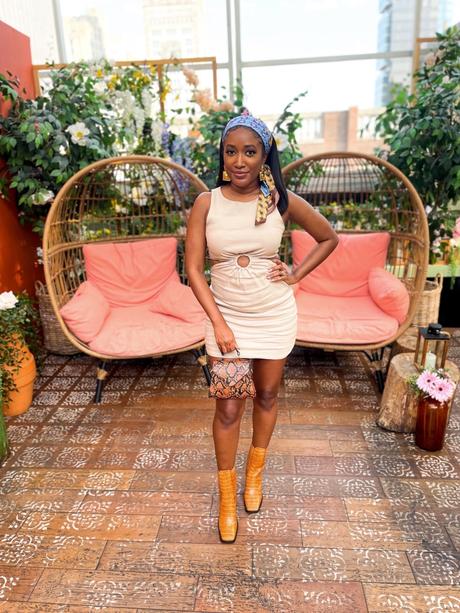
Rooftop Lunch: Printed headband with sleek hair

I wanted my outfit to do the talking for a small birthday lunch with a few friends on a rooftop. This called for a polished bob look. I had done a flipped hairstyle all weekend. So, this was the perfect switch-up!
If you're looking to dip your toes in the wig pool, a headband wig is a perfect place to start. The application is easy and beginner-friendly. It's great as both an everyday and in-between style. Use my code Alfonso for a discount on Luvme's wig collection!


