People, Meet Channar Jilipi ~ Gulab Jamuns with a college education.
The first time I met Mr. Hubby's extended family over a decade ago, they all asked me if I had ever eaten my Mother-in-law's Channar Jilipi for which she holds the unrivaled reputation of making, like no other.

While the Gulab Jamun, is its dumpy brother Channar Jilipi is its feminine reinvention. Sporting slender curves and incredibly delicate, Channar Jilipi is bound to give Gulab Jamuns a complex!
At it's best, both have a heart that is soft with a melt-in-your-mouth center that is bursting with intensely flavored syrup as you bite into it. Alas, more often than not, most end up a hard 'rock' at its core. And that dearies is what separates the novices from the whiz'.
So when my mother-in-law affectionately, Ma was visiting for a few weeks this summer (and since we both share the same passion for good cooking and food) we decided to put our heads together and make Channar Jilipi. The basis of the partnership was simple, she teach - I learn, with two notable and from what I understand, ground breaking differences.
I convinced Ma that we should skip the boring old, 'add lemon to curdle the milk' step and instead reach for store-bought Ricotta in the refrigerator aisle. Gasp! Well why not? That's exactly how Ricotta is made and imagine skipping such a tedious step for the modern kitchen (if it worked that is)
Dubious she was indeed but what a good sport and agreed to give it a go. Just when she'd come to terms with this, I suggested we get rid of good old fashioned kneading and use the food processor. Now we were both really nervous but ventured on, brave faced and all.
Enter, Ma - you must understand, the pillar of Indian kitchen is 'andaaza' - don't bother asking our Mums for recipes, they don't have one. They do everything by proportion and then a splash of this and a dash of that i.e. 'andaaza'. The proportion is critical and you never mess with it. I am quite used to my own Mum and grandma exchange recipes in the form of 1:7 - butter : flour. Sorta reminds me of mixing cement, same concept, 1:3:4 just in case you wanted to know.
To make these spiral lovelies, one essentially needs equal parts of khoya : Ricotta to which is added a smidgen of flour and other flavor adding ingredients such as cardamom seeds and sugar.

Khoya which is essentially reduced milk to its solid/thickened form, is sold as a 'brick' in Indian-Pakistani grocery stores, in the refrigerated section and is essential to this recipe. Ricotta is available in regular grocery stores.
Channar Jilipi are heavily in demand in Bengal while Gulab Jamun, its globular brother is made all over India, especially during Deepavali - the festival of lights seeing how you too are going to fall madly in love with these sweet, curvy delights!


Before we gather the remaining ingredients for the Jilipi , Ricotta cheese must first be prepared. To do this, Take a sieve and line it with double layered cheesecloth or a clean cotton or muslin cloth. Place a large bowl beneath it to trap the liquid from the ricotta.
Cook's Tip - I used one container of ricotta cheese. Place the ricotta in the sieve for at least 4 hours or preferably overnight.
Once the ricotta has lost its excess water it turns incredibly creamy and almost forms a ball.
This step forward you will need a kitchen scale - eyeballing will not do!


Gather the remaining ingredients for the Jilipi - the khoya, 1/2 tspfull whole cardamom seeds, all-purpose flour, 1/2 tsp baking powder and 1-1/2 tbs ghee. Also required is vegetable oil for deep frying.
Gather the ingredients for the Saffron syrup - 3 cups white sugar, 2 cups water and 1 tsp saffron strands (preferably A grade- spanish saffron) You may need to double this recipe if you are using a deep container to store the jilipi since the syrup must cover the jilipi.
Measure the strained ricotta using the kitchen scale. I was left with 12 oz of ricotta. Measure an equal amount of khoya that is : 12 oz ricotta : 12 oz khoya (ratio 1:1)


Measure out the all purpose flour. Amount of all-purpose flour required is 1/2 (half) that of ricotta and khoya. 12 oz ricotta/khoya : 6 oz all purpose flour. (ratio 2:1)
Set the flour aside and add the ghee and whole cardamom seeds.


Set up a food processor. Since the khoya is in the form of a solid brick, break into large chunks and process it down in the processor till it is fine as breadcrumbs.


Add the ricotta cheese to the ground khoya and process for a minute or so till combined.


Add the flour mixture and pulse for a few minutes till a ball has formed.


My mother-in-law kneading the dough ball as I take notes!
Remove the ricotta-dough ball from the processor and divide into 2 parts on a large cookie sheet. Knead the first dough ball with the heel of the palm till a smooth dough ball is formed. Work on one dough ball at a time.


Divide the first dough ball into 1-1/4" diameter dough balls. Roll each of them in the palm of the hands till round and smooth.
Now using the palm of one hand roll a dough ball into a rope about 12 inches long and of thickness a little more than 1/4".


- In a small bowl add 1/4 cup water. Dip the index finger into the bowl and pinch one end of the rope in a swirl to make an 'o'. The water acts as glue. Make sure the end if pinched tight to the rope.
- Now in a spiral lay out the rope in a swirl fashion round itself, not sticking the rope to itself.
- Finally when you reach the end of the rope, dip the index finger into the water, moisten the end of the rope liberally and attach the end accross and on the edge of the swirl - to form a 'heart' shape.


Continue forming all the jilipi and line them up on a cookie sheet not touching and in a single layer. Sprinkle a little flour on the cookie sheet to prevent the jilipis from sticking to the bottom of the sheet.

Saffron Syrup -
While you are forming the jilipis, begin working on the Saffron syrup.
In a sauce pan, bring the sugar, water and saffron strands to a simmer on medium-low heat.
Allow the mixture to simmer for about 7-10 minutes or so until it is bubbly and a thin syrup has formed.
Keep the syrup warm on the lowest setting. If the syrup cools down it will thicken.
If the syrup has begun to thicken, add 1/4 cup of water and allow it thin & simmer again.
The syrup will be used as a soak for the jilipis.
In a large and deep pan, add vegetable oil to fill 2/3 of the pan depth. The amount of oil you will need which can be several cups will depend on the shape and depth of the pan. On medium high heat, heat up the oil for a few minutes till you see ripples in the oil.


Add one of the jilipi and carefully drop it in the oil. It should immediately sizzle and puff up. Fry both sides of the jilipi to a rich golden brown.
You can fry 2-3 jilipi at a time or more as long as you don't over crowd the pan. Remove the jilipis to a platter lined with kitchen paper for a few minutes to get rid of the excess oil.


Now carefully while the second batch of jilipis are being fried, drop the fried jilipis into the saffron syrup. With a spoon press the jilipis down into the syrup so they thoroughly soak.
Allow the jilipis to soak for at least 5 minutes or until the next batch is ready for the soak. Remove the syrup soaked jilipis to a serving dish or a plastic container where they can be stored 1-2 layers.
Cook's Note - The jilipis are so delicate when hot that will break upon handling. Allow them to cool before you transfer to containers for storage. Pour the leftover syrup all over the jilipis and make sure there is enough to cover the jilipis. if not, an additional batch of syrup may be required.
Make Ahead Tips - Once cooled, the jilipis can be frozen in freeze safe containers for upto 2 months. To serve, defrost by removing to the refrigerator overnight. Heat in the microwave for about 2 minutes till hot.
I do not recommend re-heating over and over again because they tend to dry-out and toughen. So make sure you divide them into smaller portions as needed right at the onset.
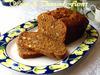
To Serve - Hot with a drizzle of syrup and slivers of pistachio nuts for a dash of color.

One bite of Channar Jilipi and it is easy to imagine this being the feast of heavenly deities.
The delicate, melt-in-the mouth texture coupled with the sweet exotic scent of saffron and cardamom, makes this one of those desserts that will always hod an esteemed place in India's vast culinary repertoire, as it so rightly has!
Recipe for
'Channar Jilipi' ~ Gulab Jamuns Reinvented : Khoya & Ricotta Spirals in Saffron syrup
In-active Preparation time - Overnight -4 hours
Active Preparation time : 1-1/2 hour
Frying time: 30 minutes
Makes approx 20 pieces Channar Jilipi
Shopping list - You will need a kitchen scale for exact quantities - eyeballing will not do!
Channar Jilipi -
15 oz (1 container) whole milk ricotta cheese (to yield 12 oz drained ricotta)
12 oz hard khoya (available at Indian or Pakistani grocery stores)
1/2 tspfull whole cardamom seeds
6 oz all-purpose flour
1/2 tsp baking powder
1-1/2 tbs ghee.
Also required is several cups vegetable oil for deep frying - quantity depending on size and depth of frying pan.
Saffron Syrup-
Gather the ingredients for the Saffron syrup - 3 cups white sugar, 2 cups water and 1 tsp saffron strands (preferably A grade- spanish saffron)
Note - You may need to double this recipe if you are using a deep container to store the jilipi since the syrup must cover the jilipi.
Preparation -
Before we gather the remaining ingredients for the Jilipi , Ricotta cheese must first be prepared. To do this, Take a sieve and line it with double layered cheesecloth or a clean cotton or muslin cloth. Place a large bowl beneath it to trap the liquid from the ricotta.
Cook's Tip - I used one container of ricotta cheese. Place the ricotta in the sieve for atleast 4 hours or preferably overnight.
Once the ricotta has lost its excess water it turns incredibly creamy and almost forms a ball.
Method -
Measure the strained ricotta using the kitchen scale. Measure an equal amount of khoya that is : 12 oz ricotta : 12 oz khoya (ratio 1:1)
Measure out the all purpose flour. Amount of all-purpose flour required is 1/2 (half) that of ricotta and khoya. 12 oz ricotta/khoya : 6 oz all purpose flour. (ratio 2:1)
Set the flour aside and add the ghee and whole cardamom seeds.
Set up a food processor. Since the khoya is in the form of a solid brick, break into large chunks and process it down in the processor till it is fine as breadcrumbs.
Add the ricotta cheese to the ground khoya and process for a minute or so till combined.
Add the flour mixture and pulse for a few minutes till a ball has formed.
Remove the ricotta-dough ball from the processor and divide into 2 parts on a large cookie sheet. Knead the first dough ball with the heel of the palm till a smooth dough ball is formed. Work on one dough ball at a time.
Divide the first dough ball into 1-1/4" diameter dough balls. Roll each of them in the palm of the hands till round and smooth.
Now using the palm of one hand roll a dough ball into a rope about 12 inches long and of thickness a little more than 1/4".
Refer to the pics in the blog post for the next steps to form the jilipis -
- In a small bowl add 1/4 cup water. Dip the index finger into the bowl and pinch one end of the rope in a swirl to make an 'o'. The water acts as glue. Make sure the end if pinched tight to the rope.
- Now in a spiral lay out the rope in a swirl fashion round itself, not sticking the rope to itself.
- Finally when you reach the end of the rope, dip the index finger into the water, moisten the end of the rope liberally and attach the end accross and on the edge of the swirl - to form a 'heart' shape.
Continue forming all the jilipi and line them up on a cookie sheet not touching and in a single layer.
Saffron Syrup -
While you are forming the jilipis, begin working on the Saffron syrup.
In a sauce pan, bring the sugar, water and saffron strands to a simmer on medium-low heat.
Allow the mixture to simmer for about 7-10 minutes or so until it is bubbly and a thin syrup has formed.
Keep the syrup warm on the lowest setting. If the syrup cools down it will thicken.
If the syrup has begun to thicken, add 1/4 cup of water and allow it thin & simmer again.
The syrup will be used as a soak for the jilipis.
In a large and deep pan, add vegetable oil to fill 2/3 of the pan depth. The amount of oil you will need which can be several cups will depend on the shape and depth of the pan. On medium high heat, heat up the oil for a few minutes till you see ripples in the oil.
Add one of the jilipi and carefully drop it in the oil. It should immediately sizzle and puff up. Fry both sides of the jilipi to a rich golden brown.
You can fry 2-3 jilipi at a time or more as long as you don't over crowd the pan. Remove the jilipis to a platter lined with kitchen paper for a few minutes to get rid of the excess oil.
Now carefully while the second batch of jilipis are being fried, drop the fried jilipis into the saffron syrup. With a spoon press the jilipis down into the syrup so they thoroughly soak.
Allow the jilipis to soak for at least 5 minutes or until the next batch is ready for the soak. Remove the syrup soaked jilipis to a serving dish or a plastic container where they can be stored 1-2 layers.
Cook's Note - The jilipis are so delicate when hot that will break upon handling. Allow them to cool before you transfer to containers for storage. Pour the leftover syrup all over the jilipis and make sure there is enough to cover the jilipis. if not, an additional batch of syrup may be required.
Make Ahead Tips - Once cooled, the jilipis can be frozen in freeze safe containers for upto 2 months. To serve, defrost by removing to the refrigerator overnight. Heat in the microwave for about 2 minutes till hot.
I do not recommend re-heating over and over again because they tend to dry-out and toughen. So make sure you divide them into smaller portions as needed right at the onset.
To Serve - Hot with a drizzle of syrup and slivers of pistachio nuts for a dash of color.
Enjoy!