
We begin our coverage of Macintosh security with this article. Next, we cover Free Security How to: Computer Security, Computer Protection on Macintosh Security Software.
Security is one of the most important parts of owning a computer. While Mac OS X has been safe for the most part, Apple continues to gain market share resulting in hackers and virus writers making more attempts to break into the Mac. 2011 was even more dangerous for Mac OS X, the Mac Defender attack woke up Mac users, and no longer can Mac users peruse their computer without fear of attack. It is important to take a few precautions to protect your information and personal data.
This article will focus on what steps you can take to lock down your Mac to protect yourself. The good news? Mac OS X Lion 10.7 is a more secure operating system. For most Mac users, many of the steps in this tutorial may be considered unnecessary to protect them from hackers and virus attacks, but if you are security conscious and require access to the Internet from an unprotected or questionable wireless network then some of these steps may just save your Macintosh from being a victims of a major attack.
Apple has a security configuration page with specific security settings for different versions of Mac OS X. Be warned that many of their security tweaks are complex and require command line input. The NSA has a shorter guide on how to secure Mac OS X. This guide also has some security tweaks requiring command line input or more detailed changes than some owners would feel comfortable doing like setting up a firmware password.
Recent Macintosh Malware Outbreaks
Flashback Trojan – March 2012 – This piece of malware infected hundreds of thousands of Macintosh’s through a security hole in Java. Apple was too slow to put out an update to Java.
Physical Hardware Security
If your Mac is located in a public place or in a home where it is easily accessible to strangers, then it is important to secure it from prying eyes and hands. Thankfully, all Macs come with a Kingston security lock port somewhere along the exterior of your Mac (it should be the port that is about as tall as a headphone jack but twice as wide, and the only port that does not affect your system in any other way besides physically attaching it to something). Mac OS X has no problematic “Autorun” functionality like you would find in Windows machines, and Apple takes extra precautions when running applications by verifying the application first. In many cases, in order to run or install applications installed on a DVD or flash drive you will be required to enter your Admin password. If your current user account is already the Admin account, we will show you how to create a new Admin account that you do not have to touch in order to provide a second safety net. Keyloggers, which capture every keystroke, for Mac OS X are very hard to come by, but for the ones that do exist, you will need to enter in your Administrator password and make sure your USB ports do not have unknown items plugged in.
The Difference Between Mac OS X Lion (10.7) and Previous Versions of Mac OS X
Mac OS X Lion is the most secure version of Mac OS X, and is considered by some security experts to be more secure than Windows 7 or even Linux Ubuntu (famous for being one of the most secure versions of the Linux OS). While many users in the past have been used to waiting for patches and updates to new versions of Mac OS X before upgrading, it is suggested by many security experts to upgrade to Mac OS X Lion as soon as possible. During its development, Apple’s Lion team called upon the help of many expert PwnToOwn hackers to crack and find as many holes as they could in Mac OS X Lion, and then allow Apple’s Lion team to go back and patch all of them to the best of their ability. This provided Apple with an excellent team of beta testers to report any security bugs they could find, allowing Apple’s developers to make Mac OS X Lion more secure than any previous version of the Mac operating system ever. Lion also requires all applications to be “Sandboxed” when running, meaning that they have restricted access to the system’s files and resources in order to prevent applications from crashing the entire system or malicious software from latching itself deep enough into the core OS to cause major problems.
Older versions of Mac OS X
Apple supports only the current shipping version of OS X along with the prior release. Security patches are not issued for those running version previous to these two. We suggest users who want security to upgrade their Mac OS X version to stay within the supported zone.
Securing Mac OS X Settings
Mac OS X Lion (and most older versions) has plenty of powerful and useful built in option to keep your Mac secure. We will optimize these to improve computer security.
1. Automatic Apple Updates:
You can start protecting your Mac by keeping your system up to date.
1. Select System Preferences Menu
2. Click Software Update
3. Select Check for Updates: to DAILY
4.Make sure Download Updates Automatically is checked
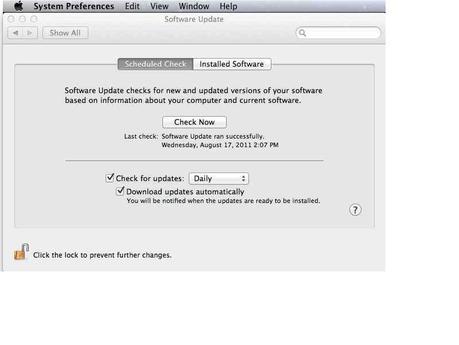
It is recommended you click the lock in the lower left corner, as shown above, in order to prevent unauthorized changes.
You can tell Mac OS X to check for updates daily, weekly, or monthly. Mac OS X will even give you the date of the last time it updated so you can see how out of date you may be.
Clicking Installed Software will cause Mac OS X to give you a list of all of your currently installed Apple software and give you the version number and date of installation.
It’s important to always keep your system updated. Apple has done an excellent job responding to virus and malware attacks. For example, a security update to remove the MacDefender virus was issued within a week after the malware’s first attacks. And as long as Apple continues to gain market share, more viruses will be written for Mac OS X. (While daily checks for updates may be tedious, it ensures that you are always getting the newest updates)
2. Updating Third Party Software
Same issue applies for third party software as with Apple software. Being up to date ensures that you get all the latest bug fixes.

The Mac App Store (Snow Leopard or newer) conveniently gives you a little notice about how many updates you have for any applications you have downloaded from the App Store. Update when it shows you any number.
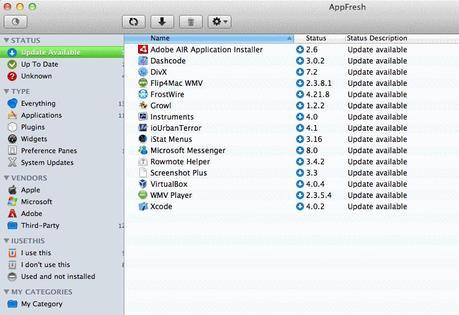
But what about all the other applications you have installed? You can download AppFresh (www.appfresh.com free). AppFresh will scan your system for all the applications you have installed and will match them with the application updates currently hosted by AppFresh’s application database (you can add to this database by adding it to your IUseThis account). With a simple click, you can download and install all of the updates. If AppFresh does not already have an application in its database, it will present you with a mini-browser and allow you to search for updates yourself.
Starting March 1, 2012, applications you purchase from the Apple App Store will have to be sandboxed, making them more secure.
3. Make sure you are not using an Administrator account
While Mac OS X does not allow downloaded content to take any action without explicit approval from the user, it is important to provide a second line of defense and normally use a standard user account. It is especially important not to surf the web or read email with an administrator account.
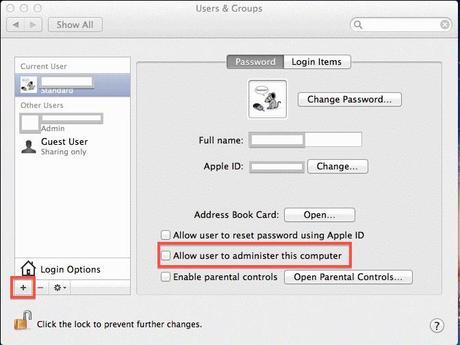
1. Open System Preferences
2. Click Users & Groups
It is recommended you click the lock in the lower left corner, as shown above, in order to prevent unauthorized changes.
Make sure you have two accounts, and uncheck “Allow user to administer this computer” under your main user account. If your main account is the only Admin account, then you will be unable to uncheck this check box.
This means you have to make a new user account and make it the Administrator.
1. Click the plus button in the bottom left corner to make a new account.
2. Make the new account an Administrator and give it the name Admin
You can use Mac OS X’s Built in Password Assistant to randomly generate a secure password.
Click on the Key symbol next to the Password input field
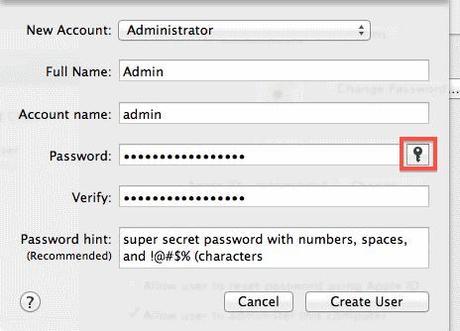
Mac OS X’s Password Assistant can generate five types of passwords: Memorable, Random, Letters & Numbers, and FIPS-181 Compliant. You can adjust the length and it will display the security quality of your password. It will also give you tips on how to make your password’s better.
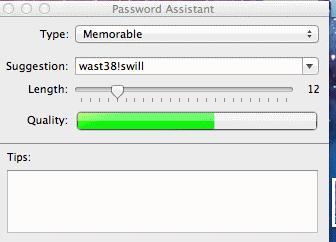
After you’ve created (and memorized) your password, you can go ahead and create your new account. Once this Admin account has been created you can go back and uncheck the Allow this user to administer this computer checkbox.
4. Check to See What Files are Being Shared
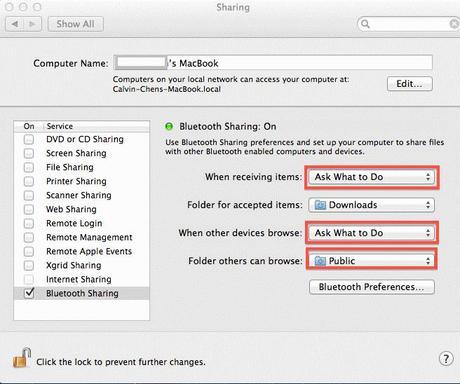
Many times you can forget the last time you shared something from your Mac. It could be the Internet, files, or your screen. It’s important to make sure you are only sharing what you want to share with everyone around you. To see what is shared, navigate to the System Preferences window
1. Open System Preferences
2. Click Sharing
Unless you want to share files, Internet, or your own screen, you should disable all sharing features until used. If you frequently share files through Bluetooth, make sure you set Mac OS X to always Ask What to Do and only give Allowed users access to your Public folder.
5. Lock up your Mac
Another way to protect your Mac is to have it automatically lock itself after it goes to sleep. To avoid accidentally leaving your Mac logged in while you’re away navigate to:
1. Open System Preferences
2. Click Security & Privacy
3. Set Require Password time interval to a comfortable setting
4. Click Disable Automatic Login
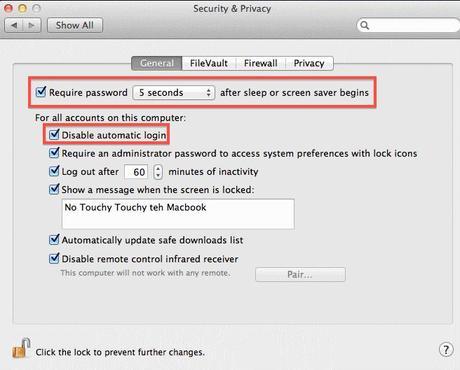
To be completely secure, it’s best to check all of the options as above. Some versions of Mac OS X may have the following options on this screen that can also be checked if present:
- Disable automatic login
- Use secure virtual memory
- Disable Location Services (if present)
- Disable remote control infrared receiver (if present)
It is recommended you click the lock in the lower left corner, as shown above, in order to prevent unauthorized changes.
6. Encrypting Your Drives
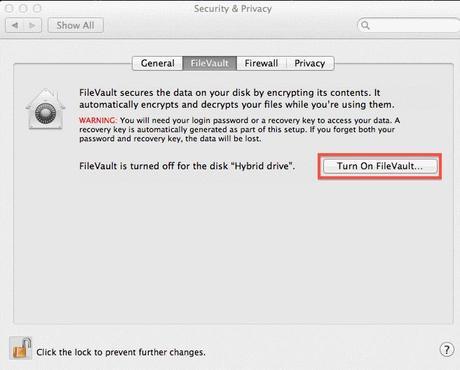
Mac OS X File Vault is one of the easiest ways to encrypt your hard drive, Time Machine backups, or external hard drives. You can encrypt drives in a variety of ways.
It is recommended you click the lock in the lower left corner, as shown above, in order to prevent unauthorized changes.
1. Select Security + Privacy
2. Click FileVault
3. Click Turn on FileVault
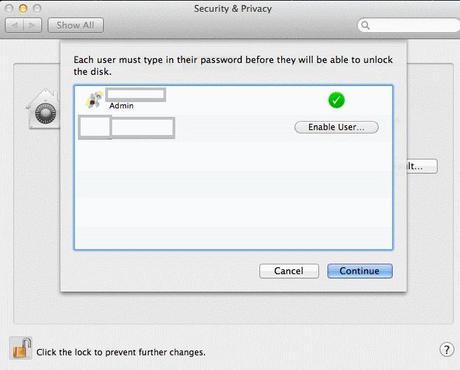
It is recommended you click the lock in the lower left corner, as shown above, in order to prevent unauthorized changes.
Type in your password, and you should see a check mark next to the account you want to encrypt.
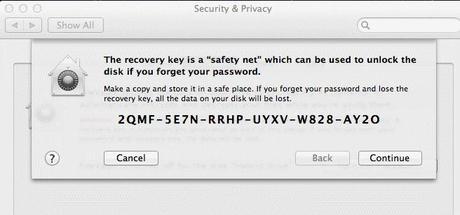
If you ever forget your password, you can use this “Safety Net Key” to recover, open, and decrypt your encrypted drive. Clicking helps prevent unauthorized changes.
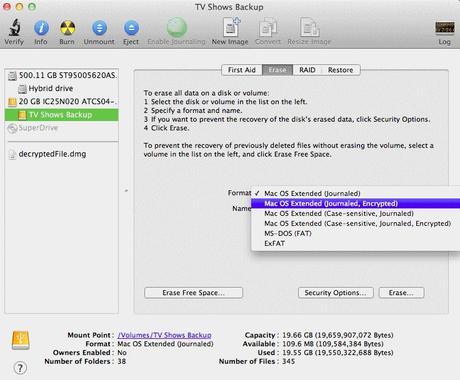
Another method of encrypting your drives is using Mac OS X’s Disk Utility
1. Open Applications
2. Click Utilities
3. Select Disk Utilities
A new feature in Mac OS X Lion was added where you can format any drive whether it be a USB flash drive or an external hard drive as a Mac OS Extended (Journaled, Encrypted) drive. This prevents users from stealing your data by mounting the drive without authorization.
7. Keep Your Old Data Safe: Backup Today
Also built into Mac OS X, Time Machine is considered one of the best backup offerings and Apple is nice enough to give it to you for free in the operating system.
Whether you have an external hard drive or Apple’s Time Capsule hardware, setting up a new Time Machine is extremely easy. Daily backups are critical to prevent loss from accidents or malware.
Start off by plugging your external drive into your Mac, and launch Time Machine from your Applications folder. You can then choose which disk to use as a Time Machine backup, and encrypt the backups desired.
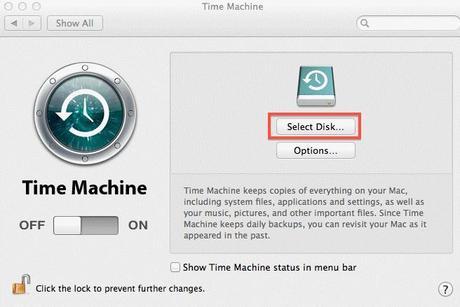
It is recommended you click the lock in the lower left corner, as shown above, in order to prevent unauthorized changes.
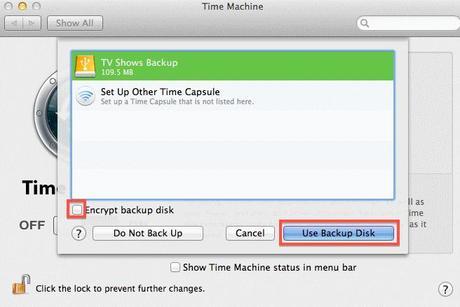
Extra settings are available, such as backing up while running off battery power, giving a notification whenever an old backup is deleted, or how long to wait until locking a document from being Auto Saved.
8. Using Mac OS X’s Built-In Firewall
A firewall prevents unauthorized network traffic from reaching your Mac. Mac OS X’s Built-In Firewall is among the easiest to use firewalls on the market. You can access Mac OS X’s Firewall settings by going to:
1.Open System Preferences
2. Click Security & Privacy or Security
3. Select Firewall
4. Make sure it is On - Click Start if needed
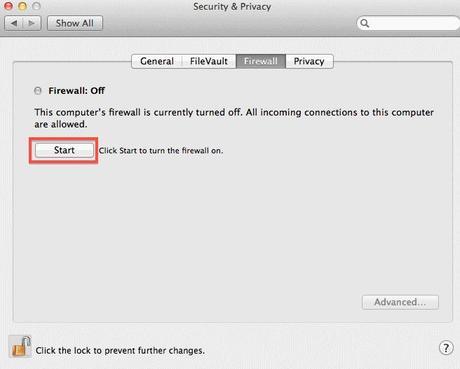
We recommend also clicking Advanced.. and checking Enable stealth mode
Click the lock to prevent further changes.
Once your Firewall is started, all of your incoming network connections must ask for permission before any action is taken.
Once activated, you can access the Advanced… Menu from the same Firewall tab.
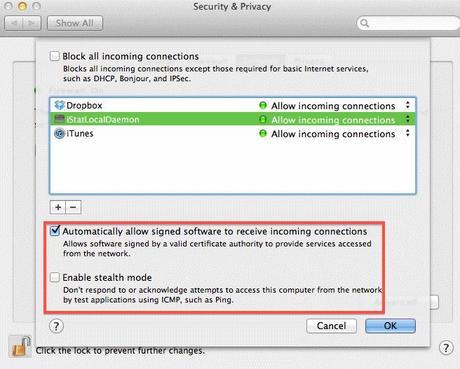
From the Advanced menu: configure which applications are allowed through your Firewall, and the extent they can affect your system. You can check “Automatically Allow signed software to receive incoming connections”. These signed applications are applications that have been verified by Apple to not contain malicious software. You can also enable Stealth mode if you don’t want your system to keep record or acknowledgment of the network responding to test applications using ICMP, or Ping. Checking Block All Incoming Connections is most secure but may be incompatible with some software.
9. Using Mac OS X’s Account Settings
Adjusting some of the accounts settings helps increase login security:
1. Open System Preferences
2. Click Accounts
3. Click on Login Options
4. Set Automatic login to OFF
5. Set Display login window as to Name and Password
6. Select Guest account and uncheck Allow guest to log into this computer
7. Uncheck Allow guest to connect to Shared folders
10. Adjusting Safari Settings
Safari requires a couple of tweaks to increase its security:
1. Open Safari
2. From the Safari menu, select Preferences
3. In the General Tab, uncheck Open safe files after downloading
4. In the Security Tab, uncheck Enable Java (note: Do not do this if you need to run a Java program, when in doubt, try unchecking it first.)
By configuring our Mac OS X operating system, we can significantly increase the security of our Macintosh MacBook notebooks and Macintosh desktops.
This concludes our Free Security How to: Computer Security, Computer Protection on Macintosh article. Other articles on Safegadget.com help you secure the other aspects of your personal computer, including How to Set up a Secure Wireless Network, and How to Secure Internet Explorer article, or How to Secure Firefox Article. Please see our other articles on security tips for your e-mail, iPad, online banking, online shopping, smart phones, and more.
