 It’s no secret that you often find one thing while looking
for another. That’s what happened to me
recently. Funnily enough, I can’t even
remember what I went in search of, but what I found was a super-nifty,
funny-family mix-n-match big-block-puzzle. (Phew! How's that for a description!?!) One of the two clever
ladies over at ‘a
couple of craft addicts’ took a series of photos of her family members, printed the photos out in similar proportions, sliced them up, then stuck them onto big plastic blocks. The result was a
fabulous mix-n-match puzzle where her child could put mum’s face on dad’s body
and her daughter's legs; genius!
Of course it takes a while to make, and being allergic to long-term commitments (outside the M-words of marriage, motherhood, mortgages and motor vehicles), I decided to make the cheat’s version of this clever craft project.
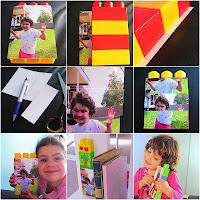
Here’s how to make a photo-block-puzzle, or at at least a much less sophisticated version (as always, you can click on the photo to enlarge it if you want to see the how-to details):
- You will need 4 three-nib-wide / double-height blocks of various colours (go for chunky blocks because the skinny ones will require skinny strips of photos which might not last under the tug-a-war that will soon eventuate).
- Lay the photo on top to check that it will be both wide and long enough (if not, choose blocks to suit).
- Experiment with different photos and lay them under the blocks to see where they will be cut up (it may be a bit traumatic for your children if they have their faces sliced through the eyes, but perhaps having a large photo of their face cut up so that their eyes and nose and mouth are on separate pieces will be funny – you know best!)
- You can then use a ruler and measure the blocks and draw the proportions properly on the back of the photo, or you can take a shortcut like I did and simply lay the blocks on top of the photo and mark out where the cuts need to go (first the left side, then the right, always making sure both the bottom of the blocks and the bottom of the photo line up).
- Join the left and right marks up (again, be good and use a ruler, or be like me and use a block or another photo to make your line).
- Now cut the photo into four panels.
- I used temporary-tack to stick my photos down; I put the blocks in place and then wriggled everything around to get it where I wanted it, then trimmed the photo edges to suit. If you don't mind losing the plain-block look forever, consider using glue instead of temporary-tac for a more permanent solution.
Since making this craft I've been thinking it could be turned into a fun Lego-party invitation idea (mixed up and they have to reassemble it to read what to do), a father's day present (with a daddy-daughter photo for example), or simply a great boredom buster for a wet weather weekend.
Next time you're looking for something on the internet, remember to keep an open mind, stay ready for alternate possibilities, and then raid your children's toy cupboard at every opportunity!
Enjoy the weekend people and stay crafty. x

