As many readers of this website know, we operate a sister blog, Discover the Burgh, focusing on being a travel guide to Pittsburgh, PA. If you've been here before, you also know that we have an incredible view from our house that we frequently share.
Ever since coming up with the concept for our local blog, I've dreamed about having a webcam on our deck pointing at the skyline for anyone to see at any time of the day- be it for sunrises, sunsets, fireworks, or to just check real-time weather.
I'll save the long rant about my webcam research for somewhere else, and summarize it by saying that getting a high resolution, weather-proof webcam with live-streaming capabilities was next to impossible on my budget. Most either had poor reviews, were too expensive to buy, or too complicated to deal with when it came to integrating it with my website.
I almost gave up hope in finding something that would work, but found the highly rated Nest Cam, a webcam designed for indoor use only, and took a risk on its potential. In this one instance, I'm really glad I took the chance.
Nest Cam is Designed for Indoor Use
Nest Cam is the newest kid on the block when it comes to compact, high resolution, and cheap webcams. Designed more for security monitoring or as a child / doggy cam, the makers of Nest Cam have put a lot of effort into making the program and associated service suitable for those who want to see what is going on in their house.
They have not, however, worked on an outdoor model that would withstand below freezing temperatures and extreme distances.But considering the webcam itself was well under $200, offered 1080p resolution, came with a magnetic base, offers live streaming to your phone, swivels to just about any configuration you need, and has many premium options for about $10/month (including historical playback, time-lapse editing, and live streaming on your website via an embed code), I was willing to take the chance to work with the view we have from our window- which is just as impressive as a few feet out on our deck.
A Few Hiccups, But Overall a Nearly Perfect Webcam
When the Nest Cam arrived, my first impressions were as high as they could be. The webcam is small, and setup really only required downloading an app, scanning the bar code on the webcam with my phone, and connecting it to our house's wifi. It literally took five minutes, if that.
For those who are computer illiterate, they really can't make it any easier than this.The trouble I had from there was figuring out how to mount it on a window, which ended up being harder than I anticipated.
My first hope was installing the camera onto something metallic, and letting it cling from there. Unfortunately, nothing near our preferred mounting spot was metal. My second thought was using the attachment plate that comes with the webcam, but it is designed for screwing into a wall and the viewing angle didn't look so great when I tried my options. I was left with either going out and buying a suction base to cling to the window, or coming up with a mounting mechanism with items I had around the house. Naturally, I chose the latter.

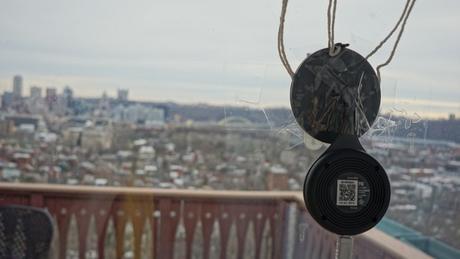
As a stop-gap I used a few double-sided adhesive stickers, a bit of extra hold-down tape, and tied some twine to the above curtain rod as a safety in case the camera fell off (and for full disclosure, it has- a secondary safety mechanism is key).
After that, it only took paying for the service and adding the provided iframe HTML code to our website (or this post, as shown below), and off we went.
The Image Quality Could Be Better
Overall, my biggest concern about the webcam is that I'm not entirely sure I would call the playback 1080p resolution. During the day, in full sun, the quality of the webcam is amazing. I wouldn't pull prints from it or make the video full screen, but for watching on a website, my phone, or on social media odds are good you won't be able to tell the difference.
Once the sun goes down, however, you really start to see the difference- especially if you have to zoom in at all to get the best image frame like we did with our view (the full viewing angle on this camera is huge- so you'll likely need to zoom in some). As there appears to be no optical zoom on this camera, any zoom reduces the quality of the streaming substantially. With an outdoor, night scene, and night vision turned off the reduction in quality is very apparent (night vision looks awful through glass- so you wont be turning that on either).
In the grand scheme of things this is a petty concern because the update rate is much better than once-per-minute like other webcams, and the image quality is also on-par, if not better in even the worst conditions.
The Time-Lapse Feature is Amazing
My favorite feature of the webcam is not the live-streaming at all, but is in fact the time-lapse generation feature which is generated entirely on Nest's website at the click of a button (okay, three clicks).
On incredibly beautiful days we are able to take any chosen time period and cut it down to just a few seconds or extend the length to a maximum of two minutes. This has been incredibly popular on our social media channels and the videos continually get shared each and every time we publish one- making it something we now watch each and every day.
Considerations for Mounting for an Outside View
Although the Nest Cam does its job beautifully for the extent we were looking to use it for, a few additional considerations need to be kept in mind if you are going to mount it inside your house for use in sharing an external view.
One of the biggest things we got lucky with in mounting our webcam for outside viewing is that the window it is attached to has a black-out curtain behind the camera- and we very rarely open it. I would be very concerned if I mounted the webcam in a spot where the room lighting would cause any glare on the glass. Just as you can see the camera reflection when the sun is in direct view on the outside, the back glare when there is lighting in the room is even worse. Take this as a warning.
I am also concerned with how the camera will perform in our window in the summer when the room gets hot. So far we've been operating the camera in the winter without issue, and the worst outdoor temperature seen was approaching 0 degrees Fahrenheit with the internal room temperature still being mild. But when it is hot outside, our room gets much, much hotter. We will see.
Finally, the Nest Cam comes with a 10 foot USB cable that connects to a power strip and has no wired internet connections. So if you have a plug that is further away, you may have to buy the 20 foot USB cable like we did ( found here), and you may also have to alter your internet router location to ensure the wifi reaches that corner of your house.
Overall, I am very impressed with the Nest Cam for outdoor use. It doesn't provide the full HD resolution I was hoping for, but at the same time saving nearly $1,000 on up-front costs for weather-proof, high-resolution webcams and halving the monthly hosting fee is a huge win in my book. For that I'll take the restrictions and put that money into other investments for our website.
So if you're looking to live-stream a view from your house, and have the necessary conditions to alleviate a few of the concerns we've highlighted above, installing a Nest Cam may work out wonderfully for you!
Thinking Nest Cam will work for your streaming goal? Pick one up on Amazon at this link. By buying through our links featured in this review, we will receive a small commission at no cost difference to you. If you found our article helpful, we would really appreciate it!Pin it!
Like this article? Share this post on Pinterest using one of the images below!


