With the news that family were visiting for the Easter break, and the (once again) chilly weather forecast, we didn’t hold out much hope of any gardening.
However, the weekend didn’t quite pan out to be the stream of gatherings and get-togethers we’d anticipated, but on the bright side, provided an ideal window of opportunity to tackle our raised beds project.
We’ve decided to install raised beds as we lost so many plants last year due to the continual wet weather. Raised beds should let excess water drain away more easily, should allow the soil to become warmer, more quickly, and should be an ideal shape and structure for us to net against birds and insects. Oh, and they should look rather smart, too.
As our vegetable bit of the garden is quite large, we decided to initially build the first raised beds on the lowest part of the garden.
The wood was delivered last week, courtesy of our cheerful farmer friend: nine lengths of 8ft planks. This would be enough to make three beds measuring 8ft by 4ft (or 2.44 m x 1.22m for the metric-savvy amongst us). They would be long enough to provide a substantial growing area and narrow enough to be able to reach all the plants without trampling all over them.

Staining the raised bed wood
After staining the wood, the other half set to work. Sawing three planks in half to provide the end panels, he attached the ends to the sides using small angle brackets in each internal corner. We then knocked a length of wood (re-used from some old bed slats) into the soil at each corner to provide a sturdy anchor to attach the bed to.
A quick check with the spirit level, a couple of screws later, and Hey Presto! The first bed was made.
This is how it looked before…

Before the raised bed was installed
And after…

I lined the bottom of this with a layer of cardboard. Apparently this should rot down, enrich the soil, and suppress weeds in the process. Next in went a layer of chicken coop waste, which we’ll follow with a layer of rotted horse manure. I’ll then empty the compost bins and spread that around, and judging from the size of the frames, I may well have to invest in a bit of top soil at some point too.
The garden is still too cold for planting, but I have stretched a couple of polythene cloches over parts of it to warm up the soil before anything goes out. The chill can’t last forever, so the better prepared I can be for start of warm weather, the better.
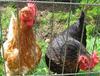
In other news, the cold snap got the better of Mildred, our chicken last week. She was fine one day, gone the next. Mercifully, she didn’t appear to have suffered and slipped away peacefully during the night – she was still perching in the coop when we found her.
So my final thought for this week is: “Rest in peace, Mildred… you laid some cracking little eggs…”
The Hinckley Times 4 April 2013

The Hinckley Times 4 April 2013