Taking a screenshot on your iOS device can really come in handy if you want to share what’s on your screen with your family, friends or colleagues. If you own an iPhone or an iPad, then you probably already know how to do this, but let’s just go through it again quickly in case there are iOS novices reading this. 
1. First, go to the screen whose image you want to capture.
2. Ready? Press the Home button (below your screen) and the Power button (on the top of your phone) together.
3. You only need to hold these two for a second. When you remove your fingers from the buttons, the screen will flash white, indicating that your screenshot has been taken.
4. To see your screenshot, go to the Photos App and then your Camera Roll.
Use Assistive Touch to Take a Screenshot
You might think that your screenshot-taking days are over in case the Home or Power button on your device gets broken, but that’s not true. If you enable Assistive Touch on your iPhone or iPad, you can still capture a screenshot, and here’s how:

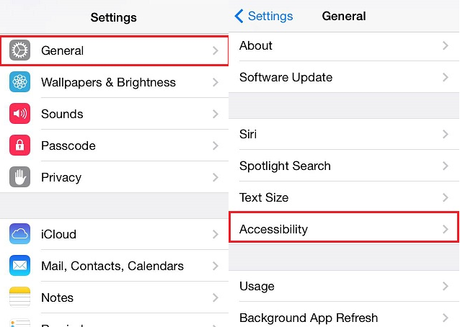
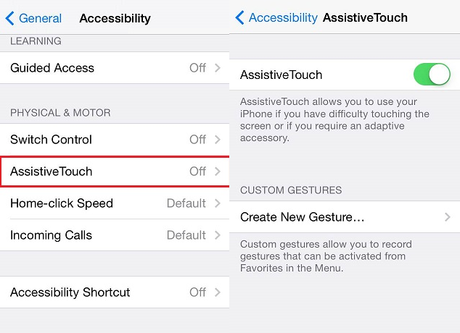
1. Go to Settings>General>Accessibility>Assistive Touch and turn it to On.

2. A black square should appear on one of the edges of your screen.
3. Go to the screen whose image you want to capture.
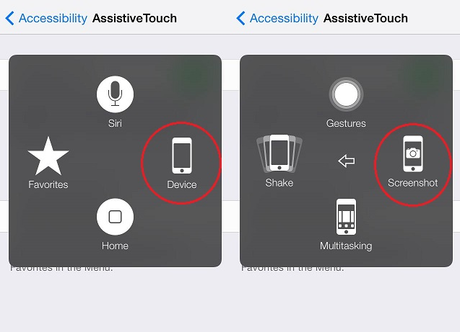
4. Tap on the black square we mentioned in step 2, and then go to Device>More and tap on the screenshot icon.

5. Your iPhone/iPad will dismiss the Assistive Touch menu and your screenshot will be taken.

