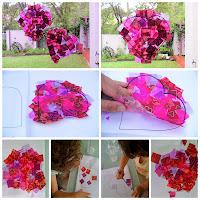
 It's no secret that I don't believe everything I hear on television; even when it's on a crafty kid's show.
About a month ago I blogged a craft project which involved decorating a coloring-in page of a dragon for a Chinese New Years Craft Project. In the post I referred to the TV show idea where they placed clear contact over a sketch, and then laid torn tissue paper over the top, sticky it in place with gloopy-glue (watered-down runny white glue). When the tissue paper was dried, they peeled it off, and the craft was ready to frame. I was dubious about something so literally paper-thin holding up.
So I tried it with my girls - and it worked a treat.
Here's how YOU can do it;
- I traced 2 heart shapes onto a piece of white paper.
- Cover the shapes with clear contact - making the contact size larger than the template you're covering.
- Create a pile of squares made from coloured tissue paper for the kids to share.
- 'Paint' the contact-shape with the gloopy-glue, then start laying your squares on top.
- Once the shape is covered, 'paint' more gloopy-glue over the whole shape to ensure everything is stuck together, and effectively coated with glue.
- Leave it overnight to dry.
- Trace the heart shape (or whatever picture you're using) with a thick black marker, while everything is still stuck down.
- Gently peel the finished product off the contact.

