Today I made the same sculpture using drinking straws, some super glue and gold spray paint. Quick, painless and cheap.
Here is a look at Round 2. I have yesterday's real brass sculpture on the left and the new drinking straw version on the right...
 Not bad, I just wish I had a brighter gold spray paint. The one I had kicking around is a bit on teh brown side.
So here is how I did this one.
Gather supplies.
-A dozen paper drinking straws. Smoother thicker plastic ones would be the best, but I was using what I had.
-Super glue.
Not bad, I just wish I had a brighter gold spray paint. The one I had kicking around is a bit on teh brown side.
So here is how I did this one.
Gather supplies.
-A dozen paper drinking straws. Smoother thicker plastic ones would be the best, but I was using what I had.
-Super glue.
 Start by gluing (2) groups of 3 straws together to create "A" shapes...
 Once dry (about 3 minutes- patience is needed or else your fingers are gonna stick together) glue the 2 "A" shapes together forming a teepee. Add straws one by one to complete your sculpture.
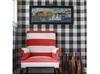
 I actually really liked it striped. I thought it would make great centerpiece or table toppers, even hanging decorations for parties...
 Here it is in front of my new painting from Jenny...
 and here it is after one coat of gold spray paint...

and an up close... you can see the paper straw lines, but if its going up on a shelf it would be fine. This is why smooth thick plastic straws are the ticket if you are painting it.
 and one more side by side.
Super easy and super cheap.
and one more side by side.
Super easy and super cheap.
 Thats all for now folks!
Later.
Thats all for now folks!
Later.