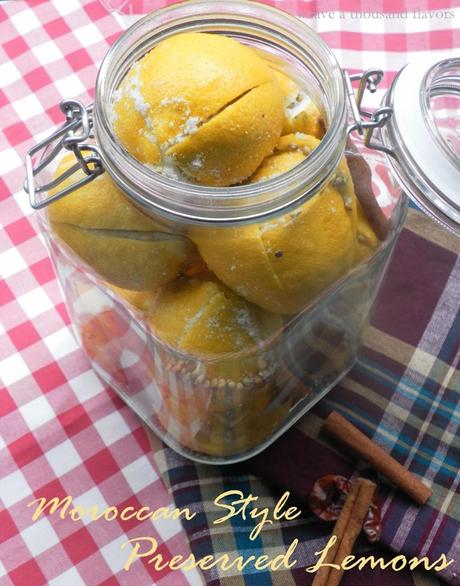
Preserved lemons are a popular condiment in Moroccan cooking and step 1 to many lovely Tagine and other culinary creations.
They are incredibly simple to make and success is guaranteed as long as you follow the directions. The main reason to preserve lemons with loads of kosher salt is allow the high salt concentration to soften the tough skin due to microbial activity and the skin is the most important part of the lemon that is used in the final product.
The process takes a solid 30 days but after the first 3 days of meddling can pretty much be left alone.
What’s fab is once you make these they’ll be ready for you whenever you need them and will keep happily in the fridge for atleast 6-8 months.
You’ll be amazed by the intense lemon flavor these impart to the dishes and fresh lemon just won’t cut it!
I began this batch July 11th and have been cooking up a storm of tagine dishes these last 2 weeks. I hope you’re excited because I’m going to give you a few reasons very soon.
Kosher Salt, lemons, air-tight jar…..GO!
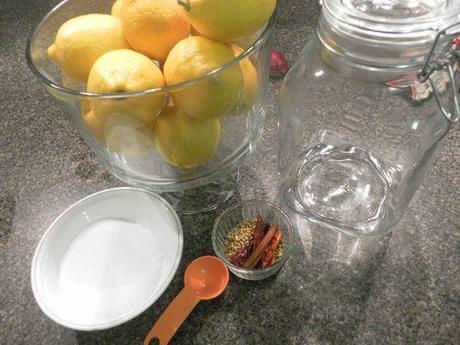
Gather the ingredients,

10 lemons, 1 tbs kosher salt per lemon (so approx. 10 tbs salt), 3-4 whole dried red chillies, 1 bay leaf, 1 cinnamon stick & 1 tbs coriander seeds
Also, a large glass jar ( quarts) with tightfitting air tight seal and a very sharp knife (get your Wusthof out!)
Wash the lemons and dry them off.

Cut off the little rounded bit at the stem end if there’s a hard little piece of the stem attached.
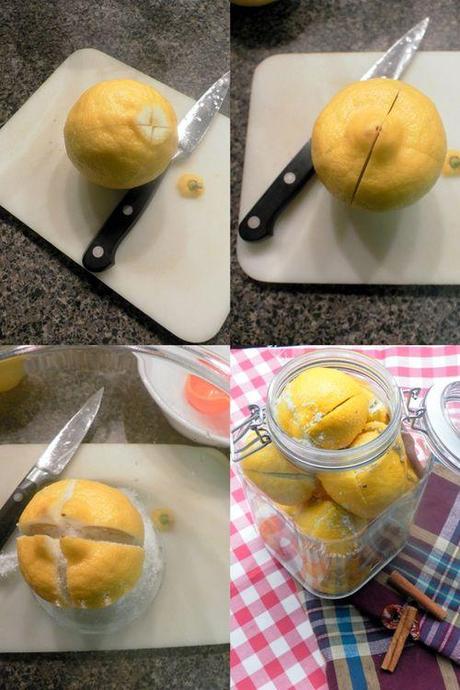
From the other end of the lemon, make a large cut by slicing lengthwise downward, stopping about 1-inch from the bottom. Repeat making another downward slice again stopping 1-inch from the bottom. Your goal is to to make an an X shape incision in each lemon.
Use about 1 tablespoon salt per lemon: Pinch the lemon to open 1 incision and with a clean, dry 1/2 tablespoon measure, pack 1/2 tbs coarse salt into the lemon. Repeat with the other and pack the other 1/2 tbs salt into the lemon. No skimping! It's all about the salt, baby!
Place the lemons in the jar a few at a time, adding a few coriander seeds, the bay leaf, a dried chili, and a cinnamon stick as you go. Use up all the coriander seeds as you stuff the lemons in the jar.
Press the lemons very firmly in the jar to get the juices flowing. Cover and let stand overnight.
Day 1 : With a wooden spoon, press the lemons down, encouraging them to release more juice as they start to soften.
Day 2: Repeat pressing the lemons with the wooden spoon to release more juices.
Day 3: The lemons should be completely covered with liquid.Transfer to a cool, dark spot in the pantry. No need to visit until 30 days later.
Cook's Note: If the lemons aren’t too juicy, add more freshly-squeezed lemon juice until they are submerged, as I generally have to do.
30 days later: The preserved lemons should be are soft & they’re ready to use.
Storing tips: Store the lemons in the refrigerator, where they’ll keep for at least 6 months. Rinse before using each lemon to remove excess salt.
To use: Remove lemons from the liquid and rinse with tap water. Split in half along the incisions and slice the lemon peels into thin strips or chop as recipe call for.
Recipe for
Moroccan Preserved Lemons
Preparation time: 15 minutes
Pickling time: 1 month
Shopping list:
10 lemons
1 tbs kosher salt per lemon (so approx. 10 tbs salt)
3-4 whole dried red chillies
1 bay leaf
1 cinnamon stick
1 tbs coriander seeds
Also, a large glass jar ( quarts) with tightfitting air tight seal and a very sharp knife (get your Wusthof out!)
Method:
Wash the lemons and dry them off.
Cut off the little rounded bit at the stem end if there’s a hard little piece of the stem attached.
From the other end of the lemon, make a large cut by slicing lengthwise downward, stopping about 1-inch from the bottom. Repeat making another downward slice again stopping 1-inch from the bottom. Your goal is to to make an an X shape incision in each lemon.
Use about 1 tablespoon salt per lemon: Pinch the lemon to open 1 incision and with a clean, dry 1/2 tablespoon measure, pack 1/2 tbs coarse salt into the lemon. Repeat with the other and pack the other 1/2 tbs salt into the lemon. No skimping! It's all about the salt, baby!
Place the lemons in the jar a few at a time, adding a few coriander seeds, the bay leaf, a dried chili, and a cinnamon stick as you go. Use up all the coriander seeds as you stuff the lemons in the jar.
Press the lemons very firmly in the jar to get the juices flowing. Cover and let stand overnight.
Day 1 : With a wooden spoon, press the lemons down, encouraging them to release more juice as they start to soften.
Day 2: Repeat pressing the lemons with the wooden spoon to release more juices.
Day 3: The lemons should be completely covered with liquid.Transfer to a cool, dark spot in the pantry. No need to visit until 30 days later.
Cook's Note: If the lemons aren’t too juicy, add more freshly-squeezed lemon juice until they are submerged, as I generally have to do.
30 days later: The preserved lemons should be are soft & they’re ready to use.
Storing tips: Store the lemons in the refrigerator, where they’ll keep for at least 6 months. Rinse before using each lemon to remove excess salt.
To use: Remove lemons from the liquid and rinse with tap water. Split in half along the incisions and slice the lemon peels into thin strips or chop as recipe call for.
Enjoy!

