The Idea
This beautiful linen drum shade chandelier jumped out at me as I walked through Innerhall at High Point Market! It was chic and simple and oh so expensive. Full retail was close to $3800 and I said to my friend, “This is fabulous! I bet I could make this for less than $50.”
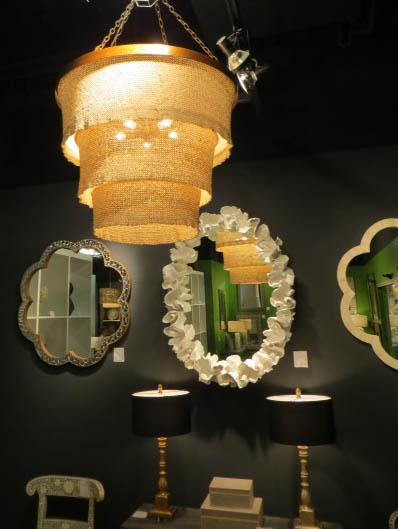
The Design
I am an idea pack rat, and it was almost a year later when I was designing my space for Serving up Style that I pulled this idea out of the messy filing system in my brain and searched for the inspiration photo. I decided to start with a tragic light fixture from the Habitat thrift store – so tragic it was 75% off of $37.50. I didn’t need the torn shade or bug covered glass bottom – you have to learn to overlook a lot in thrift stores to see the potential!
This gave me the framework, though you could also build a very similar fixture by using a wood piece to mount to the ceiling (you can buy 6″- 12″ wood circles inexpensively at Lowe’s that would work perfectly). Drill a hole through the center and push through an IKEA light cord and bulb, attach three chains to the wooden round to attach and balance the embroidery hoops. Then proceed to build the shades in the same way and attach them to the chains. Small brass chains or brushed nickel would be my suggestion.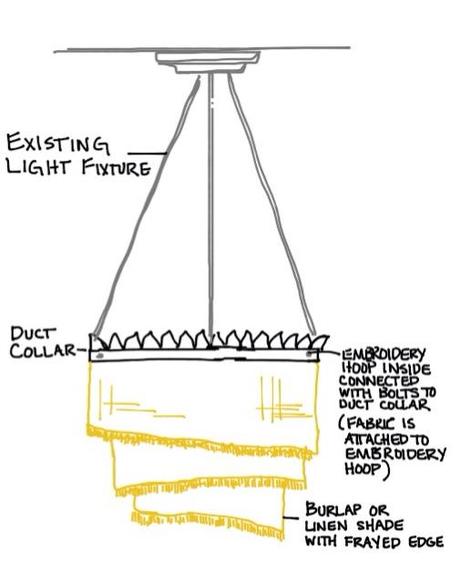
I used a large embroidery hoop that I purchased with a 50% off coupon at JoAnn’s fabrics to create the shade. Even though I loved the inspiration shade, I always see things my own way, and I loved the idea of a more organic looking shade, and every time I drew it I saw the shades as spiraling out like a nautilus shell instead of simple straight tiers. I decided to use one long piece of fabric that was taller on one end and shorter on the other side and wrap it around in one continuous piece. It would be easier and less frustrating to do individual shades but once I have an idea in my head…
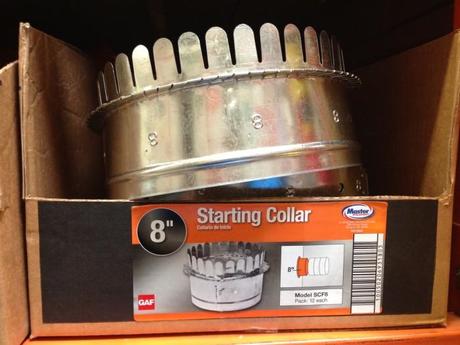
My vision of the design was complete when I found the duct collars pictured here, I knew that would be the perfect accent to my light fixture and you can buy a large variety of sizes and link them together to create the exact size you need. (I show you how to do that in the video!)
The Materials
This is what I purchased — be sure to adapt to fit your specific design! If you are not going to re-purpose a light fixture, see the items I recommend above.
- One tragic light fixture with three posts to attach rings from Habitat thrift store
- 2-3 Embroidery hoops (depending on the complexity of your design)
- Duct collars, enough to make a circle as large as your embroidery hoop
- Hammered metal spray paint (optional) – I choose “Rosemary”
- 2 yards of burlap or linen, choose your preference to suit your style and our budget
- Thread to match
- Bolts to connect the embroidery hoop to the duct collar
- I used 1″ x 1/2″ pieces of wood to attach my embroidery hoops to the light fixture, but you do not have to do this if you build the version with the chain to hold the ring! (That option just keeps looking better doesn’t it!)
- LED light bulbs, you do not want to put high heat bulbs next to your fabric
The Process
I began by stripping down and cleaning the old light fixture and then wiring it to test it! If you buy a thrift store light fixture make sure it works before you spend any more time and effort!
I then created the linen shade by laying my embroidery hoops on the floor in the exact spacing where they would hang and cut the fabric to length, started with the outside ring (it’s the one you will see!) and began wrapping and stitching the fabric in place by hand. I just loosely basted the fabric in place so there would be no gaps.
Separately, I put the duct collars together to just fit inside the embroidery hoop and I painted them with a hammered metal paint. You could leave them in their natural state but I wanted a warm contrast to the brushed nickel fixture I was using. Mixing metals is the trend right now!
I used the existing holes in the duct collars to mark the embroidery hoops (and fabric), and I drilled through both (very carefully!) so that I could run short bolts through the fabric, embroidery hoop and duct collars to make one ring.
Then I had to attach this to the fixture. If you are using chains you simply use the holes to attach chain as well to the bolts. I had to get creative and build a brace that went from one side to the other in the ring and then drill holes through the wood to attach the three poles. I will be honest and say that the fixture and the rings sat on the floor for a couple of days before I figured out how to put it all together and because I used wood I was nervous about safety and that’s why I went to low heat light bulbs as well as considering the fabric. (You get a look into the inside of the fixture on the video, it’s easier to understand the “creative” building I did that way!)
The Outcome
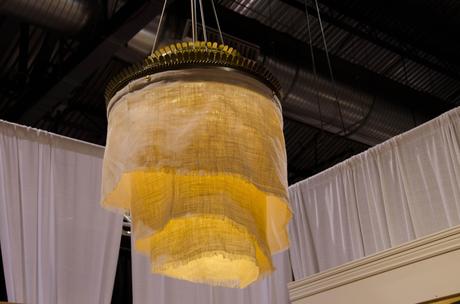
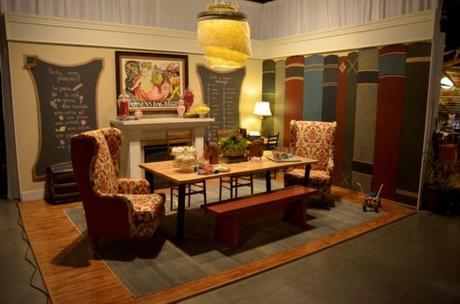
The fixture was fabulous and warm in our Serving Up Style, dining room display. While I was attending the show many, many people asked me about the fixture and I think it played an important part in why we won the People’s Choice Award. If you have a large entry way you need to fill this would be perfect. If you are using it in a dining room plan for the bottom to hang about 5′ to 5′-6″ from the floor, you can make the height adjustments based on the size of fixture you start with, or chain length and the length of your fabric shade. I would not recommend a fabric shade in a kitchen if you have a busy family.
The Budget
$9.37 Light fixture
$12 3 Embroidery hoops (watch for sales or coupons!)
$11.32 Duct collars
$3.79 Hammered metal spray paint (optional)
$5.99 2 yards of burlap $5.99 per yard (50% off)
$0.00 Thread to match (I already owned cream thread)
$4 Bolts to connect the embroidery hoop to the duct collar
$5 Wood pieces for bracing (for the construction method I choose)
TOTAL: $51.47

This project was Week 1: we will be adding a new video to our YES Spaces DIY page every Thursday for the next 51 weeks! And based on your input we will have directions and when needed measurements and plans here every week as well. So be sure to subscribe here and over on YouTube so you don’t miss anything! I am currently cooking up all 51 projects and simultaneously pulling together our MESS to YES makeover schedule for the year so if you have projects or spaces you are struggling with and would like some inspiration let me know and I will try to tackle as many as I can here this year.
If you want a beautiful, artistic home contact YES Spaces today! I would love to talk to you about your family and your space!
Visit our YES Spaces DIY channel to see videos of other family friendly projects!

