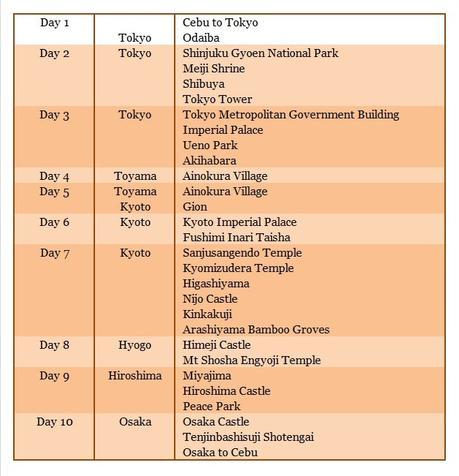
It was months after buying a plane ticket did I find some travel companions. When they themselves finally found and bought not so expensive tickets, we came up with this 10-day itinerary:

Arrive in Narita, blaze from Tokyo to Hiroshima, spending just a day or two in each of the six prefectures our ten days would allow, then wave またね "mata ne" from the plane in Kansai. We and our wallets can do this! 頑張って! Ganbatte!
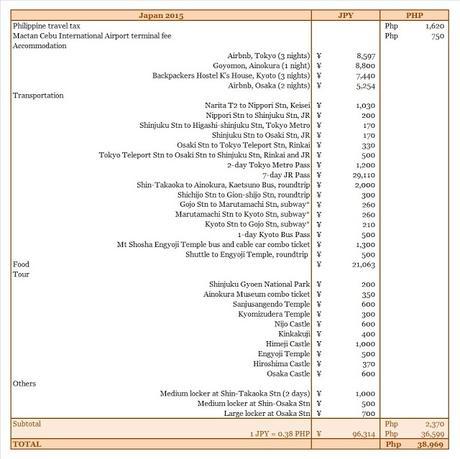
 This trip happened in 2015 when the exchange rate was 0.38 PHP per 1 JPY.At the current exchange rate of 0.45, the total in Philippine peso would be 45,325.
I've always thought I'd need about Php 10,000 per day in Japan. As you can see from the table of expenses above, I was wrong. And I'm so glad I was wrong. Yes, it is still expensive for a white collar worker like me. And yes, this is the most expensive trip I have ever been on. But not an impossible trip, see?
Plane Ticket. Like all of my posts on this blog about expenses, I did not include the cost of the plane tickets because I usually buy them six to twelve months in advance, during airline promotions. Since Filipinos need a visa to enter Japan, it is recommend to obtain a visa first before buying a ticket. But I risked it knowing full well that if I wasn't granted a visa, my tickets would not be refunded.
Visa. Philippine passport holders should apply for a visa not more than three months before their intended date of travel. Visa applications can only be processed through accredited travel agencies. Applying for a single entry visa would cost Php 1,300. In addition to the visa fee, expect to shell out some cash to obtain these requirements: photo, bank certificate, birth certificate, marriage certificate.
Accommodation. I had set a budget of Php 1,500 per night for accommodation (for a total of Php 13,500 per person for 9 nights) and the one we had assigned to take care of booking accommodations did a very good job of keeping within budget. We stayed in Airbnb apartments, a hostel, and even a minshuku (a family operated bed and breakfast)! There are many properties on Airbnb, you just have to be meticulous as the initial price shown is the cost per night only; there will be additional fees (cleaning fee and service fee). A dorm bed in a hostel would cost 2,500 JPY and above; most hostels in Japan do not offer free breakfast. The most expensive accommodation for this trip was the minshuku in Ainokura Village, which costs 8,800 JPY (Php 3,350) per person per night, but this also included awesome home cooked breakfast and dinner and a very memorable stay at a farmhouse.
Food. You can save on food if you are willing to eat rice balls for your every meal. We decided not to be such tightwads and ate at a variety of places. Sometimes we'd buy boxed meals from the convenience store, sometimes from shops at the stations, sometimes we'd eat in fastfood donburi or soba or curry shops, sometimes in restaurants (like that incredible black ramen from Nishiazabu Gogyo in Roppongi). Our meals would range from 400 JPY to 1,000 JPY, spending an average of 2,300 JPY per day.
Transportation. Fares in Japan are really high (minimum fare for the subway is 150 JPY) and taking the shinkansen (bullet train) would cost a chunk. It would be expensive to get lost in Japan. It is best to do research and plot your itinerary beforehand then see which passes would be beneficial for your trip. In Kyoto, we had forgotten to buy a 1-day subway pass (600 JPY); with the pass we could have saved 130 JPY. The 7-day JR pass (29,110 JPY) ate almost a third of my budget, but with our itinerary, we also made the most out of it (we used the JR Pass for a total of 55,530 JPY on regular fares, taking the shinkansen seven times, and local lines and limited express trains several times).
Admission Fees. Most of the temples, castles, and gardens will charge an admission fee from 200 JPY to 1500 JPY. Some would also have audio guides available for rent. Some would also offer combo tickets. Do research beforehand.
Others. For this trip, we did not rent a pocket WiFi. Our Airbnb accommodations in Tokyo and in Osaka provided one, so we were connected in those cities. We survived going around Kyoto without one. What we did spend on were lockers to lessen our burden: we were staying just one night in Ainokura Village and did not need to take all our belongings with us; in Osaka, we left our bags in a locker because the check in time wasn't until late in the afternoon; on our last day, from check out time until flight time and we did not want to drag our bags around while visiting Osaka Castle. Lockers can be found in every station, but not all stations will have the large lockers (700 JPY per day for a large locker; 500 JPY for a medium locker; 300 JPY for a small locker. The locker fee is per calendar day, not per 24-hour period).
In the end, I was tired (we were always on the go, moving from one place to another), but I was absolutely glad I did it. Even before the plane could take off for home, my brain was already plotting a return (with my starving wallet shivering at the thought).
Japan
Know Before You Go
Single Entry Tourist Visa for Japan
Roam Around Japan with a Swagger
From Tokyo to Hiroshima (2015)
10D/9N | Tokyo, Toyama, Kyoto, Hyogo, Osaka, Hiroshima (you're here!)
(more soon)
Concentrate on Kansai (2016)
(soon!)

