
Home automation is something that has only recently become widely available and, as all new things, it is trying to develop in many different directions. As it does, manufacturers of home automation devices are trying to create standards to help ensure that all home automation devices conforming to those standards will behave in a known way and will be compatible with each other. For now there are many home automation standards and protocols out there and Z-Wave is one of the most widely adopted ones.
About Z-Wave

Z-wave is a standard for wireless communication between home automation devices. Some of its main characteristics are:
- low power requirement (so that battery operated devices can adopt this standard)
- low communication latency (to encourage system responsiveness)
- reliability (for obvious reasons)
The devices communicate through radio waves with a frequency around 900 Mhz. Depending on the region of the world the frequency is slightly different:
- 868.42 MHz (Europe)
- 908.42 MHz (United States)
- 916 MHz (Israel)
- 919.82 MHz (Hong Kong)
- 921.42 MHz (Australia/New Zealand)
- 865.2 MHz (India).
Z-Wave networks limit the amount of emitted radio waves (devices can only emit radio waves in 0.1% of the time) to reduce the irradiation levels and interference with other devices to a minimum.
The Z-Wave communication specification is supported by hundreds of manufacturers and there is even a Z-Wave Alliance that consists of several major manufacturers, which certifies Z-Wave devices for correct interoperability. The devices that are found to conform to the requirements receive the Z-Wave Plus certification. The fact that the standard is clear, the support by a huge number of manufacturers, the guarantee of conformity by certification of devices and the security imposed by the standard makes Z-Wave an attractive choice for home automation enthusiasts. On the other hand it also sets the prices of devices quite high. Quality has its price.
The Z-Wave home automation networks consist of at least one main controller node (you could call it the Z-Wave server) and several slave devices (home automation components like sensors, switches, lights, dimmers, etc.). The main node manages the Z-Wave network of devices, but the slave devices can also interact with each other directly. Slave devices can be included in and excluded from the network at any time. Each node also acts as a re-transmitter to ensure that the signals get from the sender device to the receiver device. So if a network contains two Z-Wave devices which are not close enough to communicate with each other reliably, a third one can be included in the middle to pass along the messages.
Raspberry Pi + Razberry = Z-Wave Server
The Z-Wave communication protocol has a complex hardware and software implementation. It’s is not easy to build a device that speaks Z-Wave. It’s far easier to just buy one. But Z-Wave main nodes (Z-Wave network controllers) are far from being cheap. The most well known ones, like Fibaro Home Center, the Vera family, the Zipa family, etc. cost hundreds of dollars. But… there is a cost-effective alternative: building a Z-Wave server from a Raspberry Pi and a Razberry daughter card.
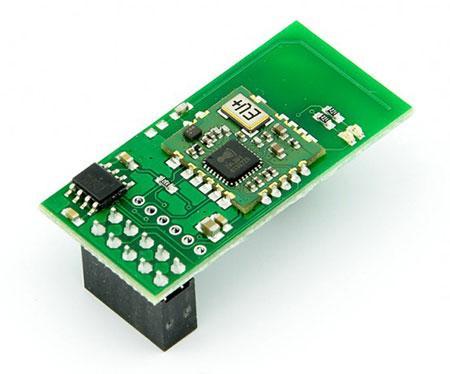
The different versions of the Raspberry Pi are cheap and yet effective ARM computers that usually run different versions of Linux. An adequately equipped Raspberry Pi, with power supply, SD card and USB Wi-Fi dongle cost as little as 70-80$ in total. Raspberry Pis are used as many kinds of servers. To turn one into a Z-Wave server, all you need is a Razberry daughter card!
The Razberry is a small add-on for the Raspberry Pi (compatible with both Raspberry Pi version 1 model B+ and with version 2) that plugs directly into the GPIO pins of the Raspberry Pi and sits on the top of it, much like an Arduino shield sits on the top of an Arduino. The Razberry daughter card only uses one 3.3V, one GND and the RX and TX pins of the Raspberry Pi, but for the sake of stability it plugs into 10 GPIO pins and further restricts access to an additional 4 pins, making a total of 14 GPIO pins inaccessible, which can be a bit annoying because access to 10 GPIO pins is lost for apparently no reason. This is because the Razberry daughter card does not have pins on top of it to break out the unused pins. On the other hand this allows it to fit nicely into a conventional Raspberry Pi case.
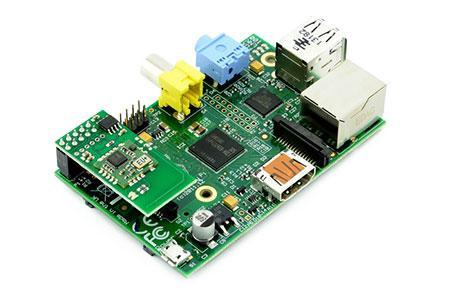
In general the Razberry is a great add-on for the Raspberry Pi. Unlike the other Z-Wave controllers, it is quite cheap (cost around 70$). It handles all the Z-Wave communication and acts as a Z-Wave controller (gateway) in a Z-Wave network. In short, it transforms a Raspberry Pi into a Z-Wave server.
The Z-Wave communication on the Razberry is handled by a Sigma Designs ZM5202 Z-Wave transceiver module (5th generation) and by a small PCBA antenna which has a surprisingly good range. As an example, it seems to be able to communicate with Z-Wave devices that are 10 meters away, behind 3 concrete walls (as a reference: 2.4 GHz Wi-Fi signals barely get through the same 3 walls).
The software that comes with the Razberry is called Z-Way. It consists of several levels of software built on top of each other and has an API that can be used to interact with the card in multiple ways (from web, from mobile apps). It encourages developers to create wrappers around the basic API in order to provide elegant access interfaces. By default it comes with a free web interface which contains all the necessary functionality and does it’s job, but I’ve personally found it a bit cumbersome to use and not very elegant. So, unless you are inclined to develop your own elegant interface for it, you are likely to soon look for alternatives. That is why we’re going to examine how Razberry can be integrated with Domoticz, which is a very nice and free home automation software, as discussed in a previous article.
Configuring Domoticz to work with Razberry
If you already have a Razberry daughter card plugged onto a Raspberry Pi, it is time to install Domoticz on your Pi and configure it to work with Razberry.
- The guide about the installation of Domoticz on the Raspberry Pi can be found at the end of this article.
- There is an excellent guide provided by Vesternet which explains in great detail how to configure Domoticz to work with the Razberry Z-Wave controller.
I’m going to take a quick detour here to tell you about Vesternet. It is a UK-based home automation website and online store that I personally like them very much for several reasons. The most important reason is that they offer a very large amount of free technical guides, free technical advice, compatibility charts, etc. The impression they give off is that they really want to help people with their home automation projects, they are not just trying to convince you to buy items from them. Their products have really detailed and clear technical descriptions, so you exactly know what you are buying if you take the time to read the descriptions. Also, they have a very wide range of Z-Wave products, so if you’re looking to build a network of Z-Wave devices, I strongly recommend to visit Vesternet.com. Note that I do not have any personal interest in recommending Vesternet, I was simply impressed by their attitude and by their variety of items, that is the only reason why I’m recommending them.
- Along the lines of the Vesternet guide for configuring Domoticz to work with Razberry, the first thing to do is to trick Domoticz into thinking that it’s accessing Razberry via the USB interface. Razberry actually communicates through the serial interface (RX, TX pins) of the Raspberry Pi, but Domoticz can only handle Z-Wave devices via its OpenZWave USB interface. That’s why a symbolic link needs to be created to redirect the USB interface used by Domoticz to the serial interface. To do this, open the file /etc/udev/rules.d/09-tty.rules in a command line window and add the translation rule from USB to serial:
sudo nano /etc/udev/rules.d/09-tty.rules
add line: KERNEL=="ttyAMA0", symlink+="ttyUSB20"
sudo reboot
2. The next step is to add Razberry to the list of hardware managed by Domoticz. To do this, open the user interface of Domoticz, go to Setup -> Hardware and add the Razberry as a new piece of hardware:
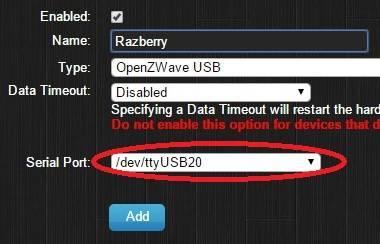
Make sure to select the USB interface that we redirected earlier to the serial interface.
Congratulations! At this point you should have a cheap but effective Z-Wave Server that you can control using Domoticz.
Adding devices to the Z-Wave network
Having a Z-Wave controller is great but you can’t do much with it unless there are some Z-Wave slave devices for it to communicate with. So the next step is to include your devices into the Z-Wave network.
- In Domoticz go to Setup->Hardware and select the Razberry Z-Wave controller (that we have just added). Click the Setup button next to it.
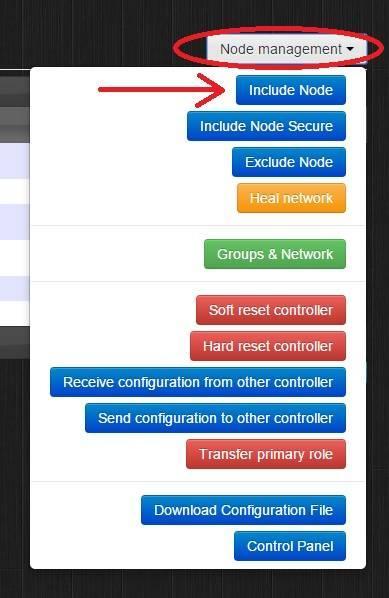
- A list of your Z-Wave devices comes up (in a newly created network the list should be empty) and at the top of the list you can find a “Node management” combo box. Click it and select “Include node”.
Using Z-Wave devices with Domoticz
The final step before you can use your newly included device is to activate it in Domoticz.
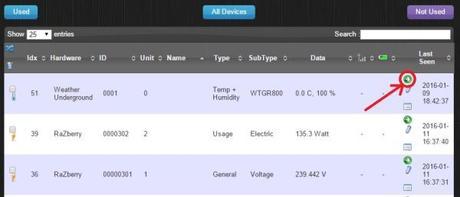
- Go to Setup->Devices and hit the “Not Used” button.
- In the list of not used devices you should see the newly included slave device. Click the little green arrow icon next to the device.
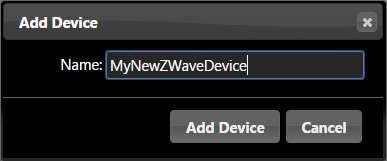
3. A window opens where you can give the new device a name.
5. Depending on the type of the device that you have just added, you can now find it in Domoticz under one of the following categories:
- Switches
- Temperature
- Weather
- Utility

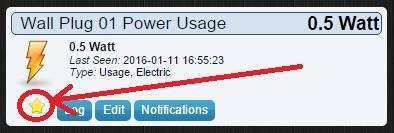
6. If you wish your new device to appear on your Domoticz dashboard, click the little start icon next to it. Turn the star’s color from gray to yellow and it will always be present on the dashboard.
Final word
Home automation in general is a great but rather expensive activity (or hobby, if you will), partly because it’s a new trend and the devices are not yet widely spread (not sold in huge quantities), but also because they contain advanced technology. Z-Wave is one of the leading home automation standards, with a great variety of available devices that conform to it (sensors, switches, locks, etc.). Unfortunately Z-Wave controllers, which are the most essential components in a Z-Wave network, have very steep prices (in the range of hundreds of dollars), which for many people is probably the first obstacle in the way of building a Z-Wave home automation network. However, building a Z-Wave server out of a Raspberry Pi and a Razberry daughter card, plus using free Domoticz home automation software on top of them results in an affordable, yet very functional, configurable, good looking and enjoyable Z-Wave home automation system.


