There was the Magic Four
And it left folks
Asking for more:
What about the thoracic spine?
Anything simple to make it feel fine?
And so came alive
The Fantastic Five!
Q: Do you remember the post in January by Beth The Magic Four for low back pain? That was a good little series and I have passed that along to older friends. Just a thought, but for a future blog maybe a little sequence for the thoracic spine would be nice to share.
A: It would be my pleasure to share a short sequence for the health of thoracic spine. This is the part of the spine that lies between the bones of the lower back and the neck bones. It is a unique area of the spine in that all your ribs attach to the sides of the spinal bones in the thoracic spine and wrap around to plug in directly or indirectly to the breastbone in front of your chest. Your rib cage does a nice job of protecting your heart and lungs, but it does end up limiting movement of this section of the spine to some degree. And as we age, most people tend to round forward in this area, and if unchecked this can lead to the appearance of a hump in the back chest, called kyphosis. Add to the stiffness and wear and tear in the spinal joints caused by the normal aging process and you could end up limited in your movements and with an achy back.
I occasionally experience pain in this area (upper back), just off to the right side of my thoracic spine, usually while doing a longer sitting meditation. I have attributed this dull, aching pain to a little functional scoliosis (a function of me playing the violin since age 5) I suspect I have. The good news is that once my sit is over and I do a little movement, the area quiets down nicely and does not bother me until the next longer sit. And a practice such as the one that follows will help to keep the area more mobile over time for me and you!
Caution: If you have trouble with balance, practice Arms Overhead and Crescent Moon poses with your back near a wall.
—Baxter
1. Arms Overhead Pose
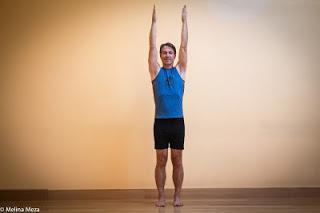 I love this pose because you get a two-for-one, as you start in Mountain pose to bring more attention to your posture, which I feel is essential to maintaining the health of the thoracic spine, and then you take the arms overhead which moves your thoracic spine into a slight backbend. I usually do a dynamic version of this pose for 6 breaths as a warm up, and then try to hold the pose for 6-12 breaths.
 - Stand Mountain pose with strong legs and a long spine for about 6-12 breaths.
- On your inhalation raise your arms up alongside your ears and on your exhalation release them back to your sides. Practice the dynamic sequence for 6 rounds of breath (see here for a video.)
- After round six, inhale and bring your arms up alongside your ears, lifting from your hips to your hands as you keep your legs strong and steady. Stay in the pose for 6-12 breaths (those with untreated high blood pressure should stay for only 4 breaths).
- To come out of the pose, exhale and release the arms to your sides. Stand in Mountain Pose for a few breaths.
2. Crescent Moon Pose
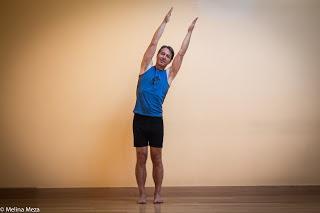 This variation of Arms Overhead pose is a great way to develop more side-bending ability in your thoracic spine. Like for Arms Overhead pose, I often first practice this pose dynamically side to side and then hold it on each side for 3-6 breaths.
 - Standing in Mountain pose, inhale and raise your arms along side your ears.
- As you exhale, side-bend your upper body and arms to the right about 6-12 inches while keeping the legs strong, then inhale back to vertical; exhale to the left and inhale back to center; repeat 2 more times side-to-side. For a video showing this dynamic sequence, see here.
- Release your arms to your sides for a few breaths in Mountain pose.
- Come back into Arms Overhead Pose, and take your self into Crescent Moon pose to the right and stay for 3-6 breaths.
- Come back to vertical and repeat on the left for 3-6 breaths.
- To come out of the pose, return to vertical and release you arms to your sides.
- Stand in Mountain pose for a few breaths
3. Easy Sitting Twist
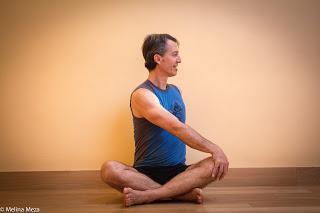 Those pose is a great way to both strengthen and stretch the muscles that twist your thoracic spine to the right and left. I usually start with a dynamic version of the pose and then finish by holding the twist on each side.
 - Come to Easy Sitting Pose, either on the floor or in a chair (not shown).
- Inhale and raise your arms up out to your sides, even with your shoulders. Then exhale twist to the right, bringing your left hand to your right knee and right hand to floor behind you. Inhale and come back to center, with arms out to sides. Exhale and twist to your left, bringing your right hand to your left knee and left hand to the floor behind you. Inhale and come back to center, with arms out to the sides. Exhale and release your arms down alongside your body. Then repeat the entire sequence two more times. For a video of Dynamic Sitting Twist, see here.
- After practicing the dynamic twist, come back into the twist on your right side, and maintaining a long, lifted spine, stay for 6-12 breaths. Then release back to center and repeat the twist on your left.
- Sit in Easy Sitting Pose for a few breaths.
4. Restorative Child's Pose
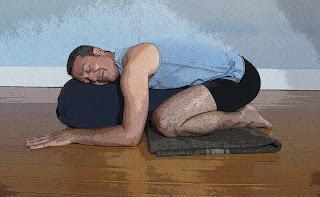 This pose is a great way to release the tightness that many have in the upper back area. Many of us hold tightness along the sides of the thoracic spine and in between the shoulder blades and this version of Child’s Pose with a bolster is a gentle way to release these tight areas.
 - Place a rectangular folded blanket across the center of your mat.
- Have a round bolster handy off to one side.
- Kneel near the front edge of the blanket with your shins on the blanket, and your toes pointing back and big toes touching.
- Sit back on your heels and separate your knees about a foot apart.
- Slide the bolster right up against your pubic bone and lower belly. (If the bolster has become flattened with use, turn it so it is on the higher side.)
- Lower your belly, chest, and head onto the bolster, and turn your head to one side.
- Take your arms out to your sides to widen your upper back.
- Set a timer for 2 minutes and rest in the pose. When the timer goes off, turn your head to other side, reset the timer, and rest 2 more minutes.
- Roll up and come to a comfortable sitting position for a few breaths.
5. Supported Reclined Cobblers Pose (With Bolster)
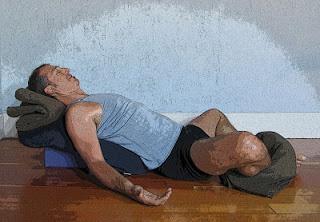 I find this a great way to end a short practice for the thoracic spine, as it is both relaxing ending pose and a gentle supported backbend for the thoracic spinal area. Be sure to prop your legs so you don’t feel any stretching sensations in them. Before entering the pose, you might want to set a timer for 5-10 minutes so you can completely relax.
 - Place a bolster lengthwise along the long axis of your mat, and place one or two blocks underneath the bolster to create a sloping angle towards the front of the mat.
- Add a folded blanket or towel at the far end to support your head and neck.
- Sit in front of the bolster (not on it), come into Cobbler’s pose. Support your hips and knees with blocks or rolled blankets.
- Use your hands to lower yourself onto the bolster.
- Position your arms out to your sides with the backs of your hands on the floor.
- Close your eyes and focus on releasing any tension in your chest, shoulders, spine, and hips.
- To come out of the pose, bring your knees together and roll to one side, coming off your props.
- Take a few moments in the sitting position to check in with your thoracic spine and the rest of your body, too. Notice if the sequence created any new sense of openness, freedom, or aliveness in your upper back and body.
Subscribe to Yoga for Healthy Aging by Email ° Follow Yoga for Healthy Aging on Facebook ° Follow Baxter Bell Yoga on Instagram ° Join this site with Google Friend Connect

