This DIY Vanity Refinishing project comes from a former customer named Linda. We stumbled across her project after noticing a blog post that she published 2 years ago on her site, French Hen Farm. This is how the story goes.
Linda was doing some renovation around the house and decided to update the upstairs bathroom. After doing some shopping, she fell in love with a vanity from Restoration Hardware. When she tried to place the order, she ran into one problem.
The vanity she had her eyes on was not available in the size she wanted and the price was a bit out of her range. So, she decided to do what any savvy shopper would do. She started perusing the internet and to her surprise, she found something similar on Tradewinds Imports.com. Perhaps the best part of it all was that it was about 2/3 the price!
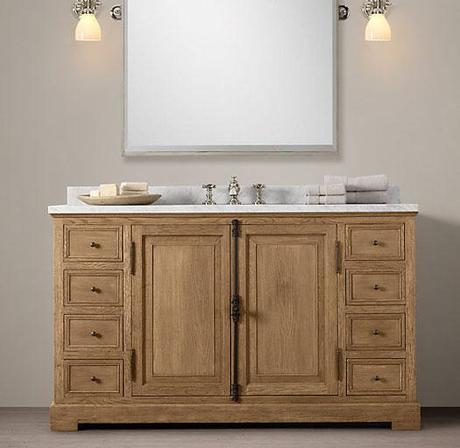
The French Casement Single Vanity from Restoration Hardware listed at $2,345-$3,395.
Above is the vanity Linda originally wanted and below is the one she ordered from Tradewinds Imports.
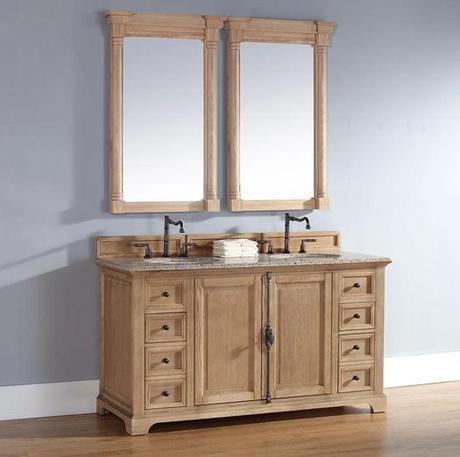
The Bellante Double Sink Vanity shown in a raw finish. Listed at $2,220. Linda saved herself almost $1,175!
*It’s important to note that the Bellante is 4 1/2″ wider and comes with 2 sinks instead of 1. And it costs less!*
Spotlight on the Bellanta Double Sink Vanity
Just for being catching wind of such an incredible story, I think the Bellante deserves a quick spotlight. It’s your time to shine buddy! Part of the Premiere Collection, the Bellante Vanity is made from natural solid oak. The wood is kiln-dried to prevent any warping that occurs when moisture is left inside the wood during the manufacturing process. It’s also available in a rustic driftwood finish.
The Bellante features high quality dovetail drawers, soft-close glides, and it even comes with an anti-mildew vanish that protects it from humidity and moisture. The Bellanta is available with 13 different top options and it can also be ordered without a top. In this case, Linda chose to go with the beautiful carrera marble top.
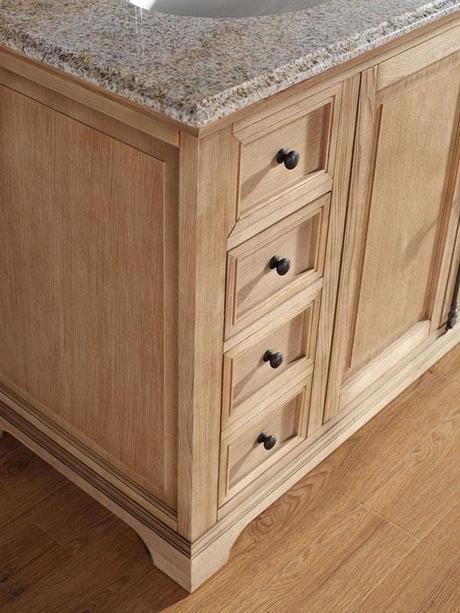
A close up of the Natural Oak Finish on the Bellante Vanity.
“I think the one we picked was very close to the one we loved at Restoration Hardware!” – Linda from French Hen Farm
Before and After Waxed Wood Cabinets
Linda purchased a raw (unfinished) vanity with the intention of painting it. After thinking about it, she decided to wax it instead. Using a coat of clear wax followed by dark wax, she finally finished her new vanity off with several clear coats of wax to give it a more noticeable shine.
Here are the before and after pictures of her old vanity, and the new one they installed.
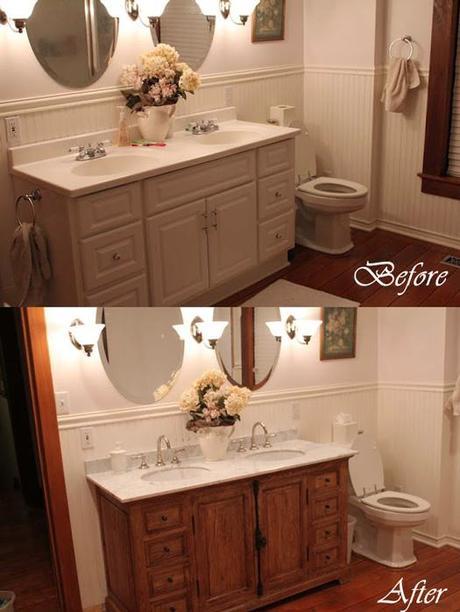
Above you can see what the cabinets looked like before. Below is an after shot showing the new Bellante Vanity with a raw finish that’s has been updated with dark and clear wax.
How to Wax Wood Cabinets
Waxing wood cabinets is a fairly simple process. It’s much like painting but it’s not quite as messy. You can apply furniture wax to give your cabinets a glowing shine or even opt for stained waxes that will alter the color of your finish. Linda chose to add a second layer of dark wax so that’s why the finished outcome is much darker than the vanity she originally received.
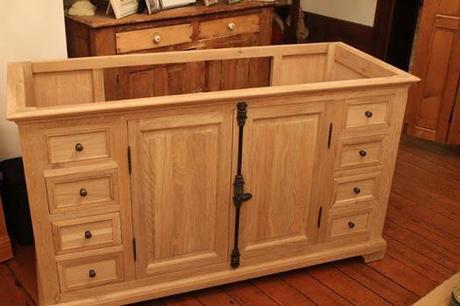
This is a shot of the actual vanity Linda received. Bare bones and ready to be waxed!
Materials You Need:
- Wood Furniture Wax (wax or liquid)
- Microfiber Cloth
- Paint Brush (optional)
- Soft Cloth for Buffing
Step 1: Seal the Cabinets
Before applying coats of wax, you have to seal the cabinets first. The wax is a finishing coat that is added over the initial base. You can use sealants such as polyurethane, varnish, lacquer, or shellac. Lucky for Linda, the Bellante came with 3 layers of varnish so she was able to skip this step!
Step 2: Applying the Wax
Use a clean microfiber cloth to apply the wax. Sometimes the wax is called a “paste wax” or “finishing wax.” You can find it at any local hardware store. It’s important to work slowly with the wax. If you apply too much, it will dry unevenly and blur the finish making it difficult to see the grains and of the wood which we’re amplify.
Remember: You can always add more wax but it’s much more difficult to remove it.
Add a single layer at a time until you’re happy with the way it looks. Work the wax in a circular motion. Remember to step back, go to the other room and then come back to take a look at it. Observe the cabinet from different angles to see if there are any small spots you missed. To prevent this, only wax one section at a time.
*Some people advise using a paint brush to apply the wax. Although you can use this method, I advise using a cloth because you’re more inclined to overcompensate with the wax when using a paint brush. Using a microfiber cloth encourages you to go slower.
Step 3 : Drying Time
Paste wax only takes 20 minutes to dry and liquid wax will usually take about 30 minutes. Dab a small spot with your finger to make sure the wax has dried before you proceed. If it still feels sticky, let it dry for 10 more minutes.
Step 4: Buffing the Wax
Buffing the wax makes it shine. It really makes a big difference! Buffing waxed furniture gives it a gleaming, polished look. All you need is a soft cloth (the softer the better). Work the wax into the wood by moving in a circular motion across the entire surface. You’ll know you’re done when the finish stops improving its sheen.
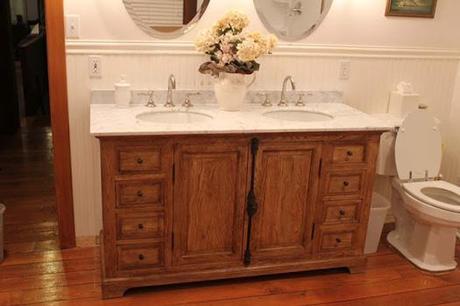
The finished product. Notice how the wax tinted the finish in a way that brings out the pattern of the grains giving it a rich and natural look.
A Few Notes About the Project
Linda applied a clear wax and a dark wax to change the tone of the natural wood finish. This made the completed project turn out to be very rich in color. The vanity didn’t come with faucets so Linda sourced Martha Stewart Faucets from Home Depot.

The Red Barn at French Hen Farm.
Linda and her sister run an antique boutique called the French Hen Farm. Here in their Big Red Barn they host a semi-annual barn sale with antique, homemade, recycled, and repurposed items. Stop by if you’re ever in Marysville, Ohio!
More Ways to Update Your Bathroom:
- How to Repaint Your Wood Vanity with Lacquer
- How to Update Bathroom Cabinets for Under $70
- A Guide to Turning a Dresser Into a Vanity
- Renewing Laminate Vanity Countertops
- The Amazing DIY Bathroom Corner Shelving Project
About the Author
Cheryl Khan is an interior designer and writer at Tradewinds Imports, an online specialty site dedicated to luxury bathroom furnishings. She has extensive knowledge about all the finer details that go into planning the perfect bath renovation project and is an expert on all things bathroom! Send her your bathroom Q’s on twitter @SuperInteriors!
