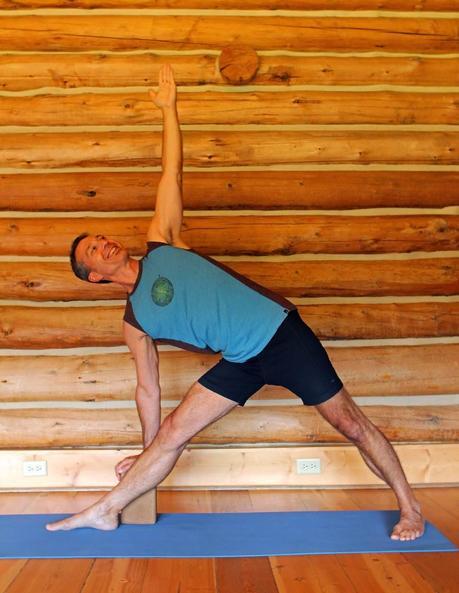
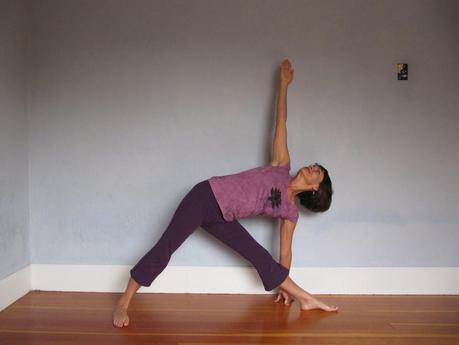
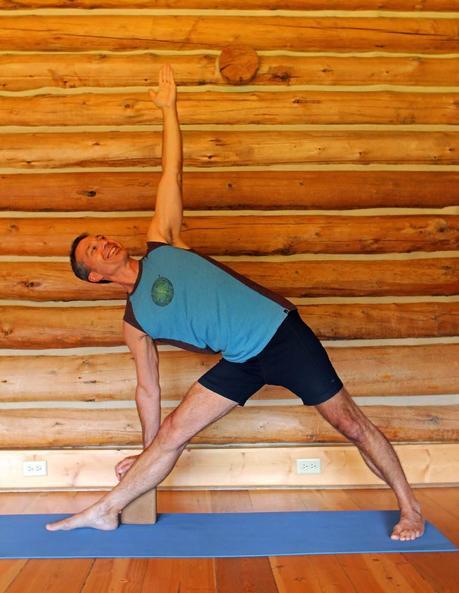
 Triangle pose (Utthita Trikonasana) is one of the most commonly practiced standing poses, and for good reasons! This accessible pose can help build upper and lower body strength, can increase upper and lower body flexibility, and can improve your balance. It is also easy to modify for those who lack, like me, the flexibility to bring the bottom hand to the floor. And if you have trouble with balance, you can do the pose with your back to the wall. Overall this pose creates a wonderful feeling of openness. Without being overly demanding, this pose can be energizing when you’re lethargic or uplifting when you’re feeling blue.
Because the poses stretches your legs and hips, it is a good way to warm up for seated forward bends and supported inverted poses. And because the poses lengthens your spine and is a mild twist, it is a good way to warm up for seated twists.
I prescribe this pose for:- general stiffness and tightness in legs and shoulders
- general muscular weakness
- improving core strength
- improving balance
Instructions:
Moving Into the Pose. Start in Mountain pose (Tadasana) facing the long edge of your mat. 1. Step your feet wide apart, somewhere between 4 and 5 feet, depending on how tall you are and how long your legs are.
2. Spinning on your right heel pad, turn your right foot AND leg out 90 degrees toward the right short edge of your mat. You can usually tell if you have your leg turned out correctly if your kneecap points in the same direction as your middle toe. (Depending on your particular anatomy, there are exceptions to this alignment, but it works most of the time.)
3. Next, pivoting on the ball of your left foot’s big toe, kick your left heel back an inch or two towards the left short edge of your mat. This will turn your left foot turning in a bit toward the front foot. (I know there are other ways to adjust the back foot, but I find this way the most efficient and stable for your balance.) Check to make sure that after you adjust both feet that both heels still line up with one another relative to the long axis of your mat.
Also, once your legs have taken on the new relationship, your hips should have naturally rotated a bit towards your front foot. This means your left hip point has rotated around towards your inner right leg and your hip points are no longer parallel to the long edge of you mat, as they were when you started. I like this new arrangement, as it is pretty healthy for the front hip joint and the left sacro-iliac joint! Now, the chest may have gone along for the ride, but see if you can easily rotate the chest back to the left a little so it squares back up with the long edge of your matt (but don’t take the hips along!).
4. After you’ve established your feet, inhale your arms up and out to your sides, parallel with the floor. Then as you exhale, reach out over your front leg like you have a letter in your right hand that you need to pass over a chasm to your beloved! This will encourage you’re the right side of your waist and chest to stay long, and not shorten and curl towards the ceiling. It will also cause a slight shift of your pelvis initially back to the left bit, and then the right side of the pelvis will tip down a bit.
5. At this point, engage your legs to stay straight and strong as you place your right hand on a chair seat, a block, or the floor, depending on your flexibility. Your propping should allow the right side of your body to stay relatively long and straight—you might need to set up in front of mirror to actually see this alignment.
Keeping your hips in their new location (don’t let them spin up!), allow your upper belly and chest to rotate around the axis of your spine toward the long edge of the mat and possibly a bit more skyward. Stop this action if your feet become ungrounded, your knees start to bend, or your pelvis starts to spin up.
For Very Flexible People: Hand on the Floor
For Less Flexible People: Hand on a Prop
6. You can line your arms up with each other if your lower hand is on the floor or a low block, but the higher your propping the more variation you might need for your top arm. I see a lot of students jamming their left shoulders or throwing their top arm way back behind their chest. Instead, consider aligning your top arm with the top edge of your shoulders, even if it angles down a bit from vertical.I prefer to have students keep their heads and necks lining up with the rest of their spine, but there are a lot of other ways this is taught. I won’t go into this here, but for the healthy aging neck, this way is pretty neutral in the joints. You can try to rotate your head to look up or even down (I like vary my head position while in a longer hold).
Being in the Pose. To keep you grounded and stable in the pose, allow there to be a downward movement of energy from your hips to your feet. At the same time, allow there to be an upward energy starting in your feet, which gains support in your pelvis and then travels up through spine to the crown of the head. At the same time, spread your arms away from your heart to your hands.
How long to stay in Triangle depends on many factors, but I start with dynamically entering and exiting the pose with the breath a few times, and then stay in the pose statically for just a few breaths or for as long as 2-3 minutes. The longer you are in it, the more stretch takes place in some areas and the more strength is required in others! Take your time advancing how long you stay in.
Leaving the Pose. Keep the strong grounded feeling in your legs, and then on an inhalation, as if someone has grabbed your top hand and is assisting you up, pivot your hips and torso back to vertical. Then exhale your arms to yours sides and bring your feet back to parallel with each other before repeating the pose on the second side.
Cautions: People with tendency to hyperextend front knee should be careful to not to jam the front knee back. Instead, shift some weight from your front heel to the ball of your front foot and micro-bend your front knee. For people with low back pain or sacroiliac dysfunction, Triangle pose sometimes can aggravate your condition. So if you are experiencing low back or sacroiliac pain in the pose, come out of the Triangle pose immediately. Finally, Nina learned from one of her female teachers, that if done too often, Triangle pose can be risky for women’s hips. So Nina recommends doing this pose only a few times a week, not every single day.Subscribe to YOGA FOR HEALTHY AGING by Email ° Follow Yoga for Healthy Aging on Facebook


