I have a recipe today for you, but it’s not of the edible variety! (sorry) I wanted to share it with you all though, because it was loads of fun to create, and it makes a great project to do with the kiddos if you have them.
First off, the inspiration:
Lilla Roger’s Round one Global Talent Search (GTS) assignment — Create wall art related to terrariums with some text in the final piece. I just love her assignments. They are very open ended yet structured enough to push me to create something I normally would never, ever create. That’s why I decided to do it even though I never thought I would make it through to the next round. You have to understand — the GTS is intense! I had only read about it in blogs last year, and I would never have even entered had I not experienced the joy of the Bootcamp! In the end, 999 people entered and only 50 made the cut! If you’re interested in seeing the 50 pieces, there is a gallery here. But honestly, I saw SO many amazing, beautiful pieces in the private forum that I loved and thought for sure would make it that didn’t. There is a lot of great art out there! It was so inspiring to see all the different creations and interpretations of the assignment. Each one was truly unique.
When I began researching terrariums for my assignment, I was instantly fascinated by all the different types. I love learning how things are made, and I found a number of sites that had tutorials. We had some extra glass vases lying around, and I had just seen these adorable mini succulents in the plant store around the corner, so I thought: We have to make some!
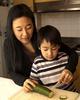
Jamie and I spent one sunny Saturday afternoon shopping for the ingredients (dad was off playing jazz piano with our friend who plays the bass guitar). This is what we came back with:

Actually, we had the glass vases and rocks at home. We bought the mini succulents, cactus potting soil, and activated charcoal (from a pet store). The charcoal is not required for a succulent terrarium — I’ve seen tutorials where it was included and where it wasn’t. But we got it because it helps to drain the water, and keep smells to a minimum. I didn’t want to take any chances with over watering our little plants.
Then we began layering:

First we put rocks at the bottom, then some charcoal (it is the black bits in the photo above the white rocks), then some potting soil.

Then we planted some plants and covered the soil with more rocks. That’s it! The whole thing took about 5 minutes. Jamie added some Go Gos to inhabit the terrarium and keep guard.


It makes our window sill so much nicer!

Here is my final (painted) terrarium! Since there was an elephant living inside, I decided to fill his space with lots of moist plants and give him a few friends to keep him company. :)

DIY Terrarium (Open Air Succulent Type)
Some large mouthed vases or glasses
Rocks
Activated Charcoal
Potting soil for succulents
Succulent plants
Any mini figure or object you’d like for decoration
1. Wash glasses and dry.
2. Fill bottom inch with rocks.
3. Add about another 1- 2 inches of charcoal
4. Add potting soil.
5. Plant succulents starting with the biggest first.
6. Cover soil with rocks.
7. Add mini objects if you’d like to live in the environment.